If you are considering switching from Google Pixel to iPhone, you may be wondering how to transfer your data and adjust to the new operating system. Switching from one smartphone to another can be a difficult task. But don't worry. This article aims to offer you a comprehensive guide on how to switch from Google Pixel to iPhone.
Coolmuster Mobile Transfer is a useful tool that allows you to transfer data between different smartphones with ease. Whether you're switching from an Android device to an iPhone, or vice versa, this software makes it easy to transfer contacts, messages, photos, videos, music, and more. Here are some of its key features:
Click on the button below to download a free trial of the Coolmuster Mobile Transfer.
Here's a step-by-step guide on how to switch from Pixel to iPhone using Coolmuster Mobile Transfer.
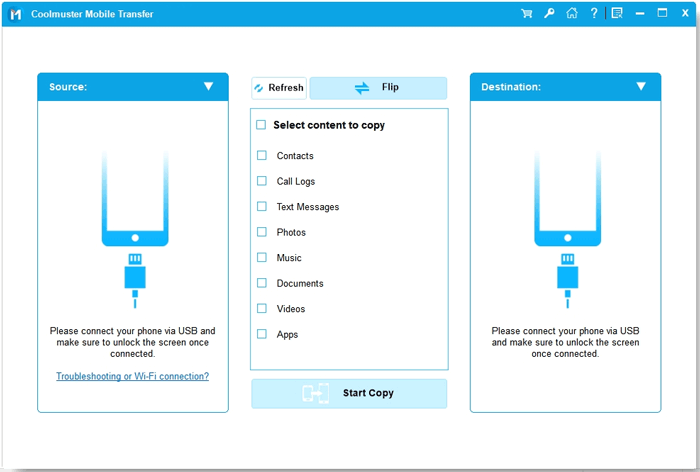
01Download and Install Coolmuster Mobile Transfer
To begin, you must first download and install Coolmuster Mobile Transfer onto your computer. Once you've downloaded and installed the software, launch it on your computer and enter the following interface.
02Connect Your Pixel and iPhone to Your Computer
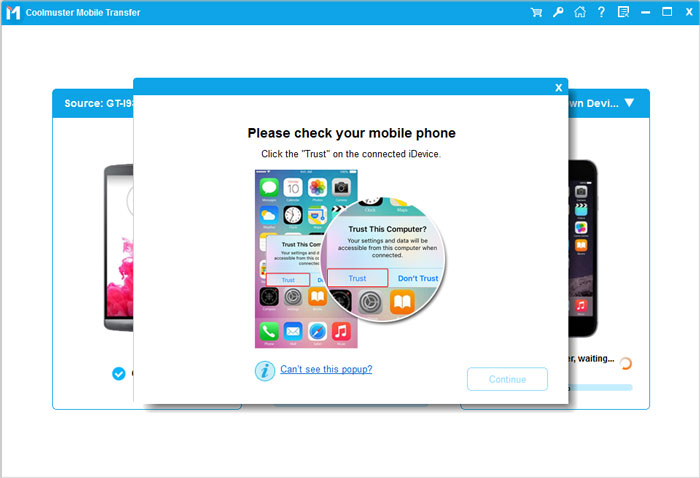
Next, connect both your Pixel and iPhone to your computer using their respective USB cables. The software should automatically detect both devices. Enable debugging mode on your Google Pixel and click on your iPhone's "Trust" pop-up to establish a connection.
03Switch from Pixel to iPhone
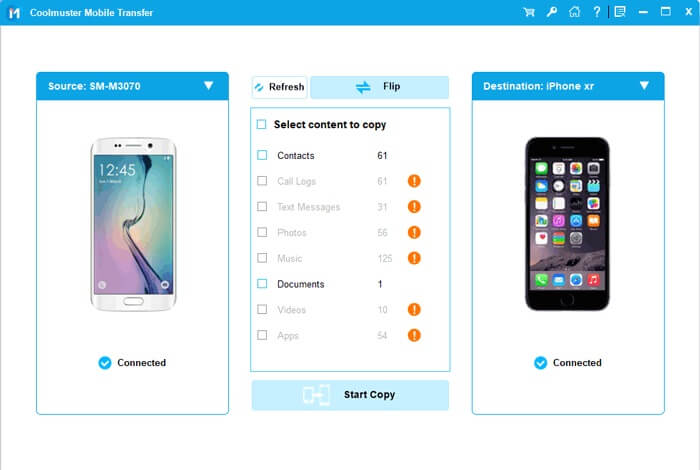
Once you've selected the data you want to transfer, click the "Start Copy" button to begin the transfer process. The software will begin transferring your data from your Pixel to your iPhone.
Here's the video guide (about 2 minutes long):
Move to iOS is a free app that can be downloaded from the Google Play Store. It's designed to help users transfer their contacts, messages, photos, videos, and other data from an Android device to a new iPhone. Here are the steps:
Step 1. You should also ensure that your Pixel device is running Android 4.0 or later.
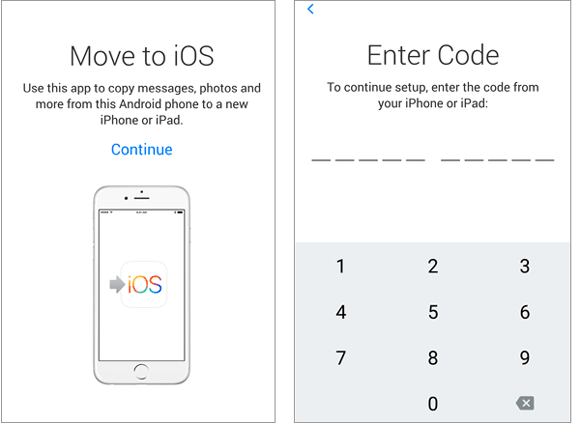
Step 2. Start up your iPhone and proceed through the setup instructions until you arrive at the "Transfer Your Apps & Data" screen. From here, select the "From Android" option.

Step 3. Next, you need to download the Move to iOS app on your Pixel device. It is possible to obtain the app by accessing the Google Play Store. Once the app is downloaded, open it on your Pixel device.
Step 4. Now, you can start the transfer process. In the Move to iOS app, select the "Continue" option and agree to the terms and conditions. Afterward, you'll be asked to enter a code that is visible on your iPhone. Enter this code on your Pixel device to establish a connection between the two devices.
Step 5. Once the two devices are connected, you can choose the data that you want to transfer to your iPhone. The Move to iOS app lets you transfer your contacts, message history, photos, videos, and other files.
Step 6. Once you've selected the data you want to transfer, tap "Next" on your Pixel. Move to iOS will now begin transferring your data to your iPhone. The duration of this process can vary depending on the amount of data being transferred and may take several minutes.
Make sure to keep both devices connected to power and Wi-Fi throughout the transfer process. Once the transfer is complete, you'll be prompted to set up your iPhone.
One of the ways you can transfer your data from your Google Pixel to your new iPhone is by using Google Drive. Google Drive is a cloud-based storage service that can be accessed from any device with an internet connection. (Google Drive is not working? This one might save you.)
Here are the steps you can follow:
Step 1. On your Google Pixel, go to the Google Drive app, and log in to your Google account if you haven't already.
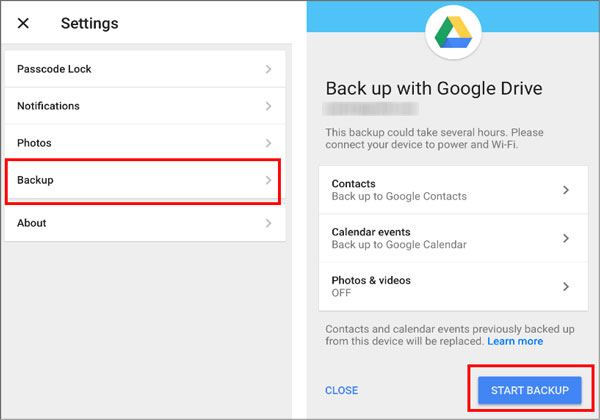
Step 2. Tap on the three horizontal lines on the top left corner to access the menu, and then select "Settings". Scroll down to "Backup" and tap on "Back up with Google Drive". Then click "START BACKUP".
Step 3. Once your data is backed up to Google Drive, set up your iPhone and sign in with the same Google account that you previously used on your Pixel. Get the Google Drive app installed on your iPhone, and sign in to your Google account.
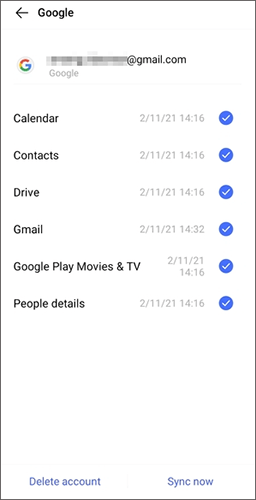
Step 4. You should see your data from your Pixel automatically sync to your iPhone. If it doesn't, tap on the three horizontal lines in the top left corner and then select "Backups".
Step 5. Tap on the backup that you want to restore, and then select "Restore". To finish the restoration procedure, simply adhere to the instructions displayed on the screen.
Note: Some data, such as text messages, may not be transferable using Google Drive.
As long as you have a Gmail account, you can utilize 15GB of free Google cloud storage to sync your data from your Google Pixel phone to your iPhone, including contacts, notes, calendar, and emails.
Here's how:
Step 1. Go to the Settings app on your Pixel phone, and then choose "Accounts". Then add your Google Account to the device.
Step 2. After that, choose the account, and tap "Account sync". To force a manual sync for all services, tap the three-dot menu (More) in the top-right corner and select "Sync now".
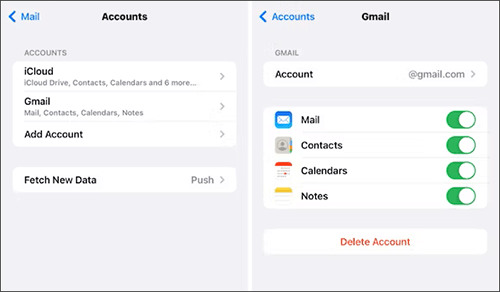
Step 3. Go to the Settings app on your iPhone, and choose "Mail" > "Accounts" > "Add Account" > "Google" to input the same account.
Step 4. Enable the data types you want to sync from your Pixel device to the iPhone.
In conclusion, Pixel to iPhone transfer may seem like a hard task, but it is actually quite easy. By following the procedures outlined in this article, you can easily transfer all of your data from your Google Pixel to your iPhone in no time at all. So if you're planning to switch from a Google Pixel to an iPhone, be sure to give Coolmuster Mobile Transfer a try.
Related Articles:
Switching from iPhone to Pixel: Is It Worth and How to Make the Data Migration? (Can't Miss)
How to Transfer Contacts & SMS from iPhone to Pixel? [Fixed]
Google Pixel File Transfer Not Working? Let's Fix It Easily
How to Transfer Data from a Google Pixel to Another Google Pixel [6 Ways]


 Free Download for PC
 Free Download for Mac

