How to Enable Developer Options and USB Debugging on Google Pixel
This guide provides clear instructions for enabling USB Debugging on Google Pixel devices, with version-specific steps to ensure proper connection to your computer for development, debugging, or file transfer purposes.
Part 1. How to Enable USB Debugging on Google Device
Part 2. Common Issues and Solutions
Part 3. Contact Us for Further Assistance
Notice: If you are not a Google device user, you can check either the general guide on how to enable USB debugging on Android device or the specific guides on other Android brands as below:
Show USB debugging guides for other brands
Allow USB debugging on Samsung >>
Enable USB debugging on Xiaomi Mi/Redmi/POCO >>
Activate USB debugging on TECNO/Infinix/itel >>
Switch on USB Debugging on OPPO/realme >>
Enable USB debugging on OnePlus >>
Turn on USB Debugging on vivo/iQOO >>
Turn on USB debugging on Huawei/Honor >>
Open USB debugging on Motorola >>
Enable USB debugging on TCL >>
Part 1. How to Enable USB Debugging on Google Device
To enable USB Debugging on Google, you can refer to the following instructions.
For Android 12 and Newer
*(Google Pixel 6/7/8 series)*
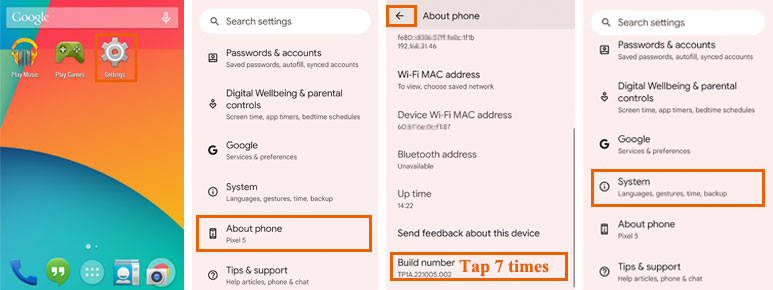
Step 1. Open the Settings app on your Pixel.
Step 2. Scroll down and select About phone.
Step 3. Locate and tap Build number 7 times until you see "You are now a developer!"
Step 4. Press the Back button.
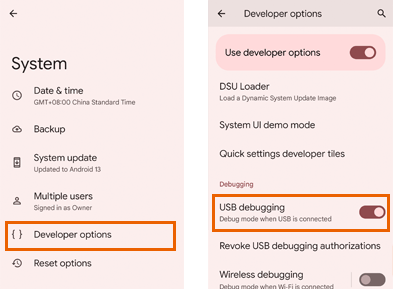
Step 5. Select System → Developer options.
Step 6. Toggle on USB debugging.
Step 7. Confirm the security warning by tapping OK.
Key Notes:
(1) Android 12+ introduces a more organized settings structure.
(2) "System" is now a separate category in Settings.
(3) Additional security warnings may appear during first connection.
For Android 11 and Older
*(Pixel 1-5 series, Android 7-11)*
Step 1. Navigate to "Settings" on your Google device.

(1) If you can see "Developer options", please skip to the next step.

(2) If you can not see "Developer options", please go to "About phone" > Tap "Build number" for 7 times in rapid succession. Then back to the Settings page, you will be able to see "Developer options" now.


Step 2. Tap "Developer options" > Toggle on "Developer options" and "USB Debugging".

Key Notes:
(1) Simpler menu structure in older Android versions.
(2) Developer options appear immediately after activation.
(3) No intermediate "System" menu required.
Part 2. Common Issues and Solutions
(1) Restart both devices.
(2) Try different USB cable/port.
(3) Check for OS updates.
2. "Allow USB debugging?" not appearing
(1) Revoke USB debugging authorizations.
(2) Reconnect device.
3. ADB devices not showing phone
(1) Install latest USB drivers.
(2) Ensure proper USB mode is selected.
4. Security Best Practices
(1) Only enable USB debugging when actively needed.
(2) Never select "Always allow" for public/shared computers.
(3) Regularly revoke authorizations via: Developer options → Revoke USB debugging authorizations.
(4) Disable USB debugging when not in use.
(5) Note for Android 14+ Users: New security restrictions may require additional permissions for certain ADB commands. Check Google's latest developer documentation for updates.
Part 3. Contact Us for Further Assistance
Need more help? Please feel free to let us know via email at support@coolmuster.com with your following information:
(1) What's your Android device's brand, model and OS version?
(2) Describe your problems in details.
(3) Send us some screenshots to show the problems.

For more problems about Coolmuster products on use, installation and connection, please go to the Product FAQs page and open the related product's FAQs to find the solutions you need.
Related Articles:
Failed to Connect Your Android Device to Computer via USB? Here's What to Do
What to Do If USB Debugging Enabled But Detection Still Failed?
What to Do If the Program Does Not Recognize My Android Device?
