Apple has always been known for its exceptional security standards, and its continuous improvements to iOS make iPhones some of the safest devices on the market. From biometric authentication like Face ID and Touch ID to features such as Find My, two-factor authentication, Apple ID protection, and iCloud Keychain, every layer is designed to safeguard your personal information. But aside from these well-known security tools, there is another powerful option many users overlook — the "Erase Data" feature. When enabled, your iPhone will automatically erase all data on iPhone after 10 failed attempts.
If you've never heard of this feature or aren't quite sure how it works, you're in the right place. This guide will walk you through everything you need to know about "erase data after 10 failed attempts on iPhone". Let's dive in!
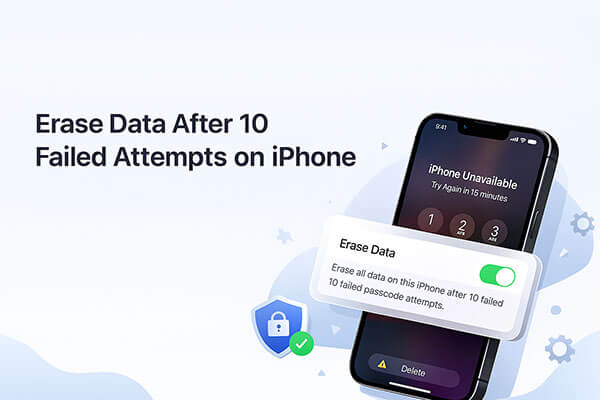
"Erase Data" is a security feature on iOS designed to prevent unauthorized access by erasing the device's data after multiple failed password attempts. What happens if you erase data after 10 failed attempts on an iPhone? When this feature is enabled, if the passcode is entered incorrectly 10 times in a row, the iPhone will automatically erase all data and restore the device to factory settings.
You can easily enable or disable this feature in the iPhone's Settings. The specific steps are as follows:
Step 1. Open "Settings" on your iPhone.
Step 2. Scroll down and tap "Face ID & Passcode" or "Touch ID & Passcode".
Step 3. Enter your device passcode to access the settings.
Step 4. Scroll to the bottom and find "Erase Data".
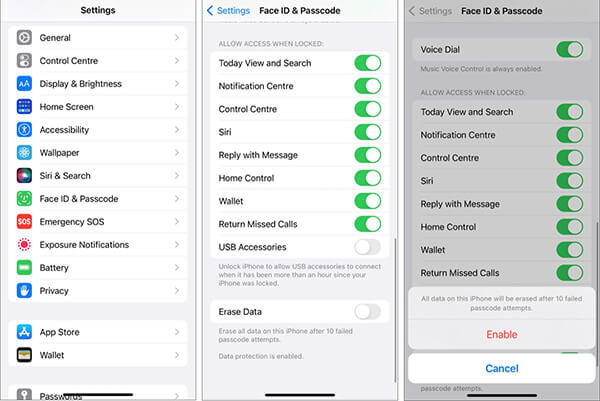
Step 5. Toggle the switch "ON" or "OFF" based on your preference.
Once enabled, your device will automatically wipe itself after ten failed attempts, so use this setting with caution.
What should you do if your iPhone has erased all data and settings after 10 failed passcode attempts? If you backed up your iPhone before the reset, you can recover your data using iCloud or iTunes/Finder. If you don't have a backup, you'll need to set up your iPhone as a new device without any of your previous data.
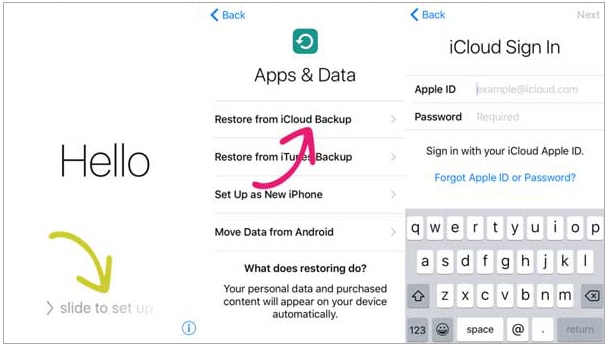
3.1 Recover Data from iCloud Backup
Step 1. Turn on your iPhone and follow the setup instructions until you reach the "Apps & Data" screen.
Step 2. Tap "Restore from iCloud Backup".
Step 3. Sign in with your Apple ID and password.
Step 4. Select the most recent backup from the list.
Step 5. Keep your iPhone connected to Wi-Fi and power during the restoration.
Step 6. Wait for the restore to complete and continue with setup.
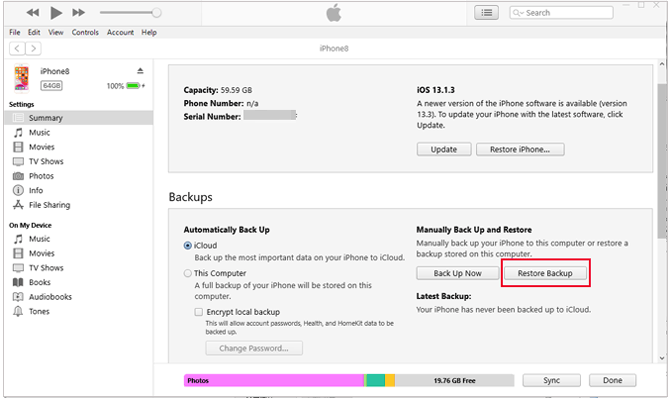
3.2 Recover Data from iTunes Backup
Step 1. Connect your iPhone to your Mac or Windows PC using a USB cable.
Step 2. Open Finder (macOS Catalina or later) or iTunes (Windows/macOS Mojave or earlier).
Step 3. Select your iPhone when it appears in the sidebar or device list.
Step 4. Click "Restore Backup".
Step 5. Choose the backup you want to restore.
Step 6. Click "Restore" and wait while your data is copied back to the device.
Step 7. Keep your iPhone connected until the process finishes and restarts automatically.
On iPhones where the "erase data after 10 failed attempts" feature is not enabled, after 10 failed passcode attempts, your iPhone will become unavailable. With no further attempts allowed, you have the following options to unlock your iPhone.
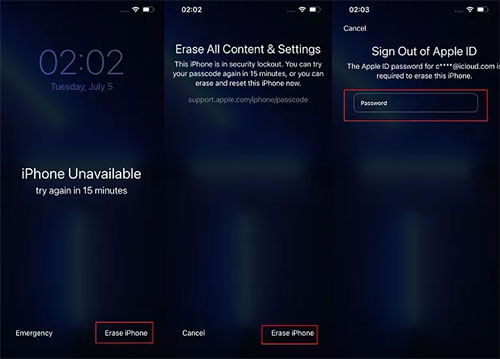
If your device is running iOS 15.2 or later, the system provides a simple and straightforward option: you can erase your iPhone directly from the lock screen.
For iOS 15.2 to iOS 16: Use "Erase iPhone"
Step 1. Tap "Erase iPhone" in the lower-right corner of the lock screen.
Step 2. On the "Erase All Content & Settings" screen, confirm your action by tapping "Erase iPhone" again.
Step 3. Enter your Apple ID password to sign out of your Apple ID.
Step 4. Tap "Erase iPhone" to begin erasing all data and settings from your iPhone, including removing the screen passcode.
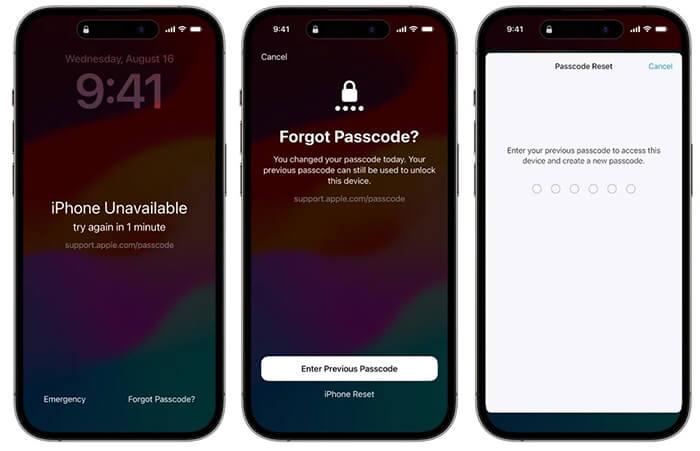
For iOS 17 and later: Use "iPhone Reset"
Step 1. Tap "Forgot Passcode?" in the bottom-right corner of the iPhone lock screen.
Step 2. Next, select "iPhone Reset" > "Start iPhone Reset".
Step 3. Enter your Apple ID password to sign out of your Apple ID.
Step 4. Tap "Erase iPhone" to remove all content and settings, including the screen passcode.
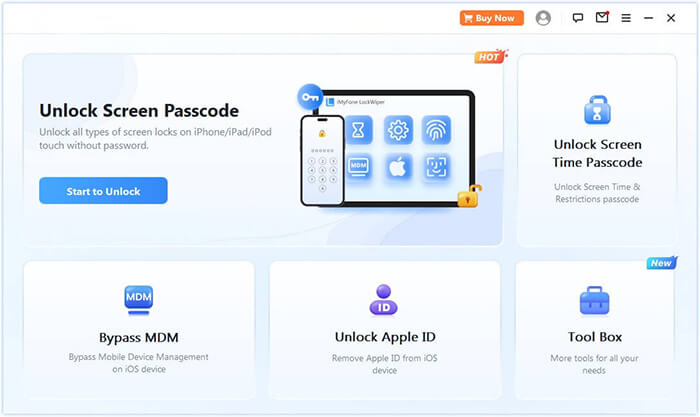
Not all iPhones have the "Erase" option on the lock screen. In such cases, you can try using third-party iPhone unlocking software like iPhone Unlocker. It can unlock your iPhone or iPad after 10 or more incorrect passcode attempts. It supports numeric passcodes, alphanumeric passcodes, Face ID, and Touch ID. No matter the model of your device or the type of lock screen issue, this software can help you resolve it.
Key features of iPhone Unlocker:
How to unlock your iPhone without a passcode using iPhone Unlocker:
01Download and launch iPhone Unlocker on your computer. Choose "Unlock Screen Passcode" mode and click "Start to Unlock". Then, connect your iPhone to the computer via USB.
02Follow the on-screen instructions to put your iPhone or iPad into Recovery Mode or DFU Mode. Once detected, select a location to save the firmware package and click "Download".
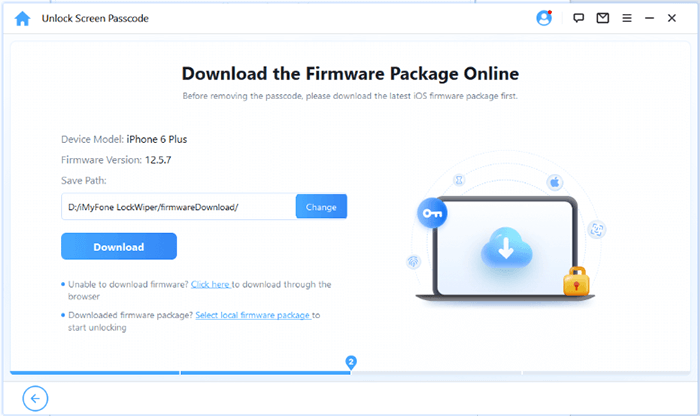
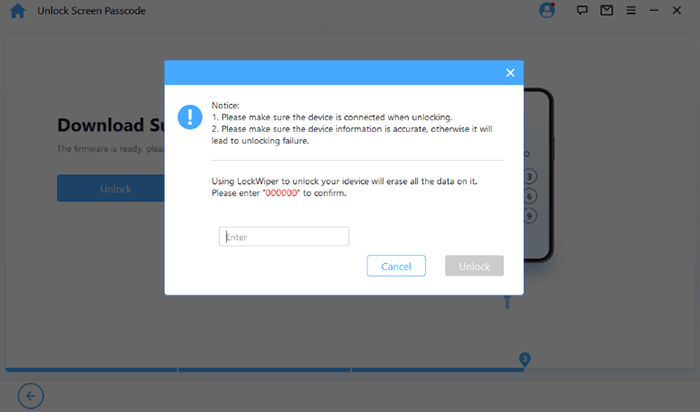
03After the firmware is downloaded, click "Unlock". Carefully read the warning message, type "000000" to confirm, and click "Unlock" again to proceed.
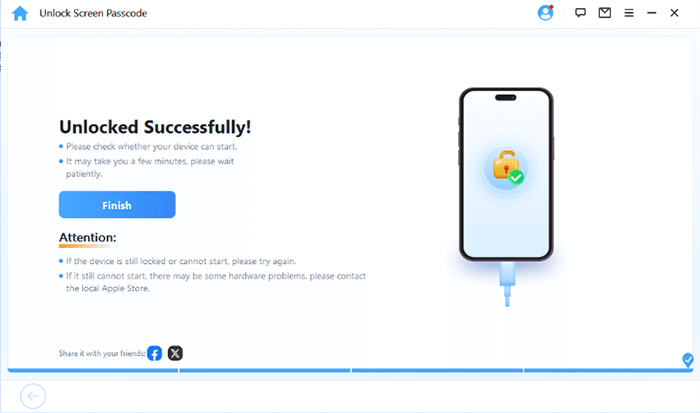
04In just a few minutes, your iPhone's screen passcode will be completely removed. You can now set up a new passcode, Face ID, or Touch ID as needed.
If you prefer to use Apple's official method, you can also use iTunes to erase your data. This will restore your iPhone to its factory settings, giving you a fresh iPhone. Just make sure that the "Find My iPhone" feature is turned off. Here are the detailed steps:
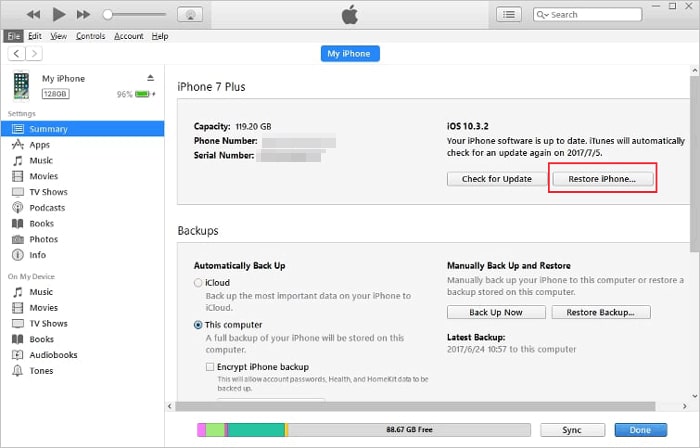
Step 1. Open iTunes (or Finder on Mac) and connect your disabled iPhone to a trusted computer.
Step 2. iTunes/Finder should detect and recognize your iPhone, displaying a device icon for you to click. If it doesn't, put your iPhone into recovery mode first.
Step 3. In the "Summary" section, click "Restore iPhone" to confirm the factory reset. If your iPhone is in recovery mode, click "Restore" in the pop-up window.
Can't erase all data on your iPhone after 10 failed passcode attempts because the "Erase Data" option is disabled? Don't worry. You can still erase your iPhone using iCloud, as long as you've enabled the Find My feature and know your iCloud account details. Here's what to do:
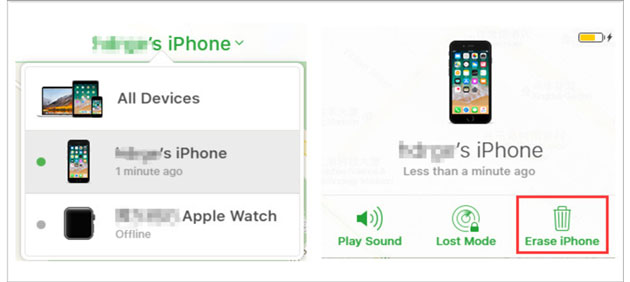
Step 1. Go to https://www.icloud.com/find/ in any browser and sign in to your iCloud account.
Step 2. In the "All Devices" list, locate your disabled iPhone.
Step 3. Select "Erase iPhone" from the available options. Your iPhone will be erased, including the screen passcode.
Automatically erasing data after 10 failed attempts on iPhone is a great data protection feature, effectively preventing personal data theft or leakage. However, it is important to back up your data in advance to avoid permanent loss in case of accidental activation.
Additionally, if you want to unlock an iPhone after 10 failed attempts, iPhone Unlocker is the best third-party software for this purpose. It can bypass the screen lock and quickly restore access to your device. Once you regain access, you can simply restore your data from a backup.
Related Articles:
[Answered] What Happens After 10 Failed Screen Time Passcode Attempts?
5 Solutions: How to Turn Off Screen Time Without Passcode
[Comprehensive Guide] How to Factory Restore a Locked iPhone?
How to Fix iPhone Unavailable No Erase Option? - 4 Easy Ways


 Free Download for PC
  Free Download for Mac

