"I had my mother-in-law reset her password as she has not been able to log into her iTunes for quite some time. After we reset apple id, we changed it in settings>store and it took it just fine. It accepted the new ID/password in the settings and online; however, we then tried to update the iPhone, but it doesn't show the correct Apple ID/email address in the "updated apps" pop-up screen, but it shows up correctly in settings>store. Please help."
- from Apple Community
When updating apps on an iPhone or iPad, many users are confused when a sudden pop-up says "Wrong Apple ID" or prompts them to enter the password for another Apple ID, especially when they are clearly logged into their own Apple ID. Why can't they update the app?
Don't worry, this is actually a very common issue. This article will systematically analyze the reasons behind the "wrong Apple ID when updating apps" error and provide various feasible solutions to help you successfully update your apps.
If you are facing the wrong Apple ID when updating apps on your iPhone, the following are some possible reasons:
* You previously used a different Apple ID to download apps.
* You bought a second-hand iPhone, and the previous owner didn't properly erase it.
* A family member used your phone to download an app using their account.
* You're in a Family Sharing group, and the app was purchased by the family organizer or another member.
* Some minor iOS bugs can also cause account information to get mixed up during the update process.
After you know the reasons for wrong Apple ID comes up when updating apps, you can try the following solutions to solve it.
One effective way to resolve the "wrong Apple ID when updating apps" error is by signing out and then signing back in. This method refreshes your Apple ID settings and clears any temporary login conflicts on your device, helping the system recognize the correct account associated with your downloaded apps. Follow these simple steps to apply this fix:
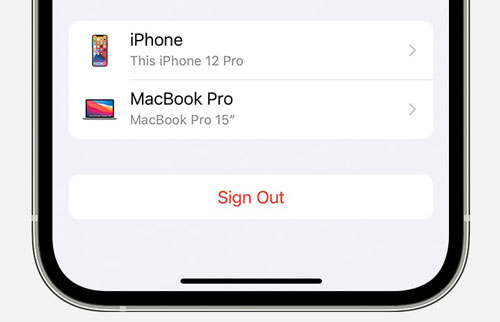
Step 1. On the main "Settings" screen, tap on your "Apple ID" account and swipe up to select "Sign Out". (Can't sign out of Apple ID?)
Step 2. Enter your Apple ID password to turn off Find My iPhone and confirm.
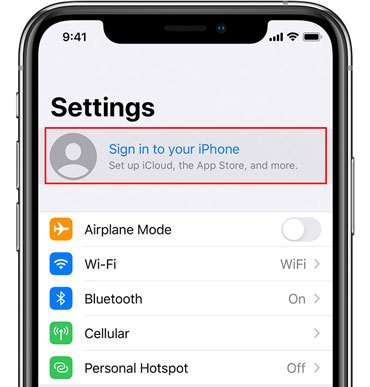
Step 3. After signing out, go back to the main "Settings" screen and tap "Sign in to your iPhone" to log back into your account.
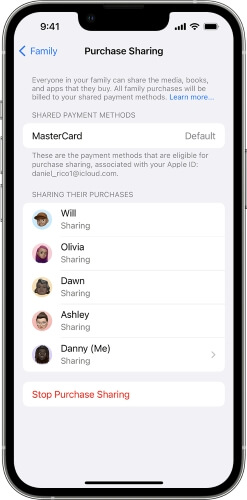
If you're in an Apple Family Sharing group, the app purchase might be linked to the Family Organizer's account, which can occasionally cause a conflict. A quick solution is to temporarily turn off purchase sharing.
Here are the steps:
Step 1. Open "Settings" and tap your name.
Step 2. Tap "Family Sharing", then select "Purchase Sharing".
Step 3. Tap "Stop Purchase Sharing". Try updating the app again. You can always enable this feature again later.
Another effective way to fix the "Wrong Apple ID" error when updating apps is by redownloading the app. This method breaks the link between the app and the previous Apple ID, and reinstalling it will associate the app with your current Apple ID instead. Follow the steps below to reinstall the app:
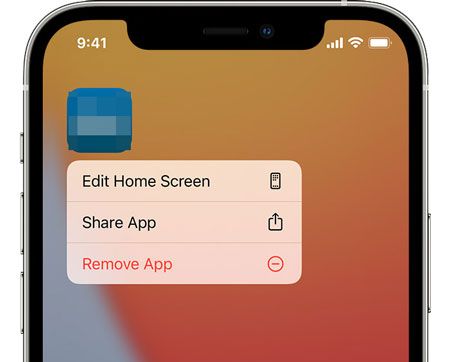
Step 1. Press and hold the problematic app for a few seconds, then select "Remove App". In the pop-up that appears, choose "Delete App", and confirm by tapping "Delete" to uninstall it. (Can't delete the app on iPhone?)
Step 2. Open the App Store, search for the app you just deleted, and tap the "cloud" icon (or the "Get" button) to download it again. This time, the app will be linked to your current Apple ID.
If your device is running an older version of iOS, it could contribute to the "wrong Apple ID when updating apps on iPhone" issue when updating apps. Updating your system may resolve this problem.
To update the iOS version, follow the steps below:
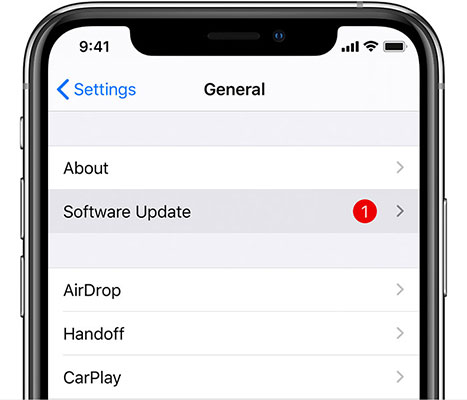
Step 1. Open the "Settings app", go to "General", and select "Software Update".
Step 2. If an update is available, tap "Update Now" to upgrade your iOS.
You can also try resetting all settings to fix the "Wrong Apple ID" issue when updating apps. This method restores your iPhone's settings to their default state without deleting any personal files or data. Follow the steps below to reset all settings on your iPhone:
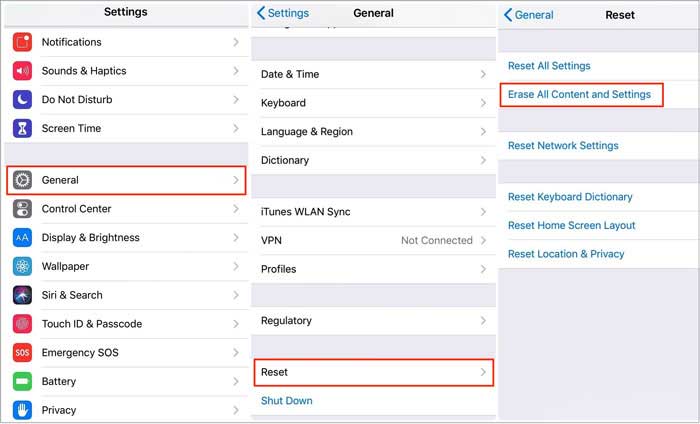
Step 1. Go to "Settings" > "General", then select "Transfer or Reset iPhone", and tap "Reset".
Step 2. Choose "Reset All Settings", enter your passcode, and tap "Reset All Settings" again to confirm.

If the "wrong Apple ID when updating apps" issue continues, performing a factory reset will remove all Apple ID associations, but it will erase all settings and content on your iPhone. Be sure to back up your iPhone before proceeding.
Here's how to reset your iPhone:
Step 1. Go to "Settings" > "General" > "Transfer or Reset iPhone".
Step 2. Tap "Erase All Content and Settings", then select "Continue" and tap "Erase iPhone".
Step 3. Enter your Apple ID password and tap "Erase iPhone" to confirm. (iPhone won't erase?)
Step 4. After the reset, set up your iPhone using the correct Apple ID.
Users can also resolve the "wrong Apple ID" issue when updating apps by removing the Apple ID from their iOS device. This is especially useful if you don't know the Apple Account password. I highly recommend using iPhone Unlocker for this.
iPhone Unlocker is a reliable tool designed to help users remove Apple ID from iOS devices without needing the password. In addition to Apple ID removal, it can also unlock disabled iPhones, bypass MDM restrictions, and remove Screen Time settings. The program is safe, easy to use, and allows anyone to resolve the issue with just a few simple clicks.
Key features of iPhone Unlocker:
Here is how to remove Apple ID from your iPhone without a passcode:
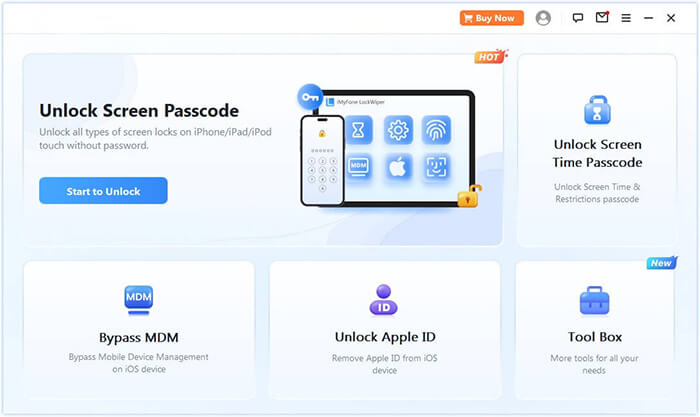
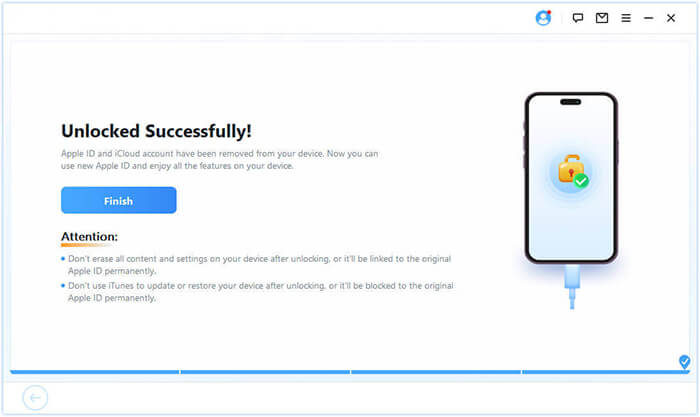
01Download and install iPhone Unlocker on your computer. Launch the program and select "Unlock Apple ID" from the main screen.
02Connect your iPhone to the computer, and the program will automatically detect your device. Once detected, click "Start" to proceed.
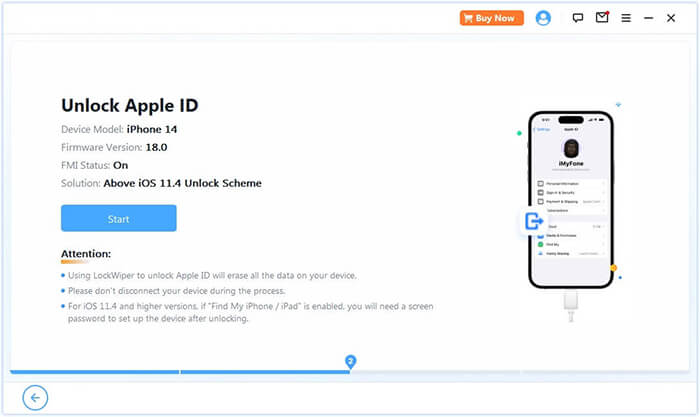
03If Find My is disabled, the program will begin unlocking your Apple ID immediately. If Find My iPhone is enabled, go to Settings > General > Reset All Settings to disable it before continuing. If two-factor authentication is active, check the device status and click "Next". A confirmation pop-up will appear—enter "000000" and click "Unlock" to proceed.

04Wait a moment, and the program will quickly unlock your Apple ID without any issues.
To remove the Apple ID from your iOS device, using iTunes is a straightforward and effective method. Restoring your iPhone with iTunes will erase everything, including the Apple ID and downloaded apps. Follow these steps to fix the "wrong Apple Account" issue on the App Store:
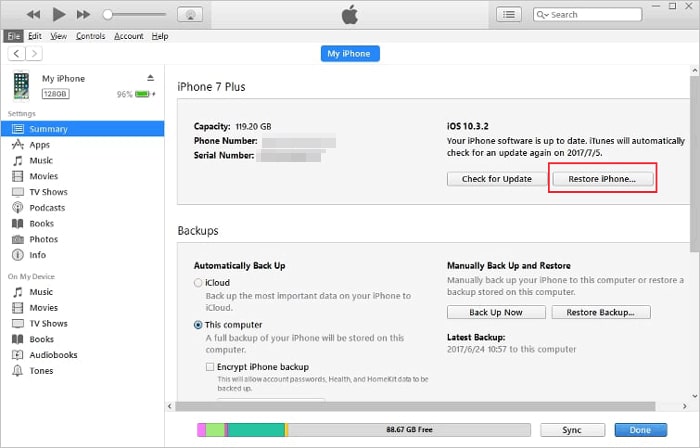
Step 1. Install and launch iTunes on your computer, then connect your iPhone to the computer.
Step 2. Once iTunes detects your iPhone, click the device icon.
Step 3. Click the "Summary" option.
Step 4. Click "Restore iPhone" to remove the Apple ID from your iPhone.
You can also use iCloud to remotely erase your Apple ID if your device isn't detected by iTunes. To wipe your iPhone using iCloud, the Find My iPhone feature must be enabled on your device, and you'll need to know your Apple ID and password.
Here's how to do it with iCloud:
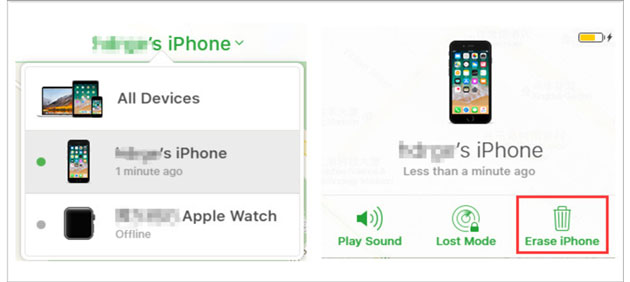
Step 1. Open a browser on your iPhone and go to iCloud.com. Log in with your Apple ID and password.
Step 2. Select "Find My iPhone" from the list of iCloud services.
Step 3. Click "All Devices", then choose the iPhone from which you want to remove the Apple ID.
Step 4. Click "Erase iPhone" to wipe the device and remove the Apple ID from your iOS device.
It can be quite frustrating when you encounter an incorrect Apple ID error while updating apps. Now that you know how to effectively solve this issue, you should be able to handle it with ease. If the problem persists, we strongly recommend using iPhone Unlocker, as it can quickly remove stubborn Apple IDs without needing a password.
If you have any other questions, feel free to leave a comment below.
Related Articles:
Can't Sign Into Apple ID? Repair the Error Immediately [Secure]
[SOLVED!] 7 Quick Fixes to Solve Apps Didn't Transfer to New iPhone
How to Fix the iTunes/App Store Keeps Asking for Password Issue on iPhone/iPad?


 Free Download for PC
  Free Download for Mac

