TL;DR:
Learning how to record screen on Windows is essential for tutorials, meetings, and content creation. Windows provides multiple recording options, including:
For users who want an easier and more flexible solution with high-quality output, Coolmuster Screen Recorder offers a beginner-friendly way to record full screen or custom areas with system or microphone audio support.
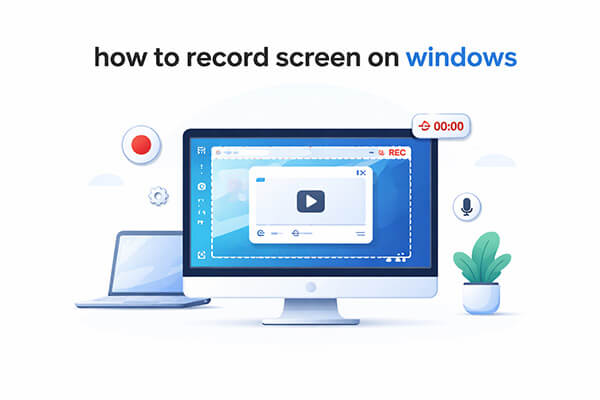
In today's world, where remote work, online learning, and content creation are becoming increasingly common, learning how to record your screen on Windows has become an essential skill. Whether you want to record tutorial videos, save online meeting content, or document software workflows, choosing the right screen recording method on Windows can make a big difference in efficiency.
In fact, both Windows 10 and Windows 11 offer several screen recording options, ranging from built-in tools to professional third-party software, each with its own advantages. This article will guide you step by step on how to record a screen on Windows, presenting four mainstream recording methods to help you make the best choice based on your needs.
If you're using Windows 10 or Windows 11, the built-in Xbox Game Bar is one of the simplest and installation-free ways to record your Windows screen. Originally designed for game recording, it can also be used to record most application windows.
Here is how to screen record on Windows 11/10 using Xbox Game Bar:
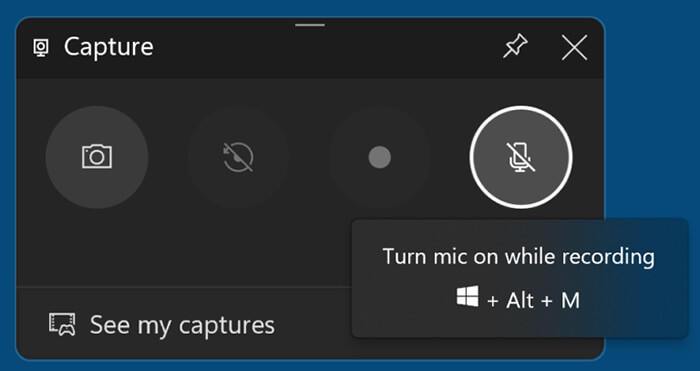
Step 1. To open the Xbox Game Bar, press "Windows + G" or search for it in the "Start" menu.
Step 2. Click the "Camera" icon to open the screen capture window, where you can choose to either record a video or take a screenshot.
Step 3. If you plan to record a video, it's a good idea to disable your microphone first. Click the "Microphone" icon and make sure it has a line through it, indicating it's muted.
Step 4. Once you're ready to start, hit the "Record" button (the solid white circle).
Step 5. To stop recording, click the "Stop" button (the solid white square), which appears in the same spot where the Record button was.
Step 6. To review your recording, click "Show all captures" at the bottom of the window. You can also go to "This PC" > "Videos" > "Captures" to find your video clips.
Windows 11 introduced a major update to the Snipping Tool by adding screen recording functionality. This built-in tool allows users to record a selected portion of the screen, making it a great option for short tutorials, bug reports, or quick demonstrations. Compared to the Xbox Game Bar, Snipping Tool offers more flexibility in selecting the recording area, but it lacks advanced audio and output settings. As a result, it works best for simple and lightweight recording tasks.
Note: Although both Windows 10 and Windows 11 include the Snipping Tool, only the version in Windows 11 offers the option to record video.
Here is how to record the screen on Windows 11/10 with Snipping Tool:
Step 1. Open the "Start" menu, search for "Snipping Tool", or you can also download it from the Microsoft Store.
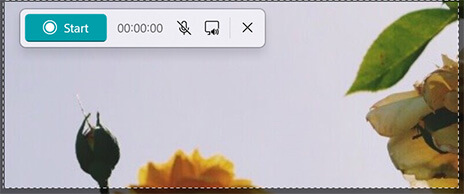
Step 2. With the Snipping Tool open, click the "camera" icon to switch to the screen recording mode. Then, click "New" to select the area of your screen you want to capture.
![]()
Step 3. Next, click the "Microphone" icon on the recording toolbar to choose your microphone or headset. You can also mute the microphone if you prefer not to record any audio.
Step 4. Click the "Start" button to begin recording your screen.
Step 5. When you're done, click the "Stop" button to finish the recording and preview your video within the Snipping Tool.
If the built-in Windows recording tools feel too limited, using a professional screen recorder can provide a much smoother experience. Coolmuster Screen Recorder is a practical solution for users who want to record videos, online meetings, tutorials, gameplay, or presentations on Windows 10 and Windows 11 without complicated settings.
Compared with the Xbox Game Bar or Snipping Tool, Coolmuster Screen Recorder offers more flexibility in recording modes and video quality. It supports full-screen and custom-area recording, allowing users to capture exactly what they need. In addition, the software is designed with a clean and beginner-friendly interface, making it suitable even for first-time users who are learning how to record a screen on Windows.
Key features of Coolmuster Screen Recorder:
* Record full screen, selected areas, or gameplay in HD with no time limits.
* Customize the recording area with precise size control.
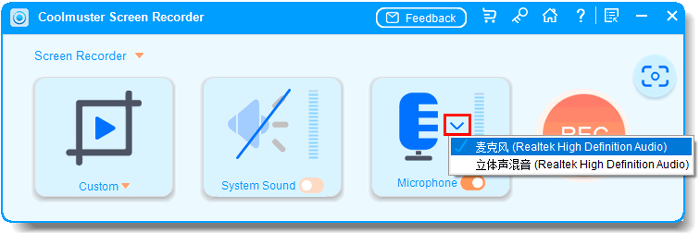
* Capture system audio or microphone sound separately.
* Save screenshots as PNG/JPG/BMP and videos as watermark-free MP4 files.
* Keep all recordings local to protect your privacy and security.
Here is how to record a Windows 10/11 screen using Coolmuster Screen Recorder:
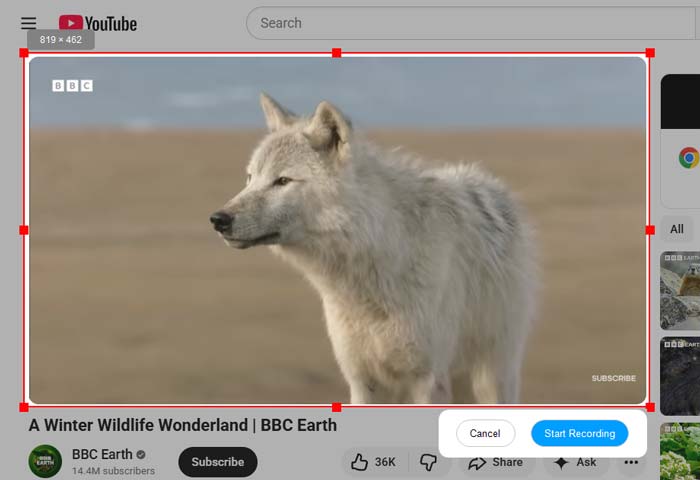
01Open Coolmuster Screen Recorder and select either "Full Screen" or "Custom" mode.
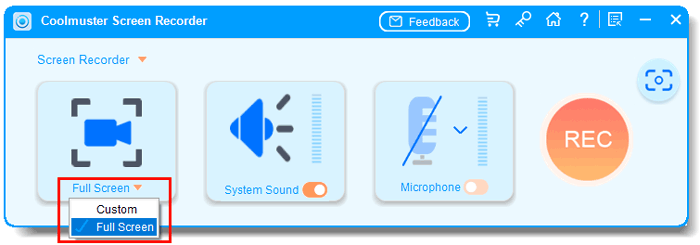
02Turn on "System Sound" or "Microphone" as needed, or disable both for silent recording.
03Click the orange "REC" button and choose "Start Recording". The recording will begin after a short countdown.
04Click "Stop Recording" when done. Your video will be saved locally as an MP4 file, with a "Copy" option for easy sharing.

Video Tutorial:
OBS Studio is a popular free and open-source screen recording software, widely used for game recording and live streaming. Compared to the previous methods, the biggest feature of OBS is its high level of customization and professional-grade controls, which also means a steeper learning curve. If you need multi-screen recording, live streaming, or precise video parameter adjustments, OBS is an incredibly powerful tool. However, for simple, everyday screen recording, beginners might find its setup to be more complex.
Here is how to record the screen on Windows 11/10 using OBS Studio:
Step 1. Download and install OBS Studio from the official OBS website to get the version for Windows.
Step 2. Launch OBS Studio, click the "+" icon at the bottom of the interface to create a new scene and give it a name.
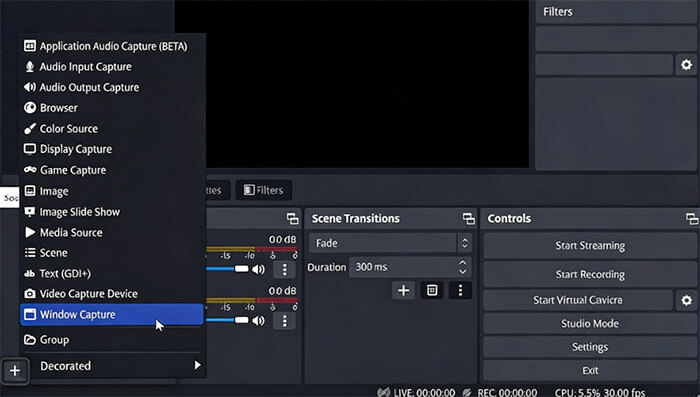
Step 3. In the "Sources" panel, click the "+" icon and choose "Display Capture" (for full-screen recording) or "Window Capture" (to record a specific application), then select the screen or window you want to record.
Step 4. Adjust the volume for Desktop Audio and Mic/Aux in the "Audio Mixer" panel.
Step 5. Click "Settings" in the lower-right corner, and under the "Output" tab, choose the recording save path, format, and encoder. In the "Video" tab, adjust the resolution and frame rate.
Step 6. Once configured, click "Start Recording" to begin, and click "Stop Recording" when done to save the file.
Step 7. Open the recording file for preview, and if editing is needed, use another video editing software.
Now you've learned several ways to record your screen on Windows, and the best option depends on your needs. If you want a screen recorder that is easy to use, flexible, and capable of producing high-quality recordings, Coolmuster Screen Recorder is a great choice for Windows 10 and Windows 11 users. It supports both full-screen and custom-area recording, allowing you to capture your screen easily without complicated a setup.
Related Articles:
iPhone Screen Recording Not Working: Reasons and 9 Best Fixes
Comprehensive Review: 7 Best Screen Recorders for Android
10 Amazing MP4 Screen Recorder Options: Record MP4 Videos Easily
How to Record Screen on Windows 10/11 with Audio in 4 Useful Ways


 Free Download for PC

