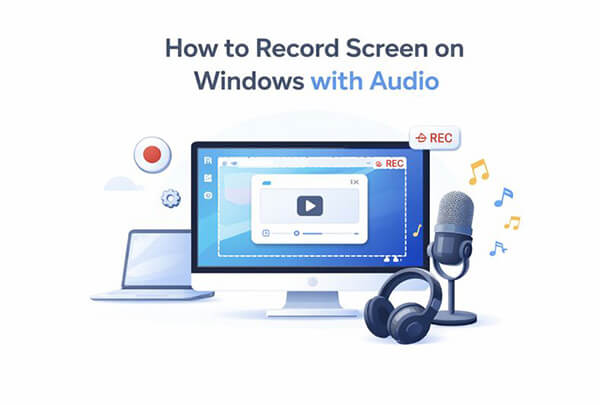
TL;DR:
If you want to record screen on Windows with audio, there are several easy ways to do it depending on your needs.
Screen recording on Windows has become a daily need for many people, such as recording online meetings, instructional videos, gaming sessions, software tutorials, and more. However, many users encounter the same issue: the screen is recorded, but the sound is not, or only system audio is recorded, not the microphone input. This article will focus on the question of how to record a screen on Windows with audio and provide detailed methods for recording both screen and audio on Windows, helping you capture both video and sound in one go.
Xbox Game Bar is a built-in screen recorder available on both Windows 10 and Windows 11. Originally designed for gamers, it can also be used to record apps, browsers, and other software windows with audio. Since it comes pre-installed, it's often the first option users try when looking for how to record the screen on Windows with audio.
Here is how to screen record on Windows 10 with audio via Xbox Game Bar:
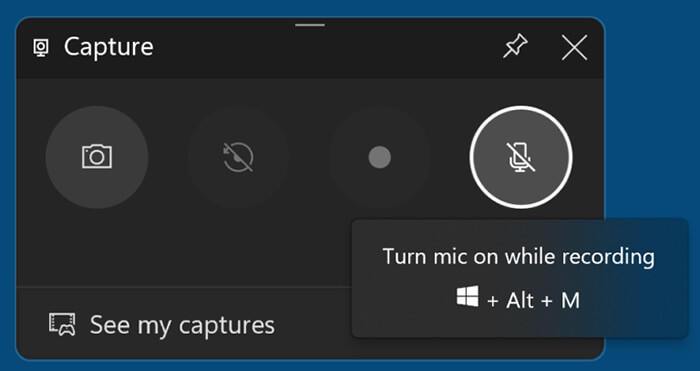
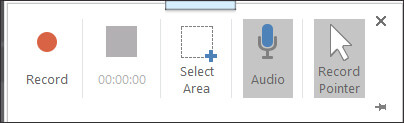
Step 1. Press "Win + G" to open Xbox Game Bar.
Step 2. In the "Capture" widget, click the "microphone icon" to toggle microphone audio on or off.
Step 3. Click the "Record" button (circle icon) or press "Win + Alt + R" to start recording.
Step 4. Press "Win + Alt + R" again or click "Stop" in the overlay to stop the recording.
Step 5. Your recording will be saved in "Videos" > "Captures".
With Windows 11 updates, the Snipping Tool is no longer just for screenshots. Microsoft added a screen recording feature, allowing users to record selected screen areas without installing third-party software. This makes it a convenient choice for users who want a simple way to record a screen on Windows 11 with audio.
Here is how to record the screen on Windows 11 with audio using Snipping Tool:
Step 1. Ensure Windows 11 is updated to 22H2 or later, and update Snipping Tool via Microsoft Store if the Record tab is missing.
Step 2. Launch Snipping Tool (search in "Start" menu or use shortcut "Win + Shift + R").
Step 3. Click the "camera" icon, then click "New".
![]()
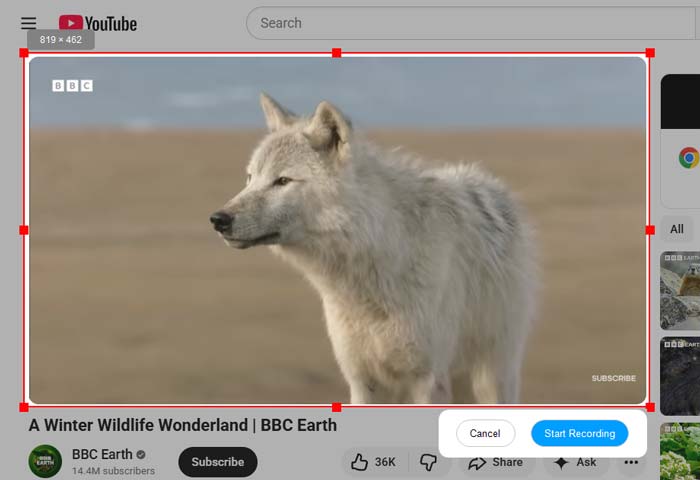
Step 4. Drag to select the recording region (or click a window/full screen).
Step 5. On the floating control bar, toggle the "speaker" icon to enable system audio, and click the "mic" icon to select and enable the microphone.
Step 6. Click "Start" (3-second countdown starts recording).
Step 7. Stop recording by clicking the red "Stop" button on the floating bar or pressing "Win + Shift + R" again.
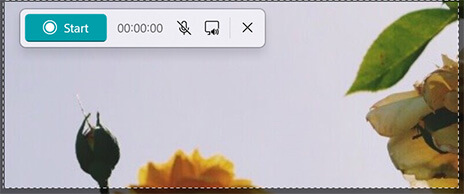
Step 8. Preview the clip in the pop-up window, then click "Save As", choose a save path, name the file, select MP4 format, and click "Save".
Recording your screen on Windows 11 using PowerPoint is also a simple and efficient method, especially for those familiar with Office tools. In addition to creating presentations, PowerPoint's built-in screen recording feature allows you to capture both screen activity and audio at the same time.
Here is how to screen record on Windows 11 with audio using PowerPoint:
Step 1. Launch PowerPoint, either by opening an existing presentation or creating a new one.
Step 2. Go to the "Insert" tab at the top and click "Screen Recording" in the toolbar (usually on the right).
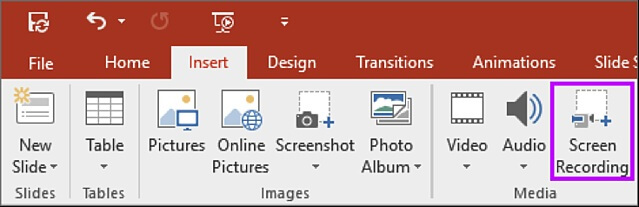
Step 3. Once you click "Screen Recording", the screen will gray out, and a selection box will appear. Choose to record the entire screen or just a portion of it.
Step 4. Keep "Audio" checked (default) to record system audio.
Step 5. After setting up the area and audio, click "Record". PowerPoint will give you a three-second countdown before it begins.
Step 6. During the recording, the control bar is hidden. To stop, simply move your mouse to the top of the screen to reveal the controls.
Step 7. The recorded video will automatically be inserted into the current slide. You can trim or edit it as needed.
Step 8. Right-click the video and select "Save As" to save it as a separate file if you want to keep it outside PowerPoint.
Is your PowerPoint screen recording not working? Don't worry; you can read this article to learn the reasons and how to fix it.
[Solved] How to Fix PowerPoint Screen Recording Not Working?If built-in Windows tools cannot fully meet your recording needs, using a professional screen recorder is a better option. Coolmuster Screen Recorder is a simple yet practical screen recording tool for Windows users. It allows you to record screen activity with audio in just a few clicks and supports recording either system sound or microphone audio. Whether you want to create tutorials, record online videos, or capture presentations, it provides a smoother recording experience than most built-in options.
Key features of Coolmuster Screen Recorder:
* Record full screen, custom areas, or gameplay in HD without time limits.
* Select any recording area with precise size control.
* Record system audio or microphone sound separately.
* Save screenshots as PNG/JPG/BMP and videos as watermark-free MP4 files.
* All recordings stay local to ensure your privacy and security.
How do I record my screen on Windows 11/10 with sound using Coolmuster Screen Recorder? Follow these steps:
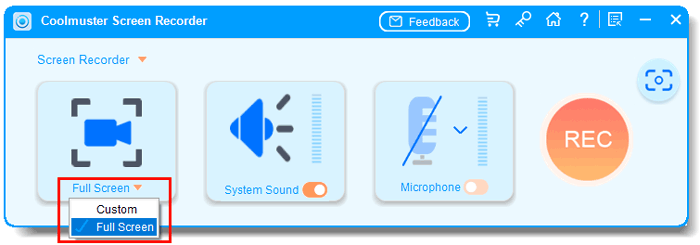
01Launch Coolmuster Screen Recorder and choose your recording area: "Full Screen" or "Custom".
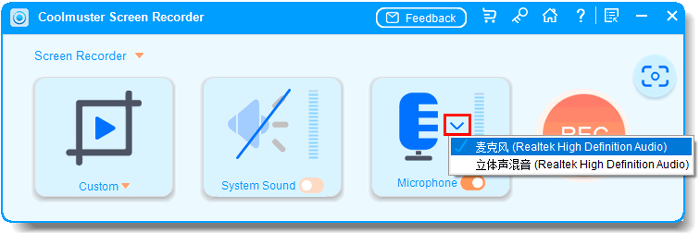
02Select your audio source by enabling "System Sound" or "Microphone". You can also disable both for silent recording.
03Click the orange "REC" button, then choose "Start Recording". Recording will begin after a short countdown.
04When finished, click "Stop Recording". The video will be saved locally as an MP4 file, and you can use the "Copy" option for quick sharing.

Video Tutorial:
Overall, if you are looking for an easy way to record a screen on Windows with audio, Windows built-in tools can handle basic recording tasks, but they often have limitations in audio settings and recording flexibility. For users who want smoother recording, better video quality, and simpler controls, Coolmuster Screen Recorder is a more practical solution. It allows you to record screen activity with audio on Windows 10 and Windows 11 quickly and efficiently, making it a good choice for tutorials, online meetings, presentations, and everyday screen recording needs.
Related Articles:
10 Amazing MP4 Screen Recorder Options: Record MP4 Videos Easily
Best Screen Recording Software in 2026: Top 13 Tools Reviewed
5 Methods: How to Screen Record on Android [Hassle-Free Guide]
How to Screen Record on Mac Step by Step: Comprehensive Guide


 Free Download for PC

