Root access allows users to have full control over their Android devices, including modifying system files, installing certain apps that require high permissions, and so on. However, rooted devices are also exposed to security risks, such as vulnerability to malware attacks and system instability. Therefore, we might want to remove root access and restore the device to its original state. So, is it possible to remove root access from an Android device? How to unroot Android? This article will elaborate on these issues in detail.
Can you restore a rooted phone? Yes, most rooted Android devices can be unrooted and restored to a non-rooted state through certain methods. However, this process may involve modifying or deleting certain system files, and the specific steps vary depending on the device and the rooting tool used.
Here are 4 common methods to remove root access, including using ES File Explorer, SuperSU, Kingo Root, and KingRoot.
ES File Explorer, a powerful file management tool, not only supports routine file operations but also allows for the removal of root-related system files to revoke root privileges. How do you unroot an Android with ES File Explorer?
Step 1. Open ES File Explorer and grant root access permissions.

Step 2. Navigate to the system root directory.
Step 3. Locate and enter the "/system/bin/" directory, then delete the file named "su".
Step 4. Return to the root directory and enter the "/system/xbin/" directory, delete the file also named "su".
Step 5. Once again, go back to the root directory and enter the "/system/app/" directory, then delete the file named "Superuser.apk".
Step 6. Reboot your device and check if the root access has been successfully removed.
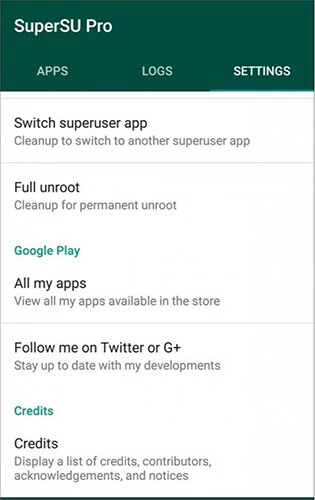
SuperSU is a tool utilized by many users to manage root privileges. It not only roots Android phones but also offers a straightforward method to unroot devices. Here's a step-by-step guide on how to unroot a rooted phone with SuperSU:
Step 1. Download, install, and open the SuperSU app.
Step 2. Head to the "SETTINGS" menu and tap on "CLEANUP" > "Full unroot".
Step 3. You will be prompted to confirm the unrooting process; tap on "Continue".
Step 4. Once the operation is completed, SuperSU will close, and your device will automatically restart, with the root privileges being removed.
Kingo Root is another popular rooting tool that also provides convenient rooting functionality. Follow these steps to remove the root on Android:
Step 1. Launch the program after you have installed it on your computer. Link your Android device to the same computer with a USB cable, and the main window of the program will pop up like the below:
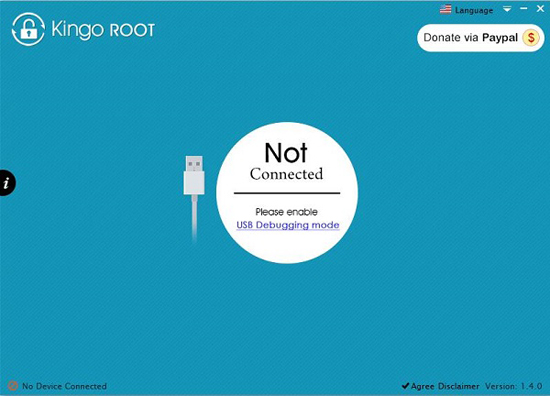
Note: If you are the first time to use Kingo Root, you have to disconnect your device and install the driver first.
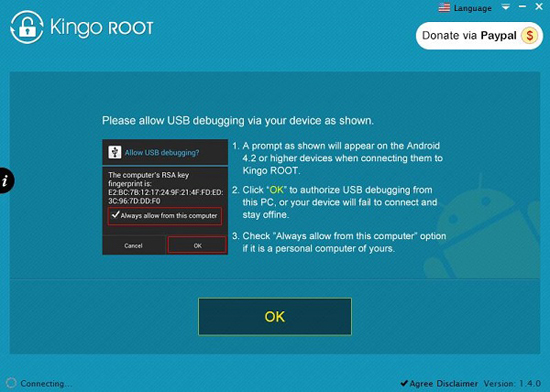
Step 2. When the driver installation is finished, you will be asked to open USB debugging on your Android device. Just click "OK" on the screen to let the program detect your Android device.
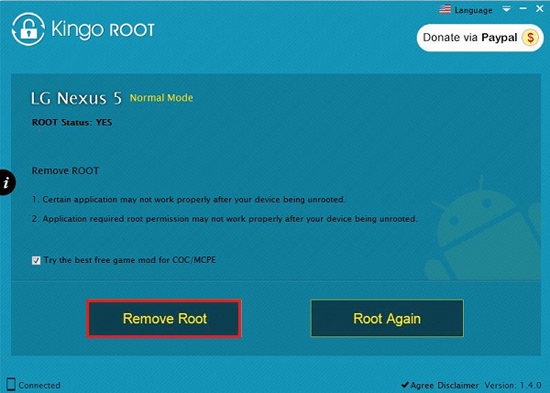
Step 3. When an Android phone is detected and connected, you will see a new interface like the one below. Now, you should click "Remove Root" in the bottom line to begin the unroot process. Keep your device connected the whole time and don't use your phone in the process.
How do you uninstall root Android? If you've rooted your device using KingRoot, the process of unrooting is relatively simple:
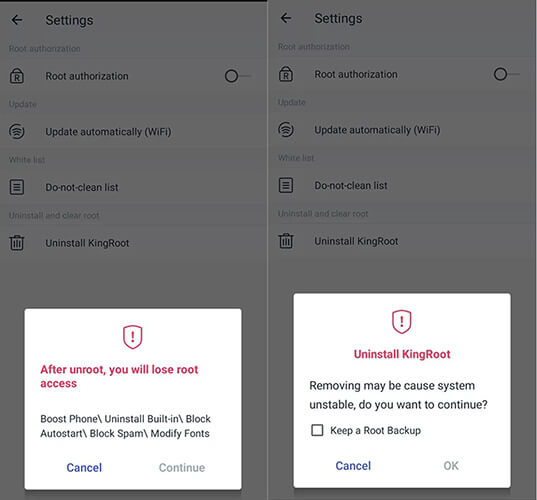
Step 1. After launching the app, tap on the three dots in the top-right corner and select "Settings".
Step 2. From the settings menu, locate the "Root authorization" option and disable it by toggling the switch beside it.
Step 3. Once you've toggled the switch to disable it, scroll down to the "Uninstall KingRoot" option at the bottom. Then, tap on it to uninstall KingRoot.
Step 4. A notification should pop up, warning you about the uninstallation; simply click on "Continue", and in the next pop-up that appears, uncheck the box next to "Keep a Root Backup" and click "OK". That's it, you're all done.
1. Will uninstall root Android delete all data on my phone?
Usually, no, but it is highly recommended to back up important data before proceeding. Removing root permissions primarily involves changes at the system level and does not directly affect user data. However, encountering errors during the process or the need to reset the device could potentially lead to data loss.
2. How to fix a rooted device?
If the device encounters problems after rooting, such as system crashes, app instability, etc., unrooting the device may be the first step to solving the problem. If the problem persists, you may need to consider factory resetting the phone or flashing the phone. However, please note that these operations will erase all data on the device, so please make sure to back up your data in advance.
3. After unrooting Android, what should be done with the apps that were previously installed using root?
After removing the root, the system-level apps or modifications that were previously installed or made using root permissions may no longer function properly or may need to be uninstalled. These apps typically rely on root permissions to perform their functions. It's necessary to manually address these apps, which may involve uninstalling them or finding alternative solutions.
It is not as difficult as we imagine to unroot Android. With the tools mentioned in the article, such as ES File Explorer, SuperSU, Kingo Root, and KingRoot, you can easily remove the root permission now. If you encounter any problems or have any other questions during the process of removing the root, please feel free to leave a message below.
Related Articles:
Is My Phone Rooted? 7 Ways to Check If Device Is Rooted
Top Samsung Root Software: Root Your Samsung Device Safely
Going Beyond Limits: Learn How to Root Android Without PC
Is It Legal to Root an Android Phone? Understanding the Risks and Safety Concerns


