If you ever lose important data on your OnePlus phone, your first thought might be to use OnePlus Switch to get it back. However, this app has now been renamed Clone Phone, and it is mainly designed for transferring contacts, SMS, and other files between devices. In other words, it helps you migrate data to a new phone, but it cannot actually recover deleted files.
The good news is that OnePlus data recovery is still possible. Whether you have a Google backup, a local backup, or even no backup at all, there are effective ways to restore your lost photos, contacts, messages, and more.
In this guide, you'll learn 5 proven methods to perform OnePlus data recovery step by step.
Yes. It's possible to recover deleted data from the OnePlus phone. When deleting something from your device, it is moved to an invisible section and makes room for new files. That is to say, you still have a chance to get it back. However, you can only recover it via a professional recovery tool.
Besides, there are also some helpful things you should know before making OnePlus 13 data recovery:
Coolmuster Lab.Fone for Android is a powerful tool that allows you to recover deleted data from any Android device without a backup. It is also user-friendly enough to let you preview all content on your phone and recover only the wanted items.
Why should you choose Coolmuster Lab.Fone for Android?
How do I recover lost data from OnePlus One without a backup?
01Install and open the software on your computer.
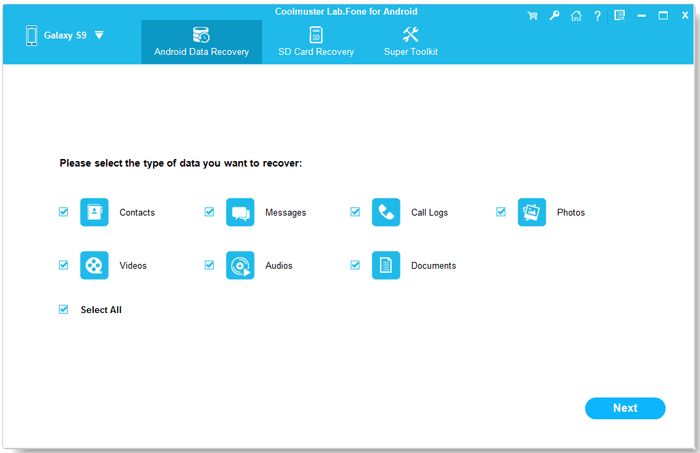
02Connect your OnePlus phone to the computer using a USB cable and enable USB debugging on your phone as required. Once connected, you will get the data selection interface. Choose the files you want to recover and hit "Next".
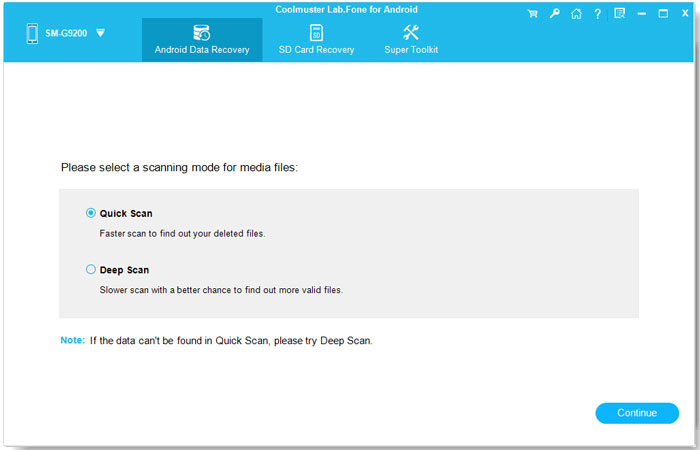
03Later, follow the on-screen prompts to scan your OnePlus device.
Note: Try rooting your device before recovery if you cannot find the desired data.
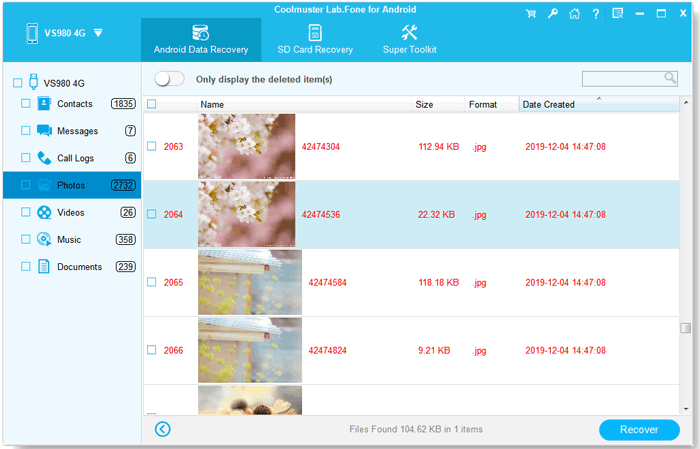
04Select one file type on the left side, preview all files, and check the items you wish to recover. After that, hit the "Recover" button in the lower-right corner to recover them to your computer.
Here is the video guide for you.
If you have synced your OnePlus phone data with your Google account in advance, you can quickly restore the deleted content by re-signing in to the same account. This method is simple and secure, but it only works if you enabled Google backup before data loss.
How to recover deleted files from OnePlus via Google account?
Step 1. On your OnePlus phone, go to "Settings" > "Google" > "Backup".
Step 2. Ensure that the backup option is enabled and that your data has been synced.
Step 3. If you've reset your phone or switched to a new OnePlus, sign in with the same Google account during the setup process.
Step 4. Choose the backup you want to restore, and the system will automatically sync the contacts, app data, and other backed-up information to your device.
![]()
Suppose you have regularly made a backup of your OnePlus with the local backup feature before. In that case, you can directly get back the deleted files from the local backup file.
How to restore deleted data from the local backup?
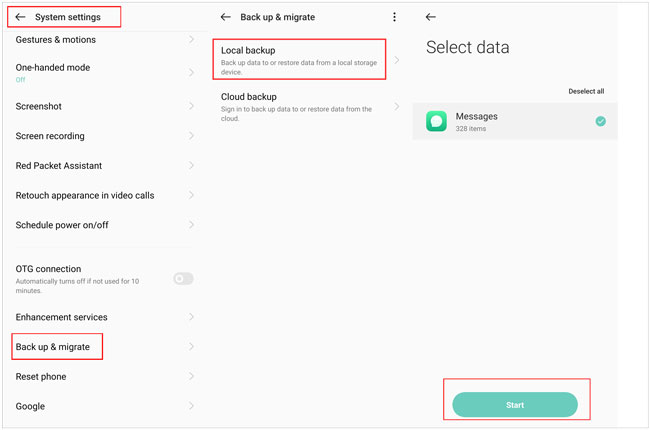
Step 1. Open the Settings app on your OnePlus phone, and click "System settings" > "Back up & migration".
Step 2. Choose "Local backup", and select the backup file you want on the screen.
Step 3. Click the "Start" icon at the bottom to restore the backup data to your OnePlus phone.
Cloud service, like Google Drive, is another way many users may use to back up their Android devices. Assume you have also backed up your OnePlus phone to Google Drive earlier. You can retrieve the deleted data from the Google Drive backup.
Here's how:
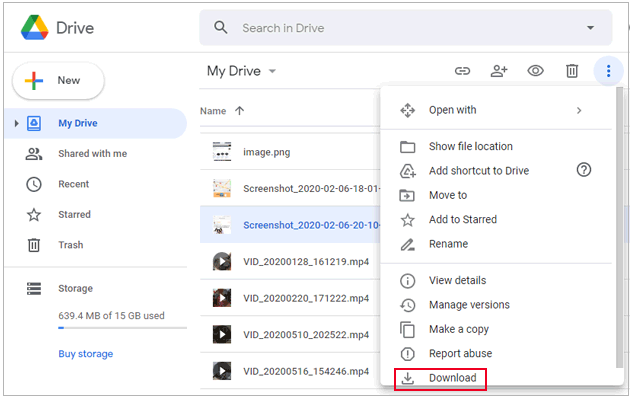
Step 1. Open the Google Drive app or visit google.com/drive on your OnePlus phone.
Step 2. Click "My Drive" and tap the file to view details.
Step 3. Pick the files you want to restore and press the "Download" icon.
Suppose you've backed up your phone's internal memory as a RAW file and enabled USB debugging on your phone previously. You can restore the deleted files with the following instructions. Note that the operation is complicated and requires your devices to be rooted beforehand.
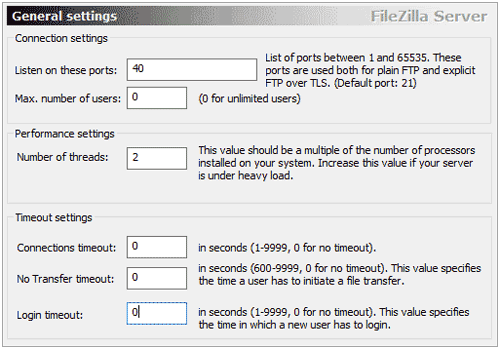
Step 1. Install and run the FileZilla server on your computer as an administrator.
Step 2. Tap its "General settings" > Type "40" in the box next to the Listen on these ports and "0" in the box next to the Connections timeout.
Step 3. Go to "Users settings" and add a new user.
Step 4. Specify the user name (for example, qwer) and set up a password for the user (for example, pass).
Step 5. Enable the read and write operations for the user and save it to C:\cygwin64\000.
Step 6. Install Android SDK on your computer from here.
Step 7. Copy the following files to the path C:\cygwin64\bin:
adb.exe
adb-windows.exe
AdbWinApi.dll
AdbWinUsbApi.dll
fastboot.exe
Step 8. Connect your Android phone to the system and ensure that you have enabled USB debugging beforehand.
Step 9. Run a command window and enter the following commands to obtain the available drives.
adb shell
su
find/dev/block/platform/-name 'mmc*' -exec fdisk -l {} \; > /sdcard/list_of_partitions.txt
Step 10. The list_of_partitions will include the phone partitions. You can copy it to a safe location with the following command:
adb pull /sdcard/list_of_partitions.txt C:/cygwin64/000
Step 11. Open the file to manually search for any information related to the missing data.
Step 12. Open a new command window and type in the following commands:
adb shell
su
mkfifo /cache/myfifo
ftpput -v -u qwer -p pass -p 40 192.168.42.79 mmcblk0p27.raw /cache/myfifo
Note: qwer and pass are the username and password, and you can replace them with yours. And they are followed by the port number and server address.
Step 13. Open another console window and input the following commands:
adb shell
su
dd if=/dev/block/mmcblk0p27 of=/cache/myfifo
Note: mmcblk0p27 is the phone location where the data gets lost, and it can vary from device to device.
Afterward, FileZilla will copy the phone data to folder 000, but the recovery process isn't completed yet.
Step 14. Download a VHD (Virtual Hard Disk) tool from here to convert the RAW file into VHD format so that you can mount it on your computer.
Step 15. Copy the VHDTool.exe file to the working folder 000 in our case.
Step 16. Open a console window again, go to the folder, and type the following commands:
cd C:/cygwin64/000 VhdTool.exe /convert mmcblk0p27.raw
Step 17. Head over to the "Disk Management" settings on your Windows PC > "Settings" > "Action" > "Attach VHD".
Step 18. Offer C:\cygwin\nexus\mmcblk0p12.raw when it asks for a location. Note that the file name may be different here.
Step 19. Right-click it and choose the "Initialize Disk" option > "GPT".
Step 20. Right-click the empty space and pick "New Simple Volume".
Step 21. Assign a new letter to the drive and disable the partitioning to complete the wizard.
Step 22. Right-click the "RAW" part and format it. The file type should be FAT 32.
Step 23. Use any free data recovery tool to scan the virtual hard disk you have just mounted. If asked, provide the letter of the VHD.
Now you've learned 5 tested methods to make the OnePlus data recovery. We strongly recommend you try Coolmuster Lab.Fone for Android if you want a reliable and user-friendly way. Also, you don't need to own a backup file to recover the deleted data. Thus, install it and give it a try.
Related Articles:
How to Recover Deleted Photos from OnePlus 13/13R and More
How to Recover Deleted Contacts from OnePlus with/without Backup
How to Recover Deleted Files on Android Without Computer [Updated]


 Free Download for PC
  Free Download for Mac

