Backing up your iPhone regularly is a smart move, and saving that backup to a Windows PC is a popular choice for a few good reasons:
There are several ways to back up an iPhone to a Windows 11 or 10 computer. Below are five of the most popular methods. Pick the one that fits your needs best.
Looking for an easy way to back up your iPhone without using iTunes or iCloud? Coolmuster iOS Assistant is a powerful tool that lets you back up and manage your iPhone data with ease. It offers two flexible backup options:
One of its biggest strengths is speed! You can transfer over 1,000 photos in just 3 minutes. Plus, it gives you the freedom to back up your data to many types of storage.
Now let's walk through the simple steps to back up your iPhone to a PC without relying on iTunes or iCloud.
01Install and launch Coolmuster iOS Assistant on your computer and plug your iPhone into the PC via a USB cable. Once connected, you will see the home interface below.

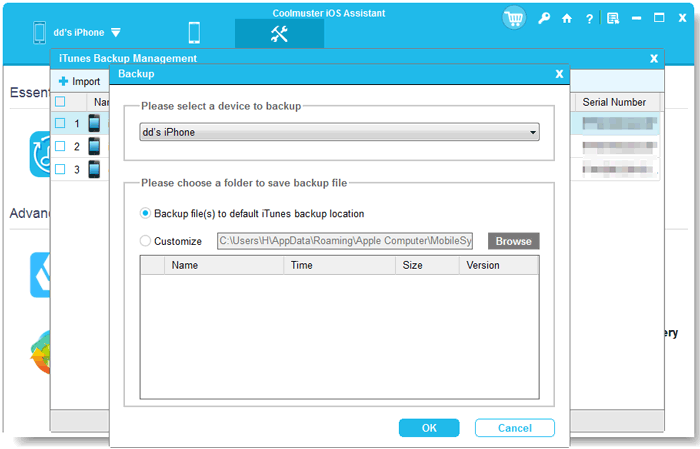
02Click "Super Toolkit" on the top > select "iTunes Backup & Restore" > "Backup". Later, choose your iPhone from the drop-down list and define a storage location on your PC to save files. After that, hit "OK" to back up your iPhone to the PC.
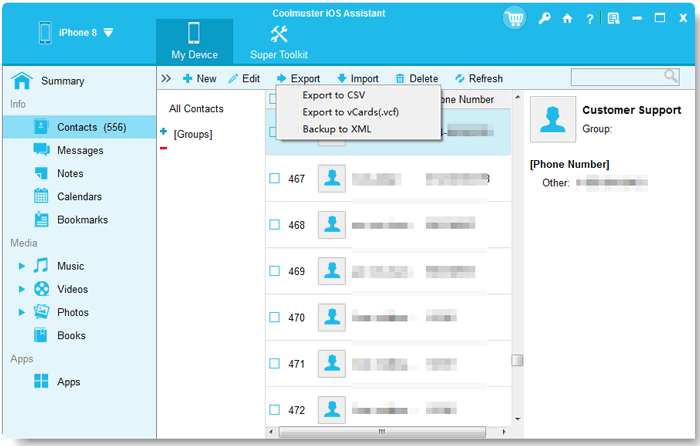
03If you only want to back up a specific file to a Windows computer, using contacts as an example, just simply access the "Contacts" folder and review additional file details, mark the contacts you wish to export to the computer, then click on the "Export" option, select the appropriate file output format, and initiate the process.
Video Tutorial:
For users who prefer Apple's native solution, this section covers the steps to back up your iPhone using iTunes on Windows 10/11. We'll explore both iTunes backup and iTunes Sync options, providing users with a comprehensive understanding of how to leverage iTunes for their backup needs.
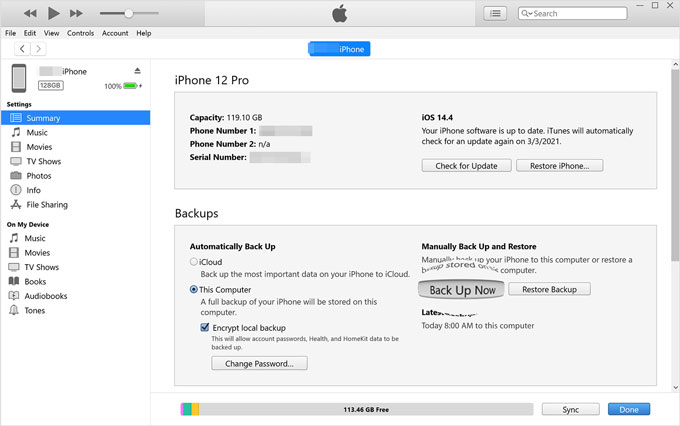
Step 1. Open iTunes on your PC and connect your iPhone using the original Apple USB cable.
Step 2. Locate and select your iPhone icon at the top-left corner of the iTunes window.
Step 3. Navigate to "Summary" and click "Back Up Now" to initiate the backup process.
Although it is one of Apple's official solutions, many people profess a violent distaste for iTunes since the backup file is unreadable on Windows PC, and the restoring process will erase the target iPhone's content. (How to find iTunes backup location?)
There are two ways you can use to back up iPhone to Windows 10/11 with iTunes sync, including the Wi-Fi method and USB method.
Step 1. Ensure both your iPhone and Windows PC are connected to the same Wi-Fi network. Subsequently, launch iTunes and establish a connection between your iPhone and iTunes using the original cable. (This step is necessary for the initial setup; however, subsequent connections won't require the use of the cable.)
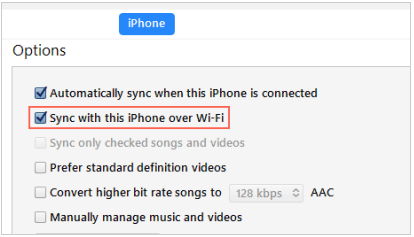
Step 2. Navigate to the "Summary" page and select "Sync with this iPhone over Wi-Fi". Finally, click the "Apply" button to save the changes.
Step 3. Disconnect the cable, and iTunes will continue to recognize your iPhone or iPad.
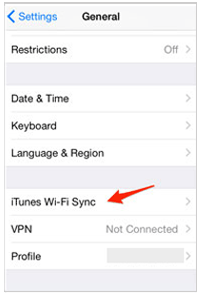
Step 4. On your iPhone, navigate to "Settings" > select "General" > locate "iTunes Wi-Fi Sync" and tap on it. Subsequently, press "Sync Now", initiating the syncing process for your iPhone.
Step 1. Open iTunes on your PC and link your iPhone to the computer using the original USB cable provided by Apple.
Step 2. Select your iPhone icon located in the top-left corner of the iTunes window.
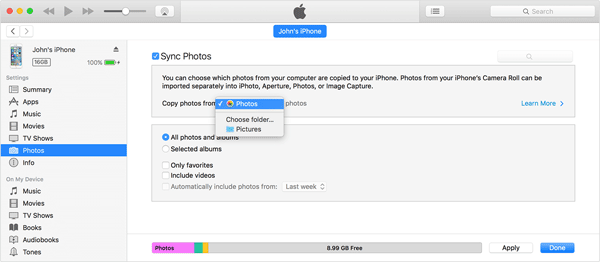
Step 3. Navigate to "Photos" in the left-side menu and mark the checkbox next to "Sync Photos".
Step 4. Follow the same procedure for other categories like Music, TV Shows, Movies, etc.
Step 5. Click "Apply" > "Sync" to finalize and execute the synchronization process.
Upon successful completion, you can access your synced data in the folder you designated for the backup on your computer.
Tips: Is your iPhone not syncing with your iTunes? Here is a troubleshooting guide you can't miss.
How do I back up my iPhone to my Windows computer without iTunes? iCloud, an Apple-provided cloud storage service, offers an alternative method for backing up your iPhone to a PC without relying on iTunes.
Upon activating iCloud, your files will synchronize seamlessly across your iPhone, iPad, and Mac devices. Once synced, you can freely access and download the iCloud backup file from your Windows PC as you want. Here is how to back up iPhone to Windows 10/11 via iCloud.com:
Step 1. Ensure your iPhone is connected to Wi-Fi or WLAN and has an adequate power supply.
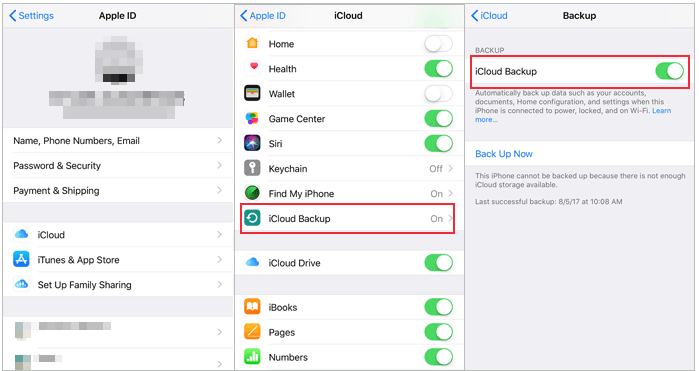
Step 2. Navigate to "Settings" on your iPhone, then select [Your name] > "iCloud" > "iCloud Backup".
Step 3. Initiate the backup process by clicking on "Back Up Now".
Step 4. Once the backup is complete, launch your computer's browser and visit www.icloud.com. Sign in with your Apple ID and choose the data you wish to back up.
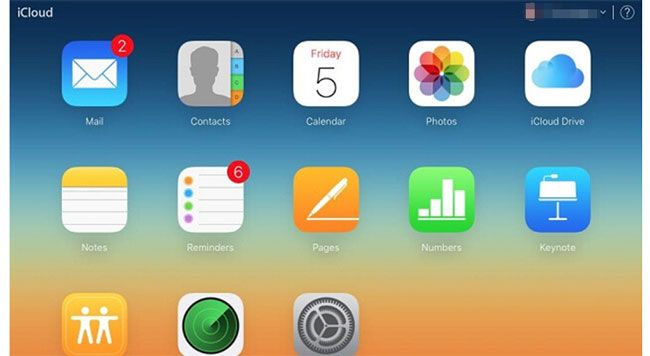
Step 5. Select the specific files you want to back up and click the "Download" button at the top of the site.
Note: iCloud only provides 5GB of free storage to everyone. So, before moving on, check if there is enough storage space in your iCloud account. If iCloud storage is not enough, you can read this article or buy more storage.
An alternative method to back up iPhone to Windows involves using the iCloud Control Panel. This Windows PC-compatible tool enables the straightforward download of photos, calendars, videos, files, emails, and various other data from iCloud to your Windows computer. Here is how to back up iPhone on Windows 11/10 via the Control Panel:
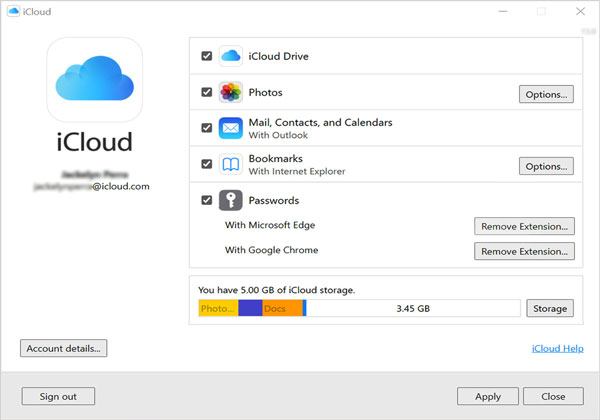
Step 1. Install iCloud for Windows on your Windows PC from the official Apple website.
Step 2. Open iCloud for Windows and sign in with your Apple ID.
Step 3. Check the box next to "Photos" and any other data you want to include in the backup.
Step 4. Click "Apply" to start the backup process.
The download capacity to your computer is restricted, and unfortunately, there's no option to preview backup files before initiating the download.
Dropbox is a handy cloud storage tool that works well across different platforms, even better than iCloud in some cases. While it doesn't let you back up your entire iPhone to your Windows 10 PC in one go, you can still upload selected files from your iPhone to Dropbox and then download them to a different drive on your computer.
Here's how to manually back up your iPhone files using Dropbox:
Step 1. Install the Dropbox app on your iPhone and log into your account.
Step 2. Open the app, choose the files or folders you want to back up, and tap the "More" option (three dots).
Step 3. Select "Export" or "Share", then tap "Save to Dropbox", and hit "Save" to upload your files.
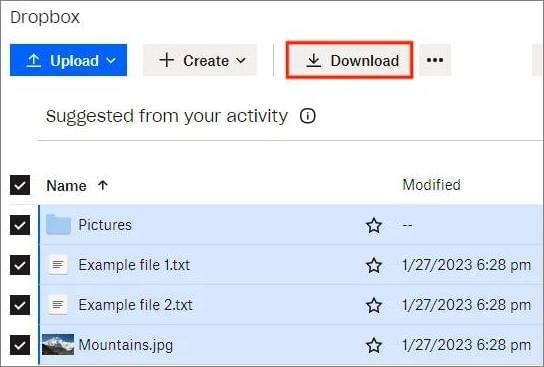
Step 4. On your Windows 10 PC, open a browser and log into your Dropbox account at the official website.
Step 5. Find the uploaded files or folders, select the ones you need, and click "Download" to save them to your desired drive on your computer.
It's a simple way to transfer specific content from your iPhone to your PC without needing iTunes or a full backup solution.
You can also back up iPhone to Windows using Windows File Explorer. However, please note that this method can only back up your photos and videos to your computer. Here is how to back up your photos and videos to your Windows computer using File Explorer:
Step 1. Connect your iPhone to your Windows computer. Then, open File Explorer.
Step 2. In the left sidebar of File Explorer, under "This PC" or "Computer", you should see your iPhone listed as a connected device. Click on it to open.
Step 3. To manually back up photos and videos, you can copy them from your iPhone to your PC. Navigate to the "DCIM" folder, where your photos and videos are stored, and copy them to a folder on your computer.

In conclusion, safeguarding the data on your iPhone is paramount, and having a reliable backup strategy is the key to ensuring you never lose precious memories or essential information. Throughout this guide, we've explored several methods for backing up your iPhone on Windows 10/11, each with its own merits.
Among the various options discussed, Coolmuster iOS Assistant stands out as an efficient and user-friendly solution. With its one-click backup feature, intuitive interface, and comprehensive capabilities, it provides a hassle-free experience for users of all levels of expertise. Consider making Coolmuster iOS Assistant your go-to tool for seamless and reliable iPhone backups.
Related Articles:
5 Methods to Back Up an iPhone without/with a Computer (Step-by-Step)
How to Back Up iPhone to Laptop in Minutes: A Complete Guide
How to Fix iPhone Backup Not Enough Space on Computer Issue (Proven Tips)


 Free Download for PC
  Free Download for Mac

