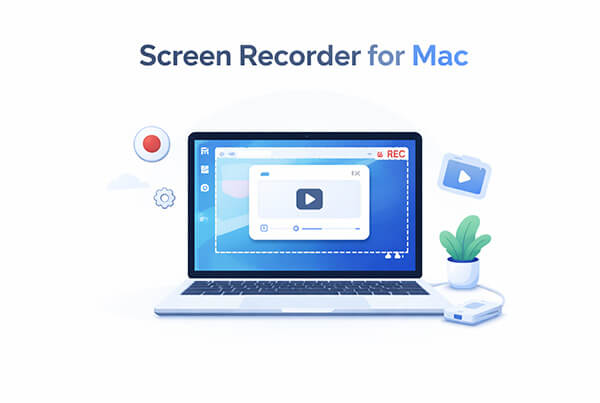
TL;DR:
We provide a comprehensive guide on how to screen record on Mac using three methods:
For users who require higher video quality and more control, Screen Recorder is a more comprehensive solution.
Screen recording on a Mac has become an essential feature for many users, whether it's for creating tutorial videos, recording online meetings, saving demonstrations, or capturing gameplay. Screen recording can be incredibly useful in all these scenarios. The good news is that macOS itself comes with a variety of built-in screen recording tools, so you can perform basic tasks without the need to install additional software. Of course, if you have higher requirements for video quality, audio, or features, third-party screen recording software would be a better choice.
In this guide, you'll learn how to screen record on Mac using three different methods, each with detailed instructions to help you easily find the best solution for your needs.
Screenshot (the screenshot tool) is an official macOS app that has been built into the system since macOS Mojave. It not only supports taking screenshots but also offers basic screen recording functionality. For users who just need to quickly record their screen without requiring complex settings, this is the simplest and most convenient method. With the Screenshot app, you don't need to install any third-party software—just use a keyboard shortcut to start recording. It's perfect for recording simple tutorials, demonstrating tasks, or creating short video content.
Here is how to record the screen in Mac using the Screen app:
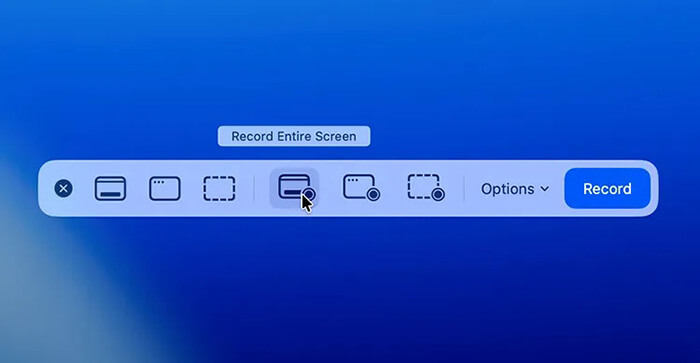
Step 1. Press "Shift" + "Command" + "5" to open the Screenshot app.
Step 2. Select your recording option: "Record Entire Screen", "Record Selected Window", or "Record Selected Portion".
Step 3. Click "Options" to adjust settings (e.g., microphone, mouse clicks, timer, save location).
Step 4. Click "Record" to start recording. If recording a selected window, click the window you want to record.
Step 5. To stop recording, click the "Stop" button in the menu bar or press "Command" + "Control" + "Esc".
Step 6. Edit the recording by clicking the thumbnail, or wait for it to save to your desktop.
QuickTime Player is another native macOS tool that supports screen recording on Mac. While it's best known as a media player, it also offers a reliable way to record your screen, especially for longer recordings.
This method is useful if you want a stable recording experience and need to preview your video immediately after recording.
Here is how to record a screen on a Mac with QuickTime Player:
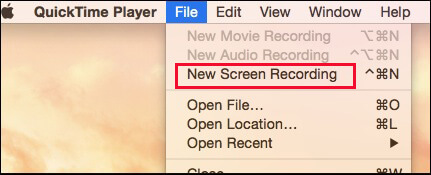
Step 1. Open QuickTime Player from the "Applications" folder.
Step 2. Choose "File" > "New Screen Recording" or press "Control" + "Command" + "N".
Step 3. Click the "arrow" next to the "Record" button to adjust settings (e.g., microphone, mouse clicks).
Step 4. To start recording, click "Record", then choose:
Step 5. To stop recording, click the "Stop" button in the menu bar or press "Command" + "Control" + "Esc".
Step 6. After stopping, QuickTime opens the recording automatically. You can play, edit, or share the recording as needed.
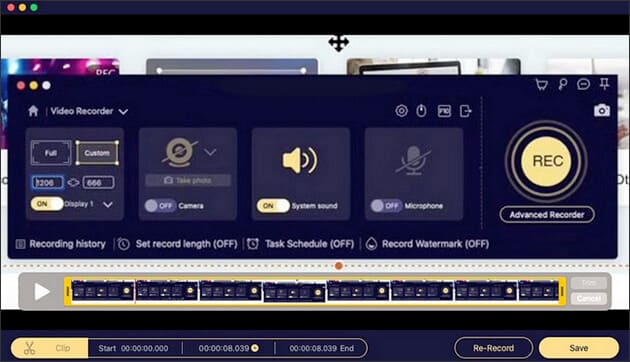
If you have higher requirements for recording, such as the need to capture both system audio and microphone sound, adjust video quality, frame rate, or perform simple post-editing, then third-party Mac screen recording software would be a better choice. Screen Recorder is a professional recording tool designed specifically for Mac users, ideal for creating tutorial videos, recording meetings, capturing gameplay, or producing high-quality presentation content.
Key features of Screen Recorder:
How do you record your screen on a Mac?
01Download, install, and launch the Mac version of Screen Recorder on your MacBook. Click the "Video Recorder" button to start recording.

02Select your recording area (Full or Custom) and enable "System Sound" or "Microphone" as needed.
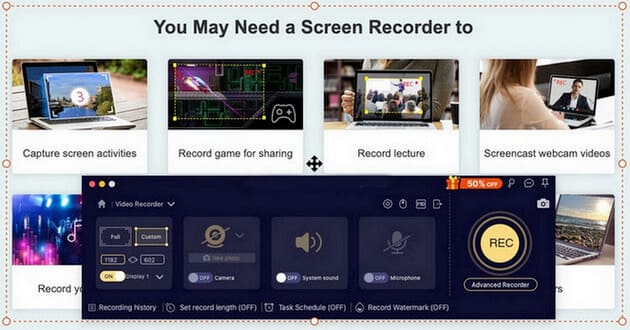
03Click the "REC" button to start recording. Once finished, preview and trim your recording to your preference.
Q1. Why is there no sound when I screen record on a Mac?
By default, macOS restricts apps from recording "System Audio" (sound from within the computer) for security and privacy reasons. To enable this, you typically need a virtual audio driver or third-party software like Screen Recorder, which includes its own audio driver.
Q2. Can I record my screen on a Mac with audio?
Yes, you can. When using the Command + Shift + 5 toolbar or QuickTime, click "Options" and select your built-in or external microphone to capture your voice while recording the screen.
Q3. Where are screen recording files saved on a Mac?
The default save location for the built-in tool is the Desktop. To change this, press "Command" + "Shift" + "5", click "Options", and select a different folder under the "Save to" section. For third-party apps, you can adjust the destination in the app's Settings or Preferences.
Now that you know how to screen record on Mac, you can choose the method that best fits your needs. Built-in tools like Screenshot and QuickTime Player are perfect for basic tasks, but if you want professional-quality screen recording on Mac, including system audio and editing features, Screen Recorder is the most complete solution.
Related Articles:
Ultimate Guide to Screen Recorders for Windows: 8 Best Tools Inside!
How to Record Screen on Windows 10/11 with Audio in 4 Useful Ways
5 Methods: How to Screen Record on Android [Hassle-Free Guide]
10 Amazing MP4 Screen Recorder Options: Record MP4 Videos Easily


 Free Download for Mac
 Free Download for PC

