How to Enable Developer Options & USB Debugging on TECNO, Infinix, itel Devices
To enable advanced features like USB debugging for app development or device troubleshooting on your TECNO, Infinix, or itel smartphone, you'll need to activate Developer Options first. Follow these steps to unlock developer settings and enable USB debugging on TECNO, Infinix, or itel phones.
Part 1. How to Enable USB Debugging on TECNO/Infinix/itel Phone
Part 2. Troubleshooting Guide for Device Connection
Part 3. Need Further Assistance?
Notes: If you don't own a TECNO, Infinix, or itel device, you can either follow the general guide on how to turn on USB debugging on Android device or refer to brand-specific instructions below:
Show USB debugging guides for other brands
Allow USB debugging on Samsung >>
Enable USB debugging on Xiaomi Mi/Redmi/POCO >>
Switch on USB Debugging on OPPO/realme >>
Enable USB debugging on OnePlus >>
Turn on USB Debugging on vivo/iQOO >>
Turn on USB debugging on Huawei/Honor >>
Open USB debugging on Motorola >>
Enable USB Debugging on Google Pixel >>
Enable USB debugging on TCL >>
Part 1. How to Enable USB Debugging on TECNO/Infinix/itel Phone
Universal steps for all three brands with version-specific notes.
For Android 11+ Devices
*(Recent models: TECNO Camon 19+, Infinix Note 12+, itel P40+)*
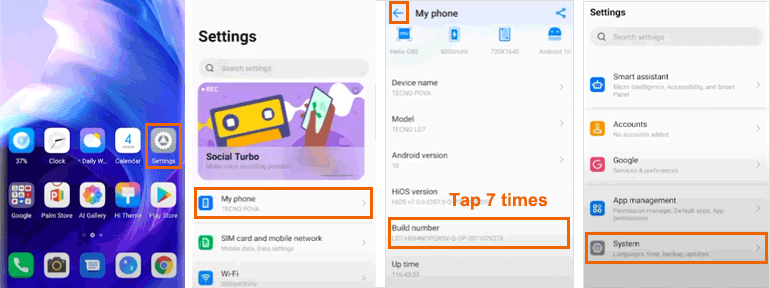
Step 1. Open Settings.
Step 2. Select My phone.
Step 3. Tap Build number 7 times rapidly until "Developer mode activated" appears. Enter lock screen PIN/pattern when prompted.
Step 4. Press Back.

Step 5. Navigate to System → Developer options.
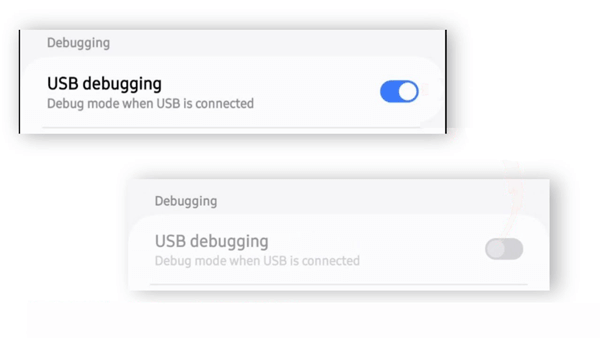
Step 6. Enable USB debugging.
Step 7. Confirm OK on security warning.
Step 8. Enable USB debugging (Security settings) and Install via USB.
* Critical for Android 13: "Disable permission monitoring" toggle might appear in Developer Options - enable it if present.
For Android 8-10 Devices
*(Older models: TECNO Spark 9, Infinix Hot 11S, itel S23)*
Step 1. Open Settings.
Step 2. Select My phone.
Step 3. Tap Build number 7 times until "You are now a developer!" appears.
Step 4. Press Back.
Step 5. Go to System → Developer options.
Step 6. Enable USB debugging.
Step 7. Confirm OK.
(No additional security toggles required)
Brand Variations:
(1) TECNO: May show "About phone" instead of "My phone" on some models.
(2) Infinix: Developer Options often under Advanced settings instead of System.
(3) itel: Might require Factory code (1122 or 1234) after step 3 on budget models.
Universal Security Practices
1. Always:
(1) Disable USB debugging after completing your task.
(2) Revoke authorizations: Developer options → Revoke USB debugging authorizations.
2. Never:
(1) Authorize USB debugging prompts from unknown computers.
(2) Enable "OEM unlocking" unless performing system-level development.
Part 2. Troubleshooting Guide for Device Connection
1. Developer Options Missing?
(1) Re-tap Build number 7 times (watch for confirmation message).
(2) On Android 13+: Complete PIN authentication during activation.
2. USB Debugging Greyed Out?
(1) Android 13+: Enable "Disable permission monitoring".
(2) All versions: Go to Settings → Security → Device admin apps and disable active administrators.
Learn more about USB Debugging greyed out on Android >>
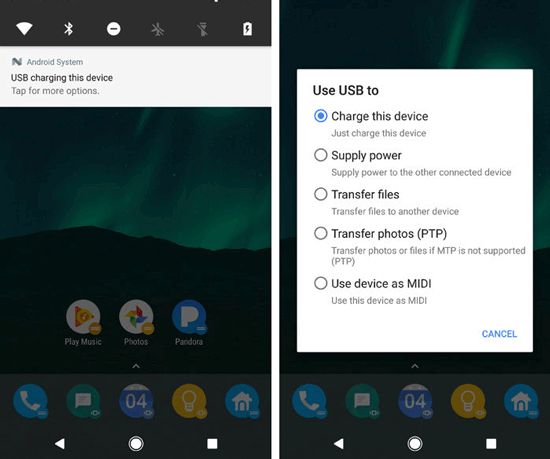
3. Computer Not Detecting Device?
(1) Swipe down → Tap "USB charging this device".
(2) Select Transfer files mode.
(3) Install brand-specific drivers.
Part 3. Need Further Assistance?
If you require additional support, please don't hesitate to contact us at support@coolmuster.com with the following details:
(1) What's your Android device's brand, model, and OS version?
(2) Describe your problems in details.
(3) Send us some screenshots to show the problems.

For other questions regarding Coolmuster products—such as installation, usage, or connectivity, please go to the Product FAQs page to explore solutions for your specific product.
Related Articles:
Failed to Connect Your Android Device to Computer via USB? Here's What to Do
What to Do If USB Debugging Enabled But Detection Still Failed?
What to Do If the Program Does Not Recognize My Android Device?
