How to Enable Developer Options and USB Debugging on Motorola Phones
This comprehensive guide provides step-by-step instructions to enable Developer Options and USB Debugging on Motorola smartphones across all Android versions. Whether you need to connect your Moto device to a computer for app development, debugging, or file transfer, these instructions will help you establish a stable connection.
Part 1. How to Enable USB Debugging on Motorola Device
Part 2. Contact Us for Further Assistance
Notice: If you are not a Motorola user, please check either the general guide on how to enable USB debugging on Android device or the specific guides on other Android brands as follows:
Show USB debugging guides for other brands
Allow USB debugging on Samsung >>
Enable USB debugging on Xiaomi Mi/Redmi/POCO >>
Activate USB debugging on TECNO/Infinix/itel >>
Switch on USB Debugging on OPPO/realme >>
Enable USB debugging on OnePlus >>
Turn on USB Debugging on vivo/iQOO >>
Turn on USB debugging on Huawei/Honor >>
Enable USB Debugging on Google Pixel >>
Enable USB debugging on TCL >>
Part 1. How to Enable USB Debugging on Motorola Phone
To switch on USB debugging mode on Motorola device, please check the following steps.
For Android 9 and Newer
*(Moto G 5G/Edge series, Razr 2022+, Android 9/10/11/12/13+)*
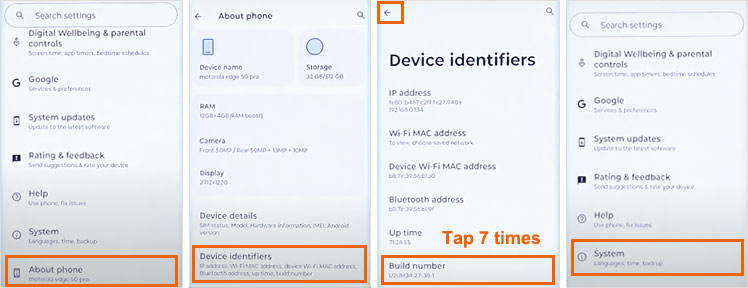
Step 1. Unlock Developer Mode
(1) Open Settings → About phone.
(2) Select Device identifiers.
(3) Tap Build number 7 times until "Developer mode enabled" appears.

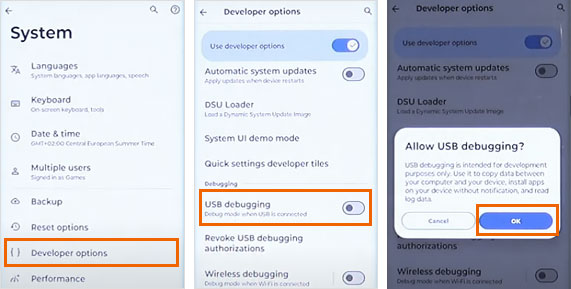
Step 2. Enable USB Debugging
(1) Press Back → Go to System → Developer options.
(2) Toggle USB debugging ON.
(3) Confirm security warning with OK.

Step 3. Complete PC Setup
(1) Connect via USB cable.
(2) Select File transfer mode when prompted.
(3) Grant permission when PC requests debugging access.
Your Motorola is now ready for ADB, flashing, or PC software connections.
Pro Tip: For wireless debugging, enable Wireless debugging option below USB debugging (Android 11+).
For Android 8.1 and Older
*(Moto G6/Z3, E5 series, Android 5-8.1)*
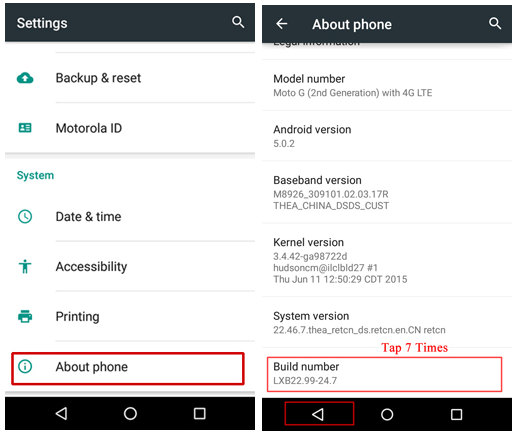
Step 1. Navigate to "Settings" on your Motorola phone.
(1) If the "Developer options" has shown up on Settings page, please skip to the next step.
(2) If you can not find "Developer options", please go to "About phone" > tap "Build number" 7 times in rapid succession. Then back to the Settings page. You will find "Developer options" here.

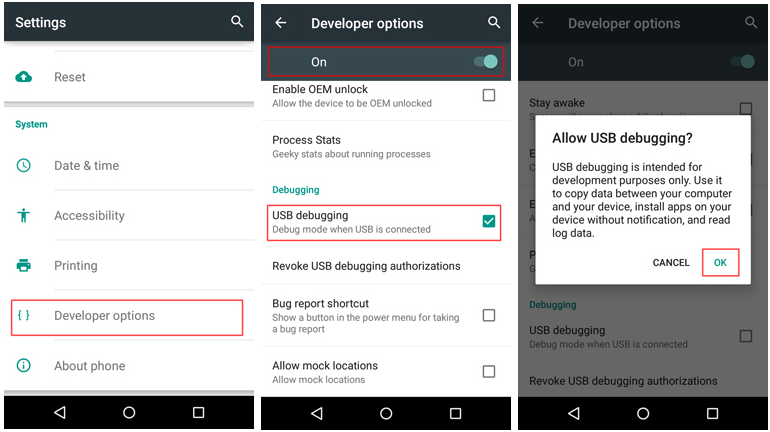
Step 2. Tap "Developer options" > switch on "Developer options" > check "USB debugging" > tap "OK" when "Allow USB debugging?" prompt appears.

Connection Security
For safe PC-to-phone linking:
(1) Always revoke USB authorizations after use (Developer options → Revoke USB debugging authorizations).
(2) Never enable "OEM unlocking" unless performing bootloader operations.
(3) Disable USB debugging when not actively using PC tools.
Part 2. Contact Us for Further Assistance
Need more help? You are welcome to contact us via email at support@coolmuster.com with your following information:
(1) What's your Android device's brand, model and OS version?
(2) Describe your problems in details.
(3) Send us some screenshots to show the problems.

For more information about Coolmuster products on connection, use and installation, please go to the Product FAQs page and open the related product's FAQs to find the solutions you need.
Related Articles:
Failed to Connect Your Android Device to Computer via USB? Here's What to Do
What to Do If USB Debugging Enabled But Detection Still Failed?
How to Fix USB Debugging Greyed Out on Android? [Solved]
What to Do If the Program Does Not Recognize My Android Device?
