As the last straw to troubleshoot an iPhone, iPad, or iPod touch, DFU mode can quickly update, jailbreak, install an older iOS version or restore your device to a normal working state in an emergency. However, it is tricky to boot an iPhone into DFU mode since it entails precise timing, and the operation varies with different iPhone/iPad models. Don't worry. This article will explain in detail how to enter DFU mode on different iPhone or iPad models.

You may have previously heard DFU mode many times on various occasions. But, what is DFU mode on iPad/iPhone on earth? iOS DFU mode, or the Device Firmware Update on iPhone or iPad, is a special mode that enables your device to communicate with iTunes, update the firmware, and restore the operating system automatically without installing iTunes.
When entering DFU mode, users can downgrade their devices to an older version of iOS, jailbreak the iPhone/iPad, un-jailbreak the iPhone/iPad, delete the iOS or iPadOS beta version, and reboot the iPhone or iPad stably.
Although iPhone/iPad DFU mode puts your devices into a recovery-similar mode, it is different from the recovery mode. DFU is a far more comprehensive mode that fixes more challenging iOS system issues and makes fewer changes to the firmware. Besides, the iPhone DFU mode will turn your device on but not yet boot it into iOS.
Well, you may also wonder what the firmware is. As the name shows, firmware is the software between the hardware and iOS operating system and provides low-level control of a device's hardware, such as the ROM, EPROM, Flash memory, etc.
The methods for putting your device in DFU mode vary from device to device because some iPhone/iPad models have a mechanical Home button while some do not. Therefore, we will illustrate how to get into DFU mode on different device models in this part.
The following steps go for iPhone 17/16/15/14/13/12/11/XS/XR/X/SE (2nd generation)/8/8 Plus:
1. Plug your iPhone into the computer that runs the latest version of iTunes, and power your iPhone off.
2. Press and quickly release the "Volume Up" button.
3. Press and quickly release the "Volume Down" button.
4. Press and hold the "Side" button until the screen goes black.
5. Press and hold the "Side" + "Volume Down" buttons for 5 seconds or so. After that, release the "Side" button but continue holding the "Volume Down" button for a while.
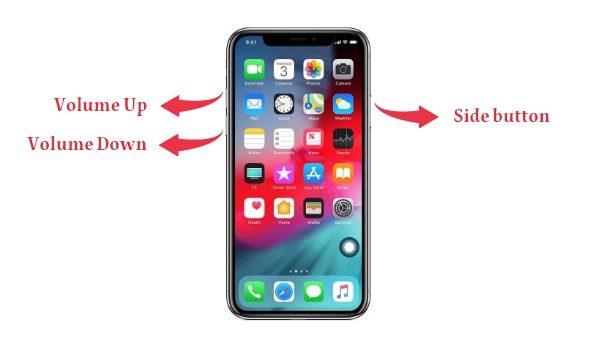
When iTunes on your computer alerts you the iPhone has entered into recovery mode, click "OK" to restore your iPhone.
![]()
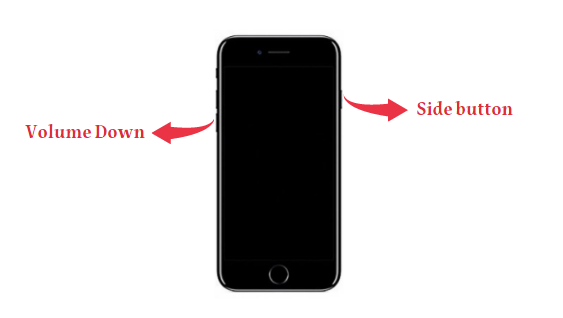
If you are using an iPhone 7 Plus/7 and want to put iPhone 7 Plus/7 into DFU mode, you can refer to these steps.
1. Power off your iPhone 7/7 Plus and plug it into your computer with a USB cable. Ensure that you have installed the latest version of iTunes on the computer.
2. Press and hold the "Side" + "Volume Down" buttons for 10 seconds and then release the "Side" button but keep holding the "Volume Down" button.
3. When iTunes pops up a message, that reads "iTunes has detected an iPhone in recovery mode. You must restore this iPhone before it can be used with iTunes.", release the button and tap "OK".
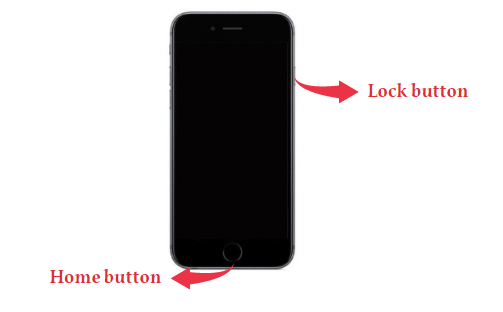
iPhone 6s is the last iPhone model with a Home button, which is released in 2015. Similarly, some iPad and iPod touch models also have the Home button. Thus, how to put iPad mini 4 in DFU mode? How to enter DFU mode on iPad Air? or how to put iPad into DFU mode?
Suppose that you have the same queries. In this case, the following instructions may be helpful to you.
1. Connect your iDevice to the computer via a USB cable and run iTunes or Finder.
2. Power off your iDevice if you don't already.
3. Press and hold the "Home" + "Lock" button for 8 seconds. Later, release the "Lock" button but continue holding the "Home" button until iTunes says your iDevice has got into the recovery mode.
If you have activated the Face ID on your iPad like iPad Pro 11-inch and later, iPad Air 4th Gen and later, you can force the iPad Pro into DFU mode with the steps below.
1. Connect your iPad with the Face ID to your computer that runs the latest version of iTunes or Finder.
2. Make sure that you have powered your iPad off.
3. Press and hold the "Side" button until the screen goes black. At this moment, keep holding the "Side" button while pressing and holding the "Volume Down" button for 10 seconds.
4. Release the "Side" button but keep holding the "Volume Down" button for another 5 seconds.
5. If you see a popup in iTunes or Finder noticing you the device has entered into recovery mode, you're done!
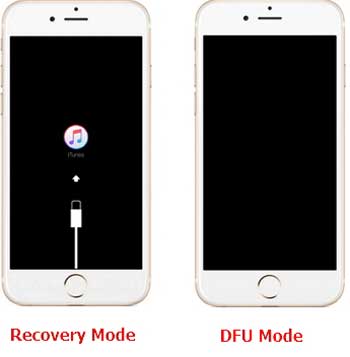
Note: During DFU mode, your iPhone, iPad, or iPod touch should go black, and nothing will display on the screen. If the Apple logo appears on the screen, you may have held down the Side or Lock button for too long.
What if you unnecessarily boot your iPhone or iPad into the DFU mode? Now, you know how to get iPhone to DFU mode. You can exit DFU mode by force restarting your device.
Before entering DFU mode, it's crucial to back up your iPhone to ensure that no data is lost in case anything goes wrong during the process. While DFU mode is useful for troubleshooting and restoring firmware, it can also erase everything on your device. Therefore, backing up your data beforehand is essential to avoid losing important information like contacts, photos, and apps.
One of the best tools to back up your iPhone quickly and easily is Coolmuster iOS Assistant. This software allows you to back up your iPhone without the need for iTunes, offering a more flexible and user-friendly experience.
Why Choose Coolmuster iOS Assistant?
How to Back Up Your iPhone Using Coolmuster iOS Assistant
01 Download and install iOS Assistant on your computer (compatible with both Windows and Mac). Open the software and connect your iPhone to the computer using a USB cable.
Ensure that your device is unlocked and you trust the computer if prompted.

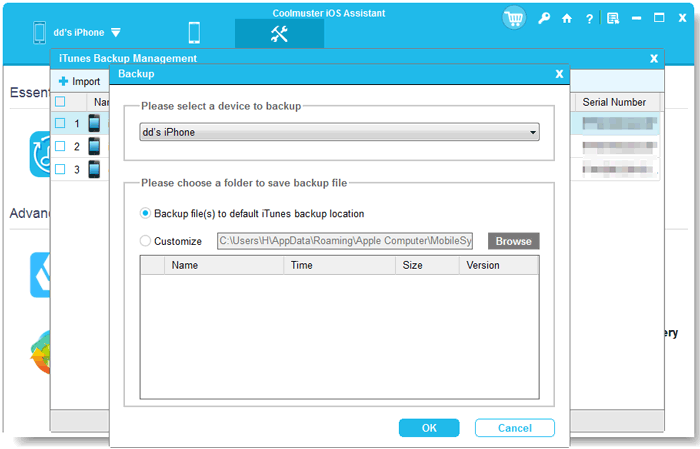
02 Switch to Super Toolkit section on the top and hit "iTunes Backup & Restore" on the interface.
03 Click the "Backup" tab and select your device for backup from the drop-down menu. You can choose the location to save the new backup files by clicking Browse option, then click "OK" to start backing up your iPhone data.
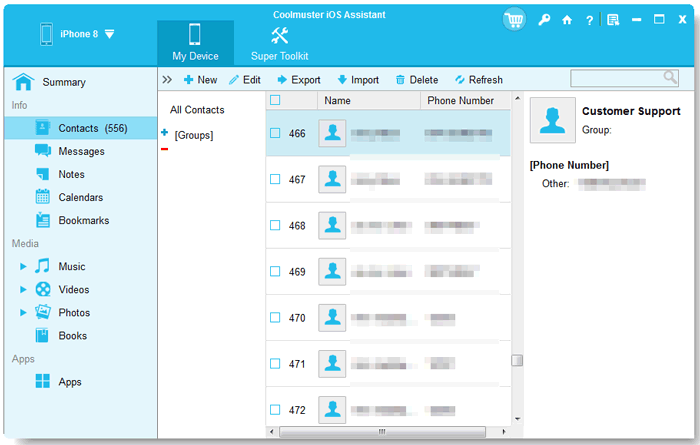
You can also selective back up your iPhone data. Once the program detects your iPhone, you can go to the left side menu, select the data types you want to back up (such as contacts, photos, messages, etc.), and then click the "Export" button to save them to your computer.
Video Guide:
While entering DFU mode is usually straightforward, users may occasionally encounter issues. Here are some of the most common problems people face when using DFU mode, along with solutions to help you resolve them.
Sometimes, despite following the steps, your iPhone or iPad won't enter DFU mode, and the screen either shows the Apple logo or the recovery mode screen instead.
Solution:
After successfully entering DFU mode, your device might get stuck in DFU mode and won't exit, even after following the proper steps.
Solution:
Even though your device is in DFU mode, iTunes or Finder doesn't recognize it or prompts with an error.
Solution:
After following the DFU mode steps, your device displays the Apple logo or shows the iTunes logo with a cable, indicating recovery mode, rather than staying black.
Solution:
Entering DFU mode, especially when restoring or updating firmware, can result in data loss.
Solution:
Some users report their device getting warm or even overheating when stuck in DFU mode for an extended period.
Solution:
DFU mode is a powerful tool for fixing iPhone and iPad issues, but it comes with its own set of potential problems. By understanding these common issues and how to address them, you'll be able to troubleshoot and resolve any problems that may arise while using DFU mode. Always make sure to back up your data before attempting any significant changes to your device, and don't hesitate to use third-party tools for extra assistance when needed.
Related Articles:
iPhone White Screen of Death? 4 Ways to Fix It
How to Fix iTunes Error 13014? [9 Methods]
How to Fix the Problem iTunes Could Not Connect to This iPhone? (6 Effective Solutions)
How to Control iPhone with Broken Screen Effortlessly? (6 Proven Ways)


 Free Download for PC
  Free Download for Mac

