TL;DR: Want to compress video for YouTube without losing quality? This guide covers 4 effective methods using Video Converter Ultimate, HandBrake, VLC, and VEED.IO to reduce video size, speed up uploads, and keep YouTube-friendly quality. Learn the best compression settings, supported formats, and simple steps to optimize your videos for YouTube.
As YouTube video quality continues to improve, 4K, 60fps, and high-bitrate videos have become common choices for many creators. However, higher-quality videos usually come with larger file sizes, which not only take up more storage space but can also result in slower uploads, longer processing times, and even affect the viewing experience. Therefore, learning how to compress video for YouTube has become an essential skill for video creators.
With the right video compression methods, you can reduce file size while preserving video quality, audio clarity, and smooth playback as much as possible. This allows videos to upload faster to YouTube and meet the platform's recommended video specifications. In this article, we will introduce 4 effective ways to compress video for YouTube. Let's take a look.

Before compressing a video for YouTube, it is important to understand YouTube's recommended upload specifications. Using the right format, resolution, and codec can help maintain the best possible quality after compression.
YouTube supports many common video formats, including MP4, MOV, AVI, WMV, FLV, WebM, and more. Among them, MP4 with the H.264 video codec and AAC audio codec is the most recommended option because it provides high quality with relatively small file sizes.
Recommended YouTube video specifications:
Recommended bitrate settings:
1080p SDR:
1440p SDR:
4K SDR:
When compressing videos for YouTube, you usually do not need to lower the resolution unless the original file is extremely large. Adjusting the codec, bitrate, and compression level is often enough to significantly reduce file size while keeping good quality.
Offline video compressors usually provide more control over output quality, resolution, codec, and bitrate. Here are three ways you can try to compress video for YouTube upload offline.
Video Converter Ultimate is a powerful video conversion and compression tool that supports Windows and Mac. It allows users to reduce video size while preserving high quality and supports popular YouTube formats such as MP4, MOV, and WebM.
Compared with basic compressors, it provides more flexible compression options, including adjusting video size, resolution, bitrate, and format. It also supports GPU acceleration, making the compression process faster for large video files.
Key features of Video Converter Ultimate:
Here is how to compress video for YouTube without losing quality:
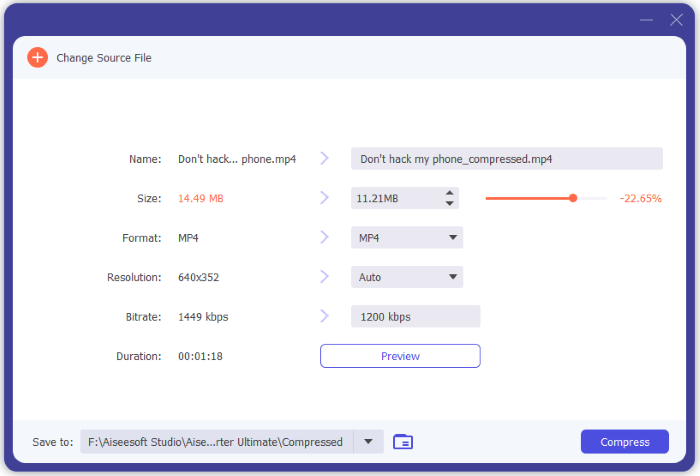
01Download and install Video Converter Ultimate on your computer, then launch the program to get ready to compress videos for YouTube.
02Open the "Video" tab from the main interface and select "Video Compressor". Add the video file you want to compress for YouTube.

03Customize the compression settings, including file size, output format, resolution, and bitrate, to optimize the video for YouTube upload. Choose a destination folder and click "Compress" to reduce the video size while maintaining the best possible quality.
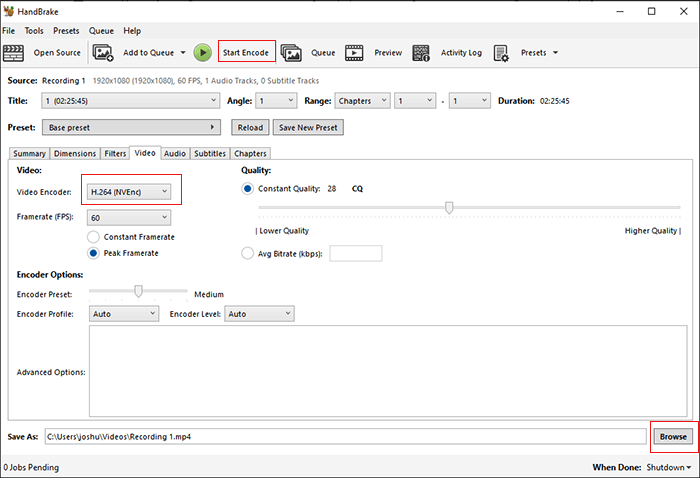
HandBrake is a free and open-source video transcoder that allows users to compress videos with advanced encoding settings. It supports Windows, Mac, and Linux, making it a popular choice among content creators.
HandBrake uses powerful codecs such as H.264 and H.265 to reduce video size while maintaining acceptable quality. However, beginners may need some time to understand its many options.
Here is how to compress video for YouTube for free using HandBrake:
Step 1. Download and install HandBrake from its official website, then launch the program on your computer.
Step 2. Click the "Open Source" button to import the video you want to compress for YouTube.
Step 3. Select a suitable preset from the Preset menu. For YouTube videos, options like "Fast 1080p30" or "HQ 1080p30 Surround" can provide a good balance between file size and video quality.
Step 4. Go to the "Summary" tab and choose "MP4" as the output format. Then open the "Video" tab and adjust settings such as encoder, frame rate, and bitrate. H.264 is recommended for better compatibility with YouTube, while H.265 can achieve smaller file sizes with similar quality.
Step 5. Click "Browse" to select the save location, then click "Start Encode" to compress the video. Once the process is complete, you can upload the smaller file to YouTube.
VLC is a popular multimedia player designed to play and stream various video and audio formats, including MP4 and AAC. Besides playback, it also provides basic video conversion and compression features that can help reduce YouTube video file sizes. Although VLC lacks advanced compression controls, it is a simple and free option for users who need a quick way to compress videos before uploading them to YouTube.
Here is how to compress video size for YouTube using VLC Media Player:
Step 1. Open VLC Media Player and navigate to "Media" > "Convert/Save".
Step 2. Click "Add" to import the video you want to compress, then click "Convert/Save" to proceed.
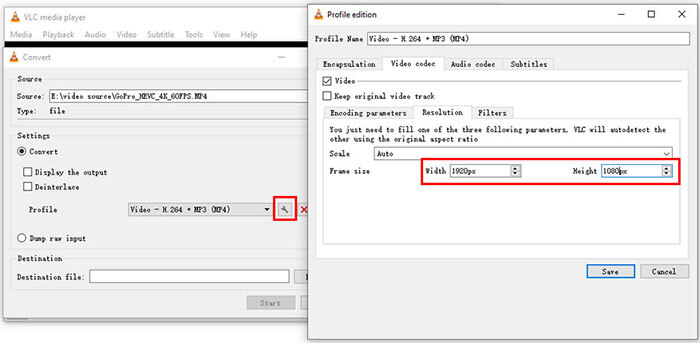
Step 3. Under the "Profile" section, select "Video - H.264 + MP3 (MP4)" as the output format for better YouTube compatibility.
Step 4. Click the "wrench" icon to customize the profile settings:
Step 5. Choose the destination file location and click "Start" to begin compressing the video for YouTube.
Want to learn more about how to compress a video using VLC? Here is a guide you can't miss.
How to Compress Video with VLC in 6 Different Ways & Best AlternativeFor users who do not want to install software, online video compressors provide a quick solution. VEED.IO is a browser-based video editing and compression platform that allows users to reduce video size directly online.
It supports common formats and provides simple compression settings, making it suitable for short videos, social media clips, and quick YouTube uploads.
Here is how to compress video online for YouTube via VEED.IO:
Step 1. Visit the VEED.IO video compressor website and upload the video you want to compress for YouTube.
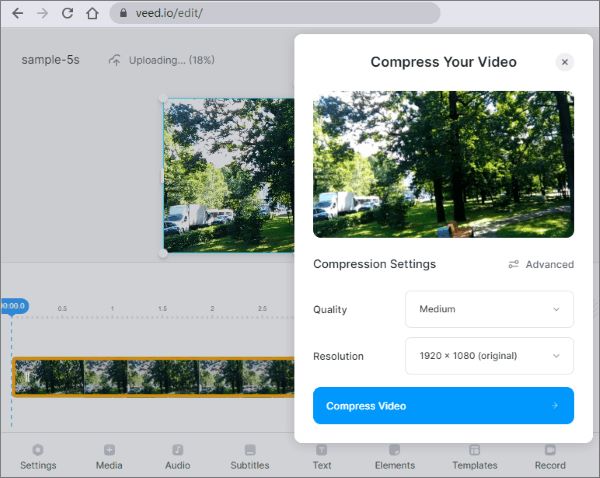
Step 2. After uploading the video, adjust the compression settings, including video quality, resolution, and output format, to reduce the file size while keeping good visual quality.
Step 3. Click the "Compress Video" button and wait for VEED.IO to process your file.
Step 4. Preview the compressed video, then download the smaller file and upload it to YouTube. For the best results, choose YouTube-friendly settings such as MP4 format, H.264 codec, and a suitable resolution.
Q1. Does YouTube compress my video after uploading?
Yes. YouTube automatically processes and re-encodes every uploaded video into different resolutions and codecs, including H.264, VP9, and AV1, to support adaptive streaming on different devices. Compressing your video with optimized settings before uploading helps provide YouTube with a high-quality source file, which can lead to better final video quality after processing.
Q2. What is the best format to upload to YouTube?
The recommended format for YouTube uploads is MP4 with H.264 video codec and AAC audio codec. This format provides excellent compatibility, efficient compression, and reliable processing results while maintaining good video and audio quality.
Q3. Can I compress a 4K video for YouTube?
Yes. You can compress 4K videos by reducing bitrate or converting them to a more efficient codec. Keeping the 4K resolution while lowering unnecessary bitrate can help reduce file size without losing too much detail.
Q4. How large should a YouTube video file be?
YouTube does not set a fixed file size limit for uploads but limits videos to 256 GB or 12 hours, whichever is less. The ideal file size depends on video length, resolution, frame rate, and bitrate.
Q5. How long should it take to upload a YouTube video?
The upload time depends on the video file size and your internet upload speed. A properly compressed 10-minute 1080p video (around 600 MB) may take approximately 5–10 minutes to upload with a 20 Mbps upload connection. Compressing a large raw video file, such as reducing it from 5 GB to 600 MB, can significantly shorten the upload time and make the process more efficient.
Compressing videos before uploading to YouTube can save storage space, reduce upload time, and maintain a better workflow for content creation. While free tools like HandBrake and VLC can handle basic compression tasks, they may require more technical knowledge or offer limited control. For users who want an easier way to compress videos while keeping high quality, Video Converter Ultimate provides a more convenient solution with flexible settings, fast processing, and support for YouTube-friendly formats.
Related Articles:
[9 Effective Ways] How to Compress a Video for Email with Ease?
[Useful Tricks] How to Download a YouTube Video Without YouTube Premium
8 Effective Ways to Download YouTube Private Videos Successfully
How to Compress Video for WhatsApp [Online & Computer & Phone Apps]




 Free Download for PC
  Free Download for Mac


