TL;DR: Want to reduce video size without losing too much quality? This guide explains how to compress video with VLC using 6 practical methods, including transcoding, lowering resolution, adjusting bitrate, changing encoding settings, optimizing audio, and trimming clips. If VLC feels too complicated, discover an easier VLC alternative that compresses videos faster with customizable size, quality, and format settings.
Large video files can quickly take up storage space, slow down uploads, and make sharing more difficult. If you are looking for a free way to reduce video size, VLC Media Player provides a simple solution without requiring expensive software. This guide will show you how to compress video with VLC while maintaining acceptable video quality. Whether you need to compress videos for email, website uploads, social media sharing, or saving storage space, VLC offers several built-in options to help reduce file size. Let's take a look at how to compress videos with VLC step by step.

To reduce the size of a video using VLC, you can try the following 6 easy ways.
Transcoding is one of the simplest ways to compress videos in VLC. It works by converting the original video into a more efficient format or codec. For example, converting a large AVI or MOV file into an MP4 file encoded with H.264 can significantly reduce the file size while maintaining good video quality.
Here is how to compress video with VLC Media Player:
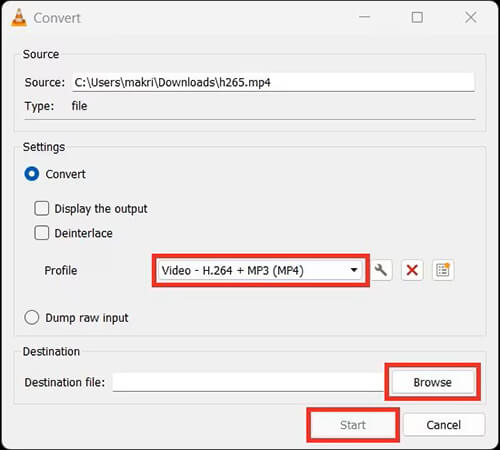
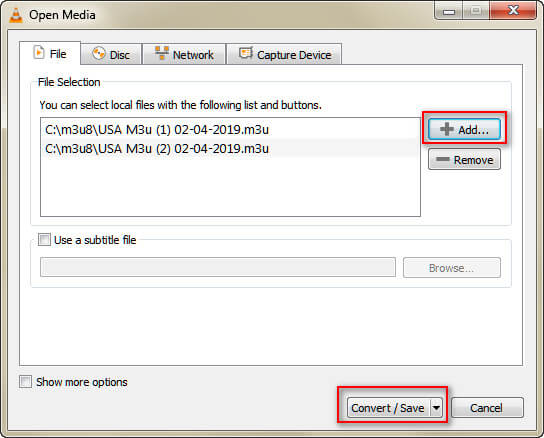
Step 1. Open VLC Media Player and go to "Media" > "Convert/Save". Click "Add" to import the video file you want to compress, then select "Convert/Save" to continue.
Step 2. Choose an output profile, such as "Video – H.265 + MP3 (MP4)" or "Video – H.264 + MP3 (MP4)", depending on your preferred compression settings.
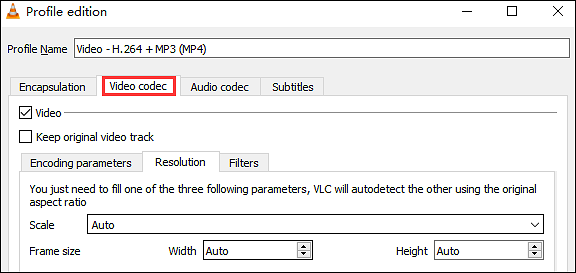
Note: If you cannot find the desired video codec, click the "wrench" icon next to the "Profile" option to open the profile settings. Then go to the "Video codec" tab to explore more codec options and customize the encoding parameters.
Step 3. Click "Browse" to select a destination folder for the compressed video, then click "Start". VLC will begin converting and compressing the video automatically.
Video resolution is one of the key factors that affects file size. High-resolution videos, such as 4K or 1080p, usually contain a large amount of data, so reducing the resolution can effectively decrease the file size. When using VLC to compress videos, you can adjust the output resolution through the profile settings.
Here is how to compress video in VLC Media Player:
Step 1. Open VLC Media Player and click "Media" > "Convert/Save". Click "Add" to import the video file you want to compress, then click "Convert/Save" to proceed.
Step 2. Select an output profile, such as "Video – H.264 + MP3 (MP4)", and click the "wrench" icon next to the profile option to edit the settings.
Step 3. Go to the "Video codec" tab, then "Resolution", and check the "Scale" option. Enter a smaller scale value, such as 0.5, to reduce the video resolution by half.
Step 4. Click "Save" to apply the new settings, then choose a destination folder by clicking "Browse".
Step 5. Click "Start" to begin compressing the video. VLC will convert the video and create a smaller file with the reduced resolution.
Video bitrate determines the amount of data required to store video information per second. A higher bitrate usually results in better video quality but also creates a larger file size. Reducing the bitrate can help decrease the overall video size.
Here is how to compress large video files with VLC:
Step 1. Open VLC Media Player and click "Media" > "Convert/Save". Click "Add" to import the video file you want to compress, then click "Convert/Save".
Step 2. Select an output profile, such as "Video – H.264 + MP3 (MP4)", and click the "wrench" icon next to the "Profile" option to edit the settings.
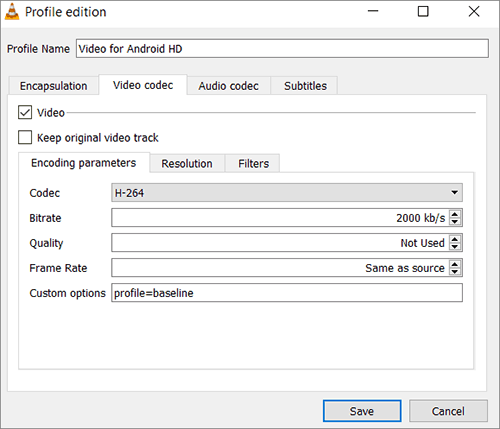
Step 3. Go to the "Video codec" tab and find the "Bitrate" option. Enter a lower value, such as reducing a 5000 kb/s bitrate to 2000–3000 kb/s, depending on your video quality requirements.
Step 4. Click "Save" to apply the new bitrate settings, then choose a destination folder by clicking "Browse".
Step 5. Click "Start" to begin the conversion process. VLC will compress the video by encoding it with the reduced bitrate and save the smaller file to your selected location.
Adjusting video encoding parameters is another way to reduce video file size in VLC. Encoding settings determine how video data is processed and compressed. By changing options such as codec, frame rate, bitrate, and other encoding settings, you can make videos smaller while maintaining reasonable image quality. VLC allows users to customize these parameters through its profile settings, providing more control over the compression process.
Here is how to compress a video file with VLC:
Step 1. Open VLC Media Player and select "Media" > "Convert/Save". Click "Add" to import the video file you want to compress, then click "Convert/Save" to continue.
Step 2. Choose an output profile, such as "Video – H.264 + MP3 (MP4)" or "Video – H.265 + MP3 (MP4)", and click the "wrench" icon to customize the profile settings.
Step 3. Open the "Video codec" tab and adjust encoding parameters, including video codec, bitrate, frame rate, and resolution. For better compression efficiency, you can choose advanced codecs like H.265/HEVC, which can reduce file size while maintaining similar video quality compared with H.264.
Step 4. Click "Save" to apply the customized encoding settings, then select a destination folder by clicking "Browse".
Step 5. Click "Start" to begin compressing the video. VLC will re-encode the video based on your selected parameters and generate a smaller output file.
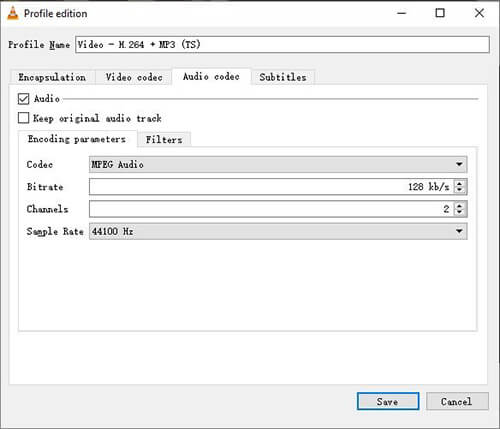
In addition to adjusting video settings to reduce file size in VLC, you can also modify audio parameters, such as the audio codec, bitrate, and sample rate. These settings can help further optimize the overall file size.
However, keep in mind that audio settings usually have a much smaller impact on video file size compared with video encoding parameters. If maintaining high video quality is your priority and you are willing to reduce audio quality slightly, adjusting audio parameters can be a useful option to try.
Here is how to compress video file size with VLC:
Step 1. Open VLC Media Player and go to "Media" > "Convert/Save". Click "Add" to import the video file you want to compress, then click "Convert/Save".
Step 2. Select an output profile, such as "Video – H.264 + MP3 (MP4)", and click the "wrench" icon next to the "Profile" option to customize the settings.
Step 3. Open the "Audio codec" tab and adjust the audio encoding settings. You can choose a more efficient audio codec, reduce the bitrate, or lower the sample rate to decrease the audio file size.
Step 4. Click "Save" to apply the new audio settings, then click "Browse" to select a destination folder for the compressed video.
Step 5. Click "Start" to begin the conversion. VLC will re-encode the video with the modified audio parameters and create a smaller file.
Another way to reduce video size is to remove unnecessary parts. Although VLC Media Player does not directly support video trimming or cutting, you can use its recording feature to capture only the important or required sections of the video. This allows you to reduce the video file size with VLC without affecting the video quality.
Here is how to compress video files with VLC:
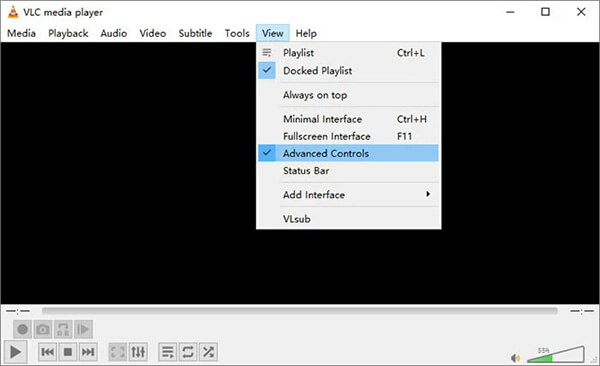
Step 1. Open VLC Media Player and import the video you want to compress. Go to "View" > "Advanced Controls" from the top menu to enable the recording toolbar, which will appear at the bottom of the playback window.
Step 2. Play the video or drag the progress bar to locate the starting point of the section you want to keep.
Step 3. Click the red "Record" button to start capturing the selected part of the video. When the playback reaches the ending point, click the "Record" button again to stop recording. VLC will automatically save the trimmed clip as a new video file in your default Videos folder, helping reduce the overall file size.
Although VLC can compress videos for free, its compression process is not always easy to understand. Users need to manually adjust codecs, bitrate, resolution, and encoding parameters, which can be confusing for beginners. In addition, VLC does not provide a dedicated compression preview feature, making it difficult to know the final file size before processing.
For a simpler and more efficient way to reduce video size, Video Converter Ultimate is a powerful VLC alternative. It provides a dedicated video compressor that allows users to shrink large video files with just a few clicks while maintaining high quality.
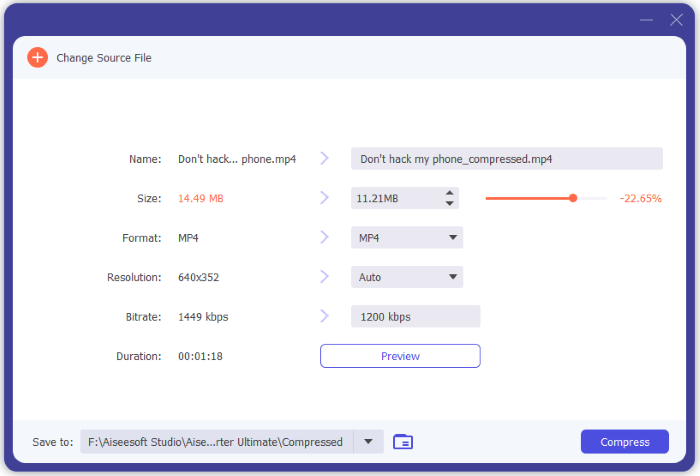
With this tool, you can directly adjust the video size, resolution, bitrate, and output format before compression. The built-in preview feature helps you check the result before exporting, making it easier to achieve the ideal balance between quality and file size.
Key features of Video Converter Ultimate:
Here is how to compress a video without losing quality via Video Converter Ultimate:
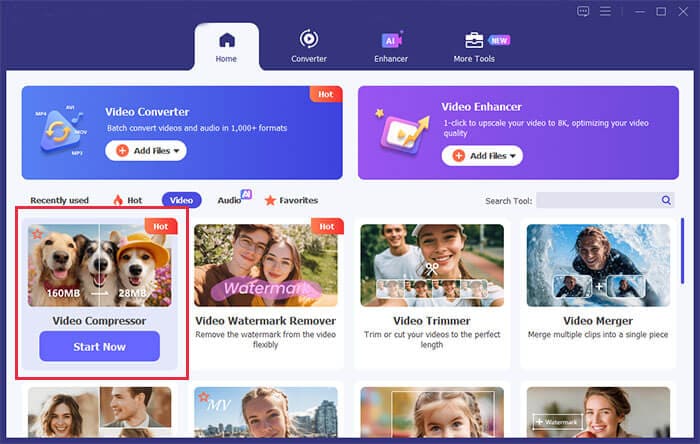
01Launch the program and select "Video Compressor" from the "Video" tab on the main interface.
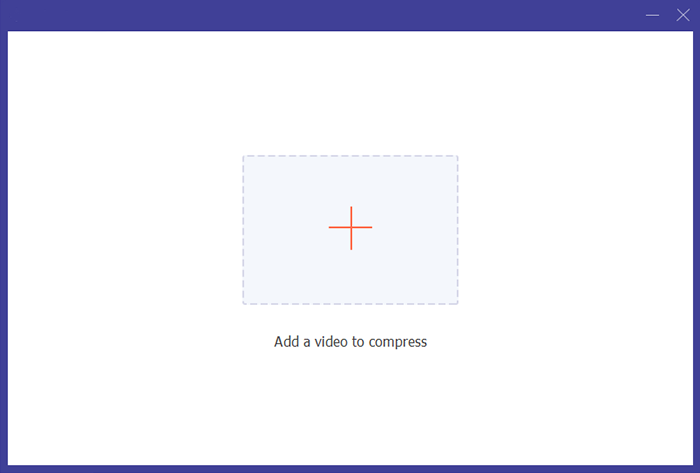
02Add the video file you want to compress, then adjust the output settings according to your needs, including file size, file name, format, resolution, and bitrate.
03Select a folder to save the compressed video, then click "Compress" to begin reducing the video file size. Once the process is complete, the compressed video will be saved to your chosen location.
VLC Media Player provides several ways to compress videos, including transcoding, reducing resolution, adjusting bitrate, changing encoding settings, modifying audio parameters, and trimming unwanted parts. Although these methods are free, they may require technical knowledge and careful configuration to achieve the desired results.
If you want a faster and easier solution to reduce video size while keeping good video quality, Video Converter Ultimate is a better choice. With its dedicated compression tools, flexible settings, and simple interface, it helps you compress large videos efficiently for storage, sharing, and online uploading.
Related Articles:
How to Reduce MP4 File Size Without Losing Quality [7 Easy Ways]
How to Compress Video for YouTube Upload [Offline & Online Tools]




 Free Download for PC
  Free Download for Mac


