TL;DR: Want to know how to screen record on Windows 10/11 without Xbox Game Bar? This guide covers 4 easy ways to capture your screen, including using Coolmuster Screen Recorder, Snipping Tool, Microsoft PowerPoint, and VLC. Whether you need to record tutorials, meetings, gameplay, or desktop activities, these methods help you create high-quality screen recordings quickly and easily.
For a smoother experience with advanced features like audio recording, custom screen areas, and unlimited recording, Coolmuster Screen Recorder is a reliable choice.
Windows' built-in Xbox Game Bar is often the first tool that comes to mind when users want to record their screen. However, it is mainly designed for game recording and comes with some limitations. For example, it cannot record certain desktop areas or File Explorer windows, and it may fail to launch properly on some computers.
So, how to screen record on Windows without Game Bar? Whether you are using Windows 10 or Windows 11, there are several alternative solutions available for screen recording. This article will introduce several simple and effective methods to help you record your Windows screen without using Game Bar.
Coolmuster Screen Recorder is a powerful screen recording tool that serves as a great alternative to Xbox Game Bar for Windows users. It allows you to record the full screen or selected areas and save videos in high-quality MP4 format. With support for system audio and microphone sound, it helps you create clear recordings for tutorials, meetings, gameplay, and presentations. The software also includes screenshot tools and no recording time limits, making it an easy and reliable choice for anyone looking for how to screen record on Windows without Game Bar.
Key features of Coolmuster Screen Recorder:
Here is how to screen record on Windows without Xbox Game Bar via Coolmuster Screen Recorder:
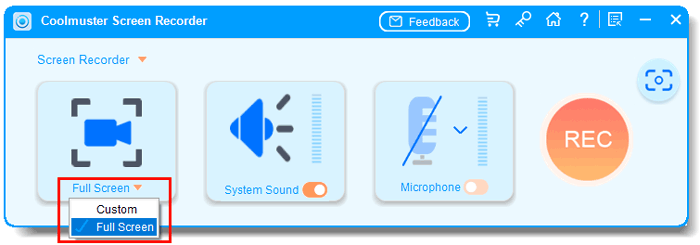
01Launch Coolmuster Screen Recorder on your Windows PC and choose the recording area. You can select "Full Screen" to capture the entire display or choose "Custom" to record a specific region.
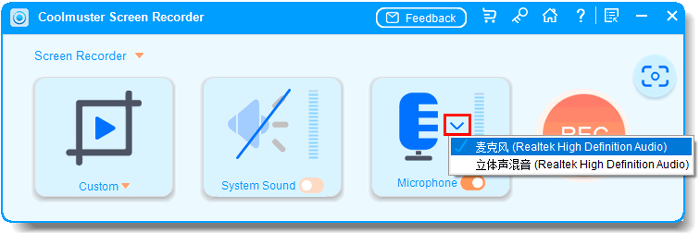
02Adjust the audio settings based on your needs. Enable "System Sound" to capture computer audio, turn on "Microphone" for voice recording, or disable both for a silent screen recording.
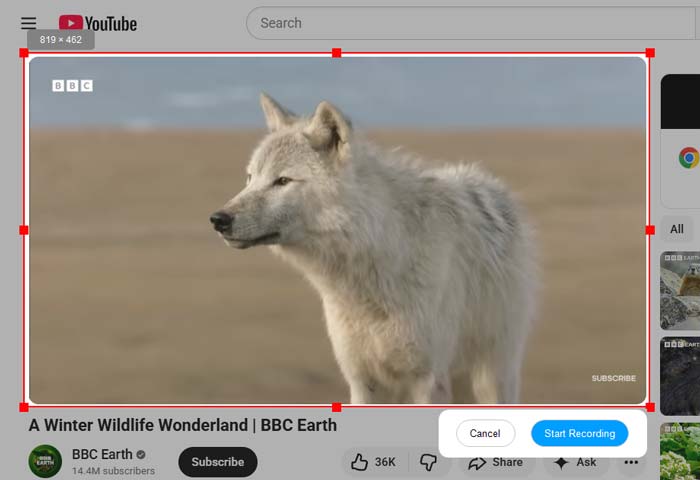
03Click the orange "REC" button and select "Start Recording". The software will begin capturing your screen after a short countdown.
04When you finish recording, click "Stop Recording". The recorded video will be saved as an MP4 file on your computer, and you can quickly copy or share the recording as needed.

Video Tutorial:
Windows 11 users can also use the built-in Snipping Tool for screen recording. Microsoft has added a screen recording feature to the updated Snipping Tool, allowing users to record their screen without installing additional software or relying on Game Bar. This method is ideal for quickly capturing simple video content, such as step-by-step guides, software demonstrations, or short video clips.
Here is how to screen record on Windows 11 without Xbox Game Bar with the Snipping Tool:
Step 1. Open the "Start" menu and search for "Snipping Tool". If it is not installed on your Windows 11 computer, you can download it from the Microsoft Store.
Step 2. Launch Snipping Tool and click the "camera" icon to switch from screenshot mode to screen recording mode. Then, select "New" and drag to choose the area of the screen you want to record.
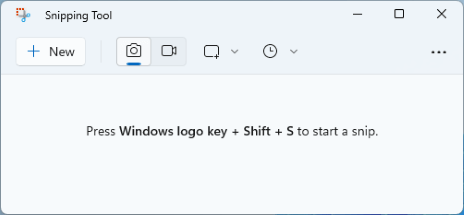
Step 3. Click the "Microphone" icon on the recording toolbar to select your preferred microphone or headset. If you only want to capture video without sound, you can turn off microphone recording.
Step 4. Click the "Start" button to begin recording your selected screen area.

Step 5. Once you finish recording, click the "Stop" button. Snipping Tool will automatically open a preview window where you can review the recorded video.
Many users may not know that Microsoft PowerPoint also comes with a built-in screen recording feature. In addition to creating presentations, it allows you to record your computer screen and directly insert the video into slides or save it as a separate file. This method is especially useful for creating tutorials, recording office workflows, and making training videos.
Here is how to screen record on a Windows 10 laptop without Game Bar using Microsoft PowerPoint:
Step 1. Open Microsoft PowerPoint on your Windows 10/11, create a new presentation, and click the "Insert" tab.
Step 2. Select "Screen Recording" from the "Media" section. PowerPoint will minimize and open the screen recording toolbar.
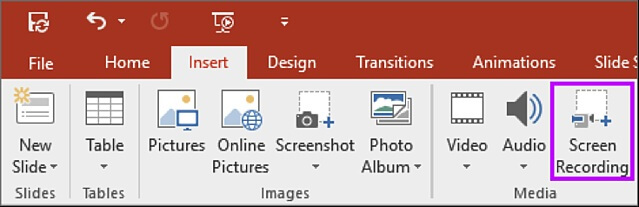
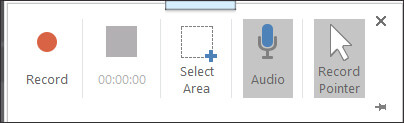
Step 3. Click "Select Area" to choose the part of the screen you want to capture. You can also enable "Audio" and "Record Pointer" if needed.
Step 4. Click the "Record" button to start recording your screen. When finished, click the "Stop" button on the toolbar to end the recording.
Step 5. The recorded video will be inserted into your PowerPoint slide automatically. Right-click the video, select "Save Media As", and save it as a separate video file.
Many users may not know that VLC is not only a video player but also supports basic screen recording. If VLC is already installed on your computer, you can use it to record your desktop activities directly without installing additional software. (How to compress a video using VLC?)
Here is how to record your screen on Windows 10/11 without Game Bar using VLC:
Step 1. Open VLC Media Player on your Windows 10/11 computer, click "Media" in the top menu, and select "Open Capture Device".
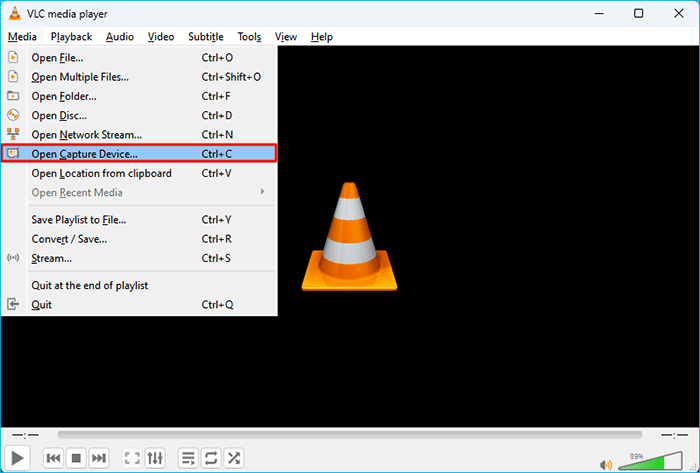
Step 2. In the "Capture Device" tab, change the "Capture mode" option to "Desktop". Then, set the desired frame rate for your screen recording.
Step 3. Click the drop-down arrow next to "Play" and select "Convert". Choose a destination file and select a video format such as MP4 for the recording output.
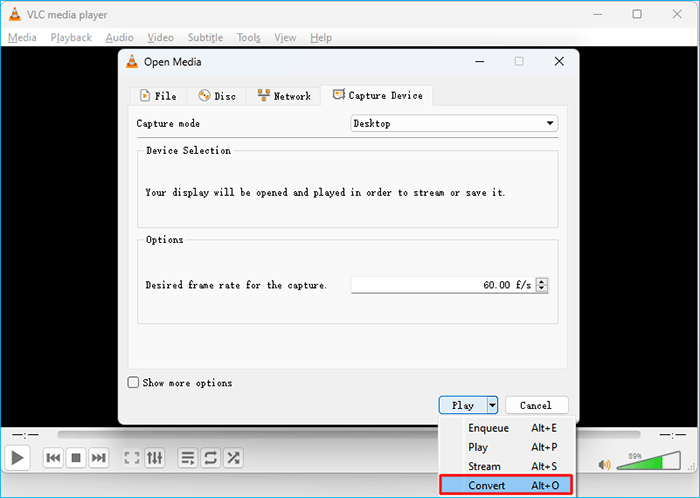
Step 4. Click "Start" to begin recording your desktop screen. VLC will capture all activities displayed on your screen.
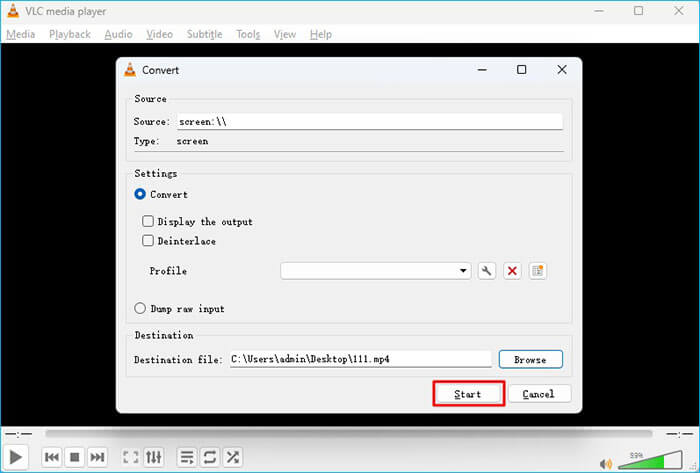
Step 5. When you finish recording, return to VLC and click the "Stop" button. The recorded video will be saved automatically to the location you selected.
That's all about how to screen record on Windows 10/11 without Xbox Game Bar. If you want a simple, stable, and professional way to record your Windows screen without Game Bar, choosing the right screen recorder can make the process much easier. Among the available choices, Coolmuster Screen Recorder stands out with its flexible recording options, smooth performance, and user-friendly design, making it an ideal solution for anyone who wants to screen record on Windows without Game Bar.
Related Articles:
Ultimate Guide to Screen Recorders for Windows: 9 Best Tools Inside!
How to Record a Teams Meeting on Windows, Mac & Mobile Devices?
How to Record Roblox on PC, Mac & Mobile Easily: Step-by-Step
How to Record Gameplay on Xbox One: Complete Step-by-Step Guide






 Free Download for PC


