Many players, when playing Roblox, wish to capture exciting moments, such as uploading them to YouTube, sharing on social media, or simply saving their game highlights. However, many may wonder: how to record Roblox? In fact, there are many ways to do it; whether you're using a computer or a phone, you can easily record your gameplay. This article will teach you several simple and practical methods to record Roblox.
If you're looking for a quick and easy way to record Roblox without downloading any extra software, Roblox's built-in recorder is the perfect choice. Designed specifically for Roblox players, this built-in tool is free, accessible to all users, and works on both desktop and mobile devices. It allows you to capture short clips (up to 30 seconds) of your gameplay with just a few clicks, making it ideal for sharing quick moments with friends or social media. While it doesn't have advanced features like audio customization or long recording times, it's the most convenient option for casual recording.
Below is a detailed step-by-step guide to using Roblox's built-in recorder to record Roblox gameplay:
Step 1. Open Roblox and start the game you want to play and record.
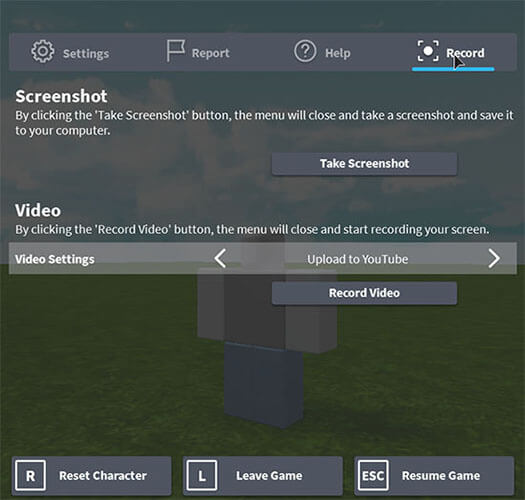
Step 2. Press the "Esc" key to open the menu, then go to the "Record" tab at the top.
Step 3. Click the "Record Video" button to start recording. A faint red border will appear around the screen, indicating that recording is active.
Step 4. To stop recording, press "Esc" again to reopen the menu, return to the "Record" tab, and click "Stop Recording".
Note: Roblox's built-in recording tool does not capture voice chat or in-game audio, and it removes UI elements from the video to keep the visuals clean. It is better suited for short clips rather than professional or long-form content.
Here are four simple and reliable ways to record your Roblox gameplay on a computer. Pick the one that fits your needs and get ready to start recording.
Screen Recorder is our top recommendation for recording Roblox on PC and Mac, thanks to its user-friendly interface, powerful features, and high-quality output. This tool allows you to record Roblox gameplay in 4K HD, capture both system audio (game sounds) and microphone audio (your commentary), and even add webcam footage for a more engaging video. It also offers flexible recording modes, so you can record the entire screen, just the Roblox window, or a custom area. Best of all, it's easy to use—even for beginners—and works seamlessly with Roblox.
The main features of Screen Recorder:
* Record Roblox on both Windows and Mac effortlessly.
* Select any area of your screen to record with complete flexibility.
* Capture both system audio and microphone sound at the same time.
* Record your Android or iPhone screen while connected.
* Export your recordings in popular formats like MP4, AVI, and MOV.
* Enhance your recordings in real-time by adding text, shapes, and other elements.
Follow these steps to record Roblox using Screen Recorder:
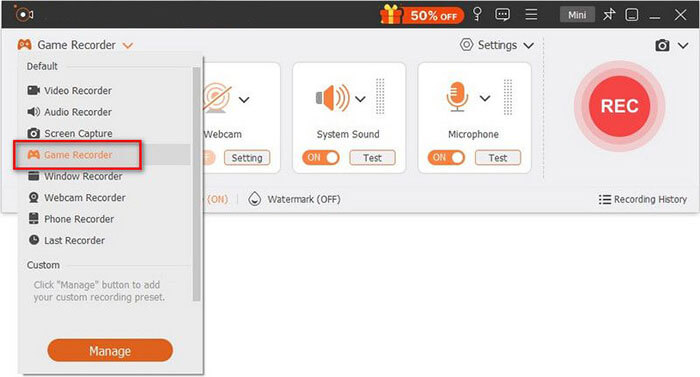
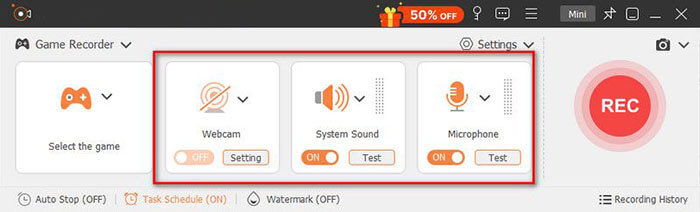
01Open Screen Recorder when you're ready to capture your Roblox gameplay. Choose the dedicated "Game Recorder" option to record your session.
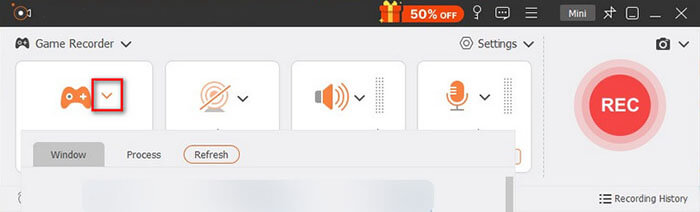
02In the "Select the Game" panel, click the down arrow to pick your active game from the list. The recorder will automatically adjust the capture area to fit your game window.
03If you want to capture audio, enable both "System Sound" and "Microphone". To include yourself in the video, turn on the "Webcam" and tweak the settings as needed. Press "REC" to start recording your Roblox video. You can pause and resume the recording anytime.
04Once you're done, you can instantly preview and edit the video. Finally, click "Export" to save your Roblox video in WMV/MP4 format to your PC.
OBS Studio is a free, open-source screen recorder and streaming tool that's popular among gamers for its flexibility and advanced features. It's ideal for users who want to record Roblox gameplay for free while having control over settings like resolution, frame rate, and audio.
Here is how to use OBS to record Roblox:
Step 1. Download and install OBS Studio from the official website, then open it once so it can automatically set up the basic configuration on your computer.
Step 2. Open OBS and look at the bottom section called "Sources" (this is where you add what OBS records).
Step 3. Click the "+" button inside the Sources box, then choose "Game Capture" from the list of options.
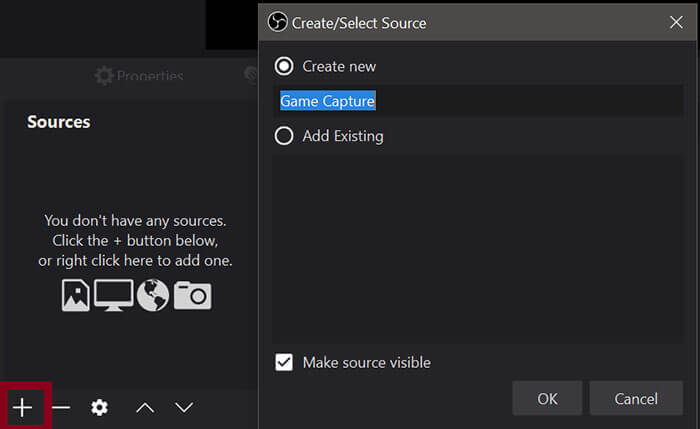
Step 4. In the Game Capture settings window, set the mode to "Capture specific window", then open the "Window" dropdown menu and select "RobloxPlayerBeta.exe" (make sure Roblox is already running; it may not appear).
Step 5. Go to "Settings" in OBS, then open the "Video" tab to adjust your recording quality.
Step 6. Once everything is set up, return to the main OBS window and click "Start Recording". At this point, OBS will begin capturing your Roblox gameplay along with audio if it is configured correctly.
Step 7. When you are finished recording, click "Stop Recording". OBS will automatically save your video file to the recording folder you selected in Settings, and you can open that folder to view or edit your recording.
If you are searching for the best alternatives to OBS Studio, you can read this article.
Top 8 OBS Screen Recorder Alternative Tools for Easy RecordingIf you're a Mac user and don't want to download third-party software, QuickTime Player, Apple's built-in media player, can also be used to record Roblox gameplay. QuickTime Player is free, pre-installed on all Macs, and easy to use, making it a convenient option for casual recording. (How to record a screen on Mac?)
Here is how to record Roblox on Mac via QuickTime Player:
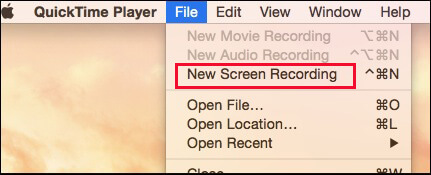
Step 1. Open QuickTime Player on your Mac (you can find it in the "Applications" folder or search for it using Spotlight).
Step 2. Click "File" in the top menu bar, then select "New Screen Recording" to open the recording window.
Step 3. Click the "small arrow" next to the record button to choose your microphone (if you want to add commentary), and you can also enable "Show Mouse Clicks" if needed.
Step 4. Open Roblox and adjust the game window to a suitable position. Then click "Record" and choose whether to capture the entire screen or a selected portion.
Step 5. When you finish recording, click the "Stop" button (a square icon) in the menu bar, or press "Command" + "Control" + "Esc". The recorded video will automatically open in QuickTime Player.
Windows 10 and 11 users have a built-in game recording tool called Xbox Game Bar, which is designed specifically for recording gameplay, including Roblox. Xbox Game Bar is free, pre-installed on all Windows devices, and requires no extra downloads or setup, making it a quick and easy option for recording Roblox on PC. It's ideal for casual users who want to capture short clips or screenshots without any hassle.
Follow these steps to record Roblox on Windows with Xbox Game Bar:
Step 1. Open Roblox and enter the game you want to record. It is recommended to run it in full-screen or windowed mode.
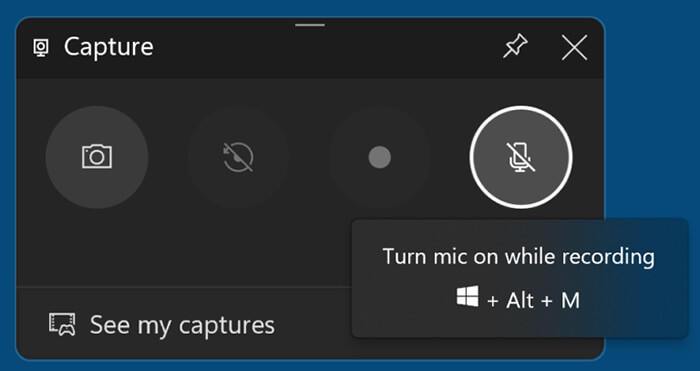
Step 2. Press "Windows" key + "G" to open the Xbox Game Bar (you can also press the "Xbox" button on a controller).
Step 3. Click the "Record" button (circle icon), or press "Windows" key + "Alt" + "R" to start recording.
Step 4. Play Roblox normally. The recording will capture gameplay and audio automatically, and a recording status will appear in the top-right corner.
Step 5. Press "Windows" key + "Alt" + "R" again to stop recording. The video will be automatically saved in the "Videos" > "Captures" folder.
Note: Please click here to learn more ways to screen record on Windows.
Playing Roblox on your phone and want to share your gameplay with friends or followers? Good news—you can easily record your sessions directly on your mobile device, whether you're using an Android phone or an iPhone. This part will introduce how to record yourself playing Roblox on your phone.
Apple devices include a native screen recording feature that allows you to easily record Roblox gameplay on iPhone or iPad. This method is perfect for quick recordings without installing extra apps.
Here is how to record Roblox on iPhone/iPad:
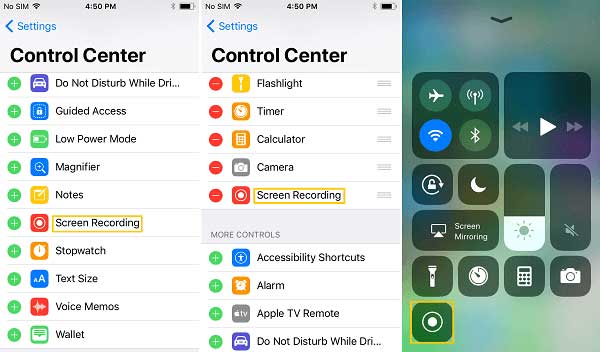
Step 1. Unlock your iPhone or iPad, then go to "Settings" > "Control Center" > "Customize Controls". Tap the "+" next to "Screen Recording" to add it to your Control Center.
Step 2. Open Roblox. Swipe down from the top-right corner (or up from the bottom on older devices) to open Control Center. Tap and hold the "Screen Recording" button, then tap "Start Recording" after the 3-second countdown begins.
Step 3. When you're finished, open Control Center again and tap the "Stop" button (or the red status bar) to end the recording. Your video will be saved automatically in the Photos app, where you can view and share it. (iPhone screen recording not working?)
Most Android phones (running Android 10 or later) also have a built-in screen recording feature that can be used to record Roblox gameplay. The exact steps may vary slightly depending on your phone's brand (e.g., Samsung, Google Pixel, Xiaomi), but the general process is similar. If your phone doesn't have a built-in screen recorder, you can download a free third-party app like AZ Screen Recorder, but the built-in tool is the easiest option.
Here is how to record Roblox on a Samsung phone:
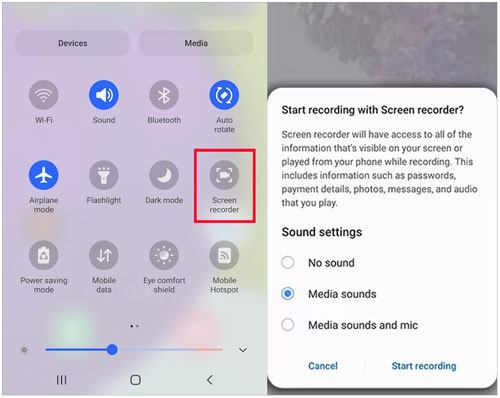
Step 1. Swipe down from the top of the screen to open Quick Settings. Find and enable "Screen Recorder"; if it's not available, add it first by editing the Quick Settings panel.
Step 2. Open Roblox and enter the game you want to record.
Step 3. Swipe down again to open Quick Settings, then tap "Screen Recorder". You can choose to enable audio and microphone if needed.
Step 4. Tap "Start", wait for the countdown to finish, and then begin playing Roblox normally.
Step 5. When you're done, tap "Stop". The video will be automatically saved to your Gallery/Photos app or the "Screen Recordings" folder.
That's the complete guide on how to record Roblox. From Roblox's built-in recording tools to professional desktop software and mobile screen recording, each method has its own use case.
If you only need simple recordings, you can use the built-in tools or your device's screen recorder. However, if you want to create high-quality videos, upload content to YouTube, or do more serious content creation, Screen Recorder is a better choice—it's easy to use, powerful, and can meet almost all your recording needs.
Related Articles:
How to Record Live TV: A Complete Guide for All Devices
Step-by-Step Guide to Screen Record on Dell Laptop in Minutes
[Solved] How to Fix PowerPoint Screen Recording Not Working?
10 Best Game Recording Software to Record Gameplay Without Hassle


 Free Download for PC
  Free Download for Mac

