When switching to a new phone, many users move from Android to iPhone. But if you've already completed the initial setup of your iPhone and haven't had the chance to transfer your photos yet, what should you do? Unfortunately, Apple's official migration tool only works during the initial setup process, which makes things a bit tricky afterward.
The good news is that there are still several effective ways to transfer photos from Android to iPhone after setup. We will introduce a variety of practical methods in detail to help you easily complete the photo transfer.
If you want the fastest and easiest way to transfer photos from Android to iPhone after setup, a professional tool like Phone Transfer is your best option. It supports direct photo transfer between Android and iPhone without relying on a network or requiring complicated configuration, making it especially suitable for batch migration.
Compared with cloud services or manual copying, its biggest advantage is that it gets the job done in one step, especially when you have hundreds or even thousands of photos; it can save you a significant amount of time.
The main features of Phone Transfer:
How do I transfer photos from Android to iPhone after setup in 1 click?
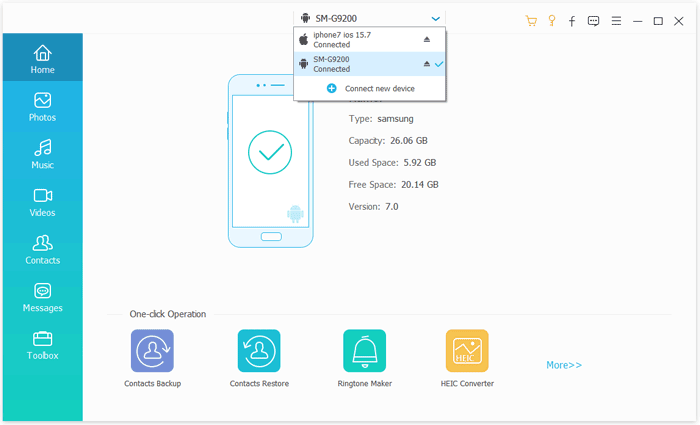
01Download, install, and open Phone Transfer on your computer. Connect both your Android phone and iPhone using USB cables.
02Once the devices are detected, the software will show them on screen. Make sure your Android phone is selected as the source device; if not, use the drop-down menu to switch it.
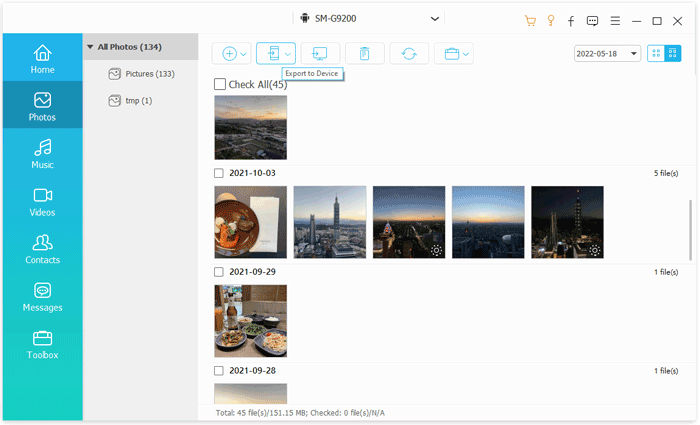
03Check the "Photos" option, select the photos you want to transfer, and click "Export to Device". Your chosen photos will be transferred instantly to your iPhone.
Another popular way to transfer photos from Android to iPhone after setup is by using cloud services like Google Photos. This method works by uploading your photos from Android to the cloud and then accessing them on your iPhone.
It's a convenient wireless solution that doesn't require cables or a computer. However, it depends heavily on your internet speed and storage availability.
Here is how to share photos from Android to iPhone after setup via Google Photos:
Step 1. Install and open Google Photos on both your Android device and iPhone, and log in with the same Google account.
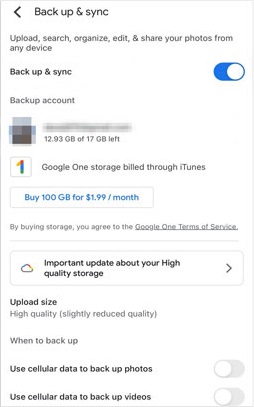
Step 2. On your Android device, tap your profile icon, go to "Settings", and make sure "Backup & sync" is turned on to upload your photos to Google Photos.
Step 3. Open Google Photos on your iPhone and log in with the same Google account.
Step 4. Find and select the photos you want.
Step 5. To download a photo, tap the photo and select "Download".
If you're already using Apple services, iCloud is another effective way to transfer photos from Android to iPhone after setup. This method involves uploading photos to iCloud from your Android device and syncing them to your iPhone.
Although it requires a few extra steps, it integrates seamlessly with the iPhone's Photos app once everything is set up.
Here is how to transfer photos from Android to iPhone after setup with iCloud:
Step 1. Open a browser on your Android device and go to the iCloud website.
Step 2. Sign in with your Apple ID.
Step 3. Open "Photos" and click the "upload" button to upload photos from your Android device.
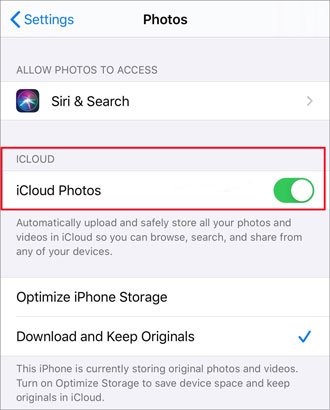
Step 4. On your iPhone, go to "Settings" > "Apple ID" > "iCloud" > "Photos".
Step 5. Turn on "iCloud Photos" and wait for the photos to sync automatically. (iCloud Photos not syncing?)
If you don't want to use cloud services or connect to a computer, then using a wireless transfer tool would be more convenient. SHAREit is a popular cross-platform file transfer app that allows high-speed transfers between devices via Wi-Fi.
The advantage of this method is that it doesn't require cables or consume data, making it ideal for transferring photos temporarily. However, it's important to note that the transfer process depends on the stability of the app's connection.
Here is how to send photos from Android to iPhone after setup using SHAREit:
Step 1. Install SHAREit on both your Android device and iPhone from the Google Play Store and App Store.
Step 2. Open SHAREit on both devices and ensure they are connected to the same Wi-Fi network.
Step 3. On your Android device, select the photos you want to send and tap the "Send" button.
Step 4. On your iPhone, open SHAREit and tap the "Receive" button.
Step 5. Once the devices are connected, the photos will transfer automatically to your iPhone.

Using a computer is a traditional yet reliable way to transfer photos from Android to iPhone after setup. This method involves copying photos from your Android device to your computer and then syncing them to your iPhone.
While it requires more steps, it gives you full control over file organization and is ideal for large transfers.
Here is how to move photos from Android to iPhone after setup using a computer:
Step 1. Connect your Android phone to the computer with a USB cable, enable "File Transfer", and copy photos from the "DCIM" or "Pictures" folder to your computer.
Step 2. Install and open iTunes (on Windows) or use Finder (on Mac).
Step 3. Connect your iPhone to the computer with a USB cable, unlock it, and allow access.
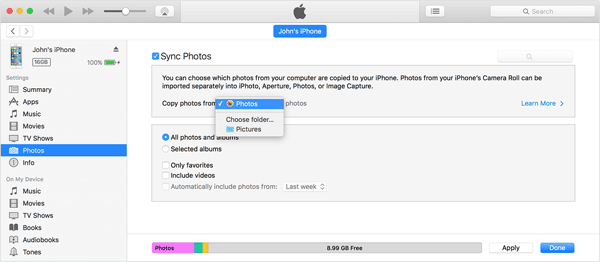
Step 4. Select your iPhone device in iTunes or Finder.
Step 5. Go to the "Photos" section and check "Sync Photos".
Step 6. Choose the folder where you saved the Android photos.
Step 7. Click "Apply" or "Sync" and wait for the photos to appear in the Photos app on your iPhone.
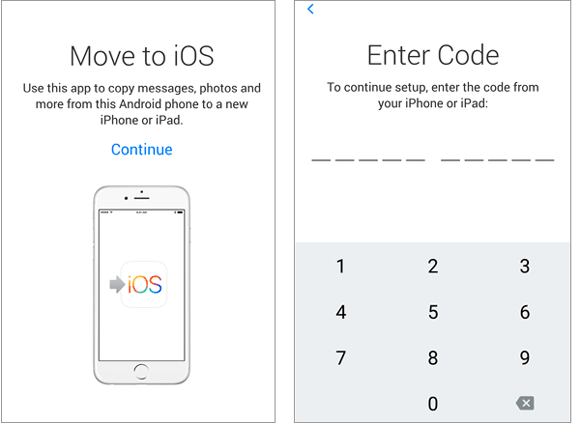
Many users ask: Can you use Move to iOS after setup? The short answer is no. Move to iOS only works during the initial setup of your iPhone. However, if you're willing to erase your iPhone, you can still use it to transfer photos from Android to iPhone after setup by starting over.
Here is how to move photos from Android to iPhone after setup via Move to iOS:
Step 1. Back up anything important on your iPhone (this process will erase it).
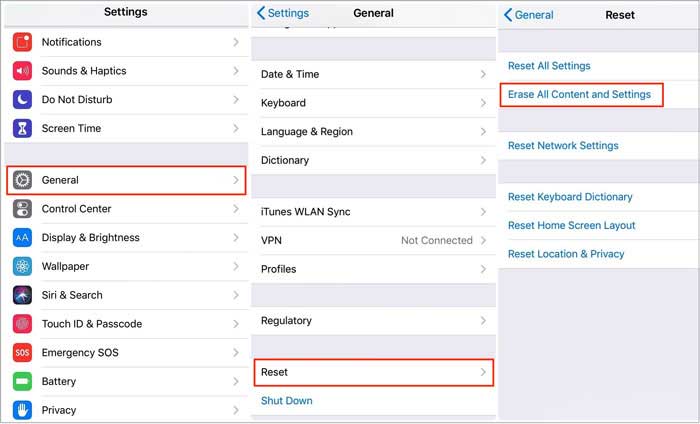
Step 2. Go to "Settings" → "General" → "Transfer or Reset iPhone" → "Erase All Content and Settings".
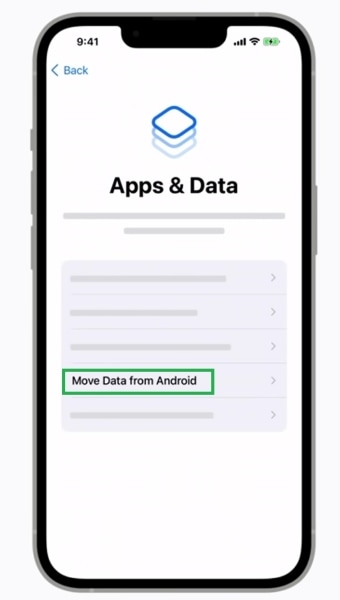
Step 3. Restart the iPhone and begin setup until you reach the "Apps & Data" screen.
Step 4. Select "Move Data from Android".
Step 5. On your Android phone, install and open Move to iOS.
Step 6. Enter the code shown on your iPhone and select "Photos" and other data if needed. (Move to iOS not working?)
Step 7. Wait for the transfer to finish, then complete iPhone setup and check your Photos app.
Here is the complete solution for transferring photos from Android to iPhone after setup. Each method has its own advantages and suitable scenarios. If you want something simple, fast, and without any loss in image quality, the most recommended option is Phone Transfer, which allows you to complete batch transfers with just one click.
Overall, choosing the method that best fits your needs will make the photo migration process more efficient and hassle-free.
Related Articles:
How to Transfer Data from Android to iPhone After Setup in 7 Proven Methods
How to Transfer Photos from Android to iPhone Wirelessly
How to Transfer Data from Android to iPhone Without Resetting Easily
Samsung to iPhone Transfer: Easily Transfer Data from Samsung to iPhone


 Free Download for PC
  Free Download for Mac

