Installing iTunes on a Windows computer is usually simple, but sometimes things don't go as planned. You may see error messages, the installation may fail, or the setup might get stuck halfway. These problems can be caused by outdated system versions, missing components, corrupted files, or software conflicts. The good news is that most iTunes installation errors can be fixed with a few easy steps. In this guide, we will go through the common causes and show you simple, practical solutions to help you install iTunes successfully and get it working without trouble.
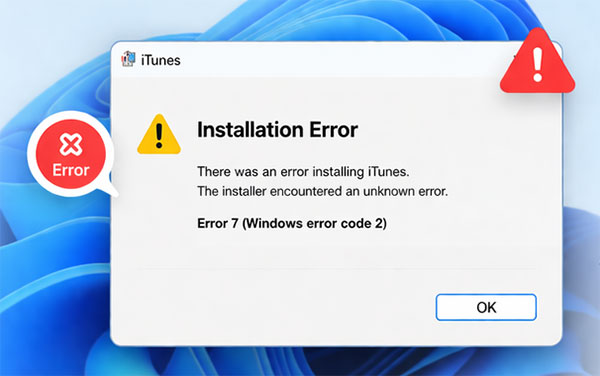
When installing iTunes on a Windows PC, you may encounter different types of errors that prevent the installation from completing successfully. These errors can appear as codes, pop-up messages, or simply cause the installation to freeze. Here are some of the most common iTunes installation errors and messages:
Understanding these common error messages can help you quickly identify the cause and apply the appropriate solution in the following sections.
Before installing iTunes, make sure your computer meets the minimum system requirements. Incompatible systems can cause installation failures or error messages.
Step 1: Check your Windows version by going to "Settings" > "System" > "About" and confirm that you are running a supported version (Windows 10 or later).
Step 2: Ensure your computer has enough available storage space for the installation and related components.
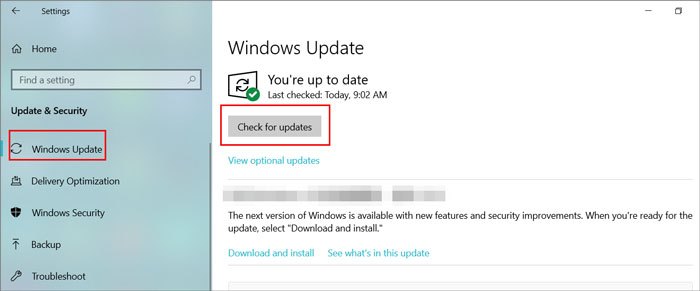
Step 3: Verify that your system is up to date by installing the latest Windows updates.
Step 4: If you are using an older version of Windows, consider updating your system or downloading a compatible version of iTunes.
Once your system meets the requirements, try installing iTunes again to see if the issue is resolved.
Lack of sufficient permissions can prevent iTunes from installing properly. Running the installer as an administrator can help avoid permission-related errors.
Step 1: Locate the iTunes installation file you downloaded on your computer.
Step 2: Right-click the installer file and select "Run as administrator" from the menu.
Step 3: If prompted by User Account Control, click "Yes" to allow the program to make changes.
Step 4: Follow the on-screen instructions to proceed with the installation.
Using an outdated or corrupted installer can lead to installation errors. Downloading the latest version of iTunes ensures better compatibility and fewer issues.
Step 1: Go to the official Apple website or the Microsoft Store on your Windows PC.
Step 2: Download the latest version of iTunes that matches your system (32-bit or 64-bit if applicable).
Step 3: Once downloaded, locate the installer file on your computer.
Step 4: Run the installer and follow the on-screen instructions to complete the installation.
Leftover or corrupted Apple components from a previous installation can cause conflicts and prevent iTunes from installing correctly. Removing them completely can help resolve the issue.
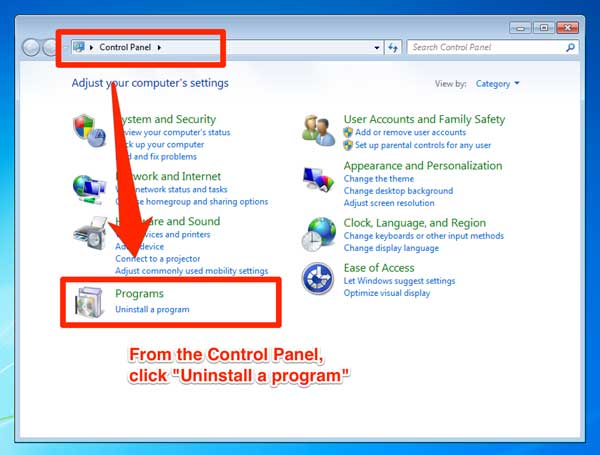
Step 1: Open "Control Panel" on your computer and go to "Programs > Programs and Features".
Step 2: Locate and uninstall all Apple-related software in the following order:

Step 3: After uninstalling, restart your computer to clear any remaining processes.
Step 4: (Optional) Go to the "Program Files" and "Program Files (x86)" folders and manually delete any remaining Apple folders if they still exist.
Step 5: Download the latest version of iTunes and reinstall it on your computer.
This clean removal ensures no leftover files interfere with the new installation. (iPhone Stuck on Connect to iTunes?)
Sometimes antivirus software or firewall settings can block or interrupt the iTunes installation process. Temporarily disabling them may help the installation complete successfully.
Step 1: Open your antivirus program and temporarily disable real-time protection.
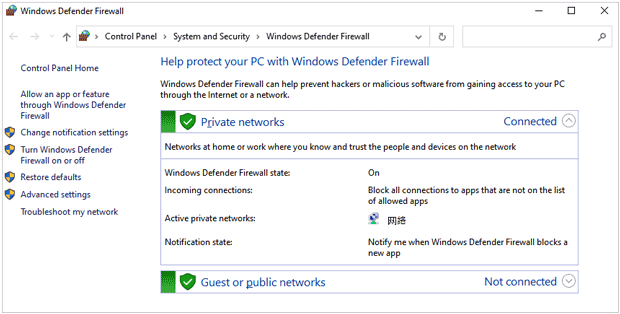
Step 2: Go to "Control Panel" > "System and Security" > "Windows Defender Firewall", and click "Turn Windows Defender Firewall on or off".
Step 3: Select the option to turn off the firewall for both private and public networks (temporarily).
Step 4: Run the iTunes installer again and follow the on-screen instructions.
Step 5: After the installation is complete, re-enable your antivirus software and firewall to keep your system protected.
Missing or corrupted Windows components, such as .NET Framework or the Windows Installer service, can cause iTunes installation errors. Repairing or reinstalling these components may resolve the issue.
Step 1: Press Win + R, type services.msc, and press Enter to open the Services window.
Step 2: Scroll down and find "Windows Installer", then right-click it and select "Restart" (or "Start" if it's not running).
Step 3: Make sure your system has the latest version of ".NET Framework" installed by checking Windows Update. Install any available updates.
Step 4: Open "Control Panel > Programs > Turn Windows features on or off", and ensure required components like .NET Framework are enabled.
Step 5: Restart your computer to apply the changes.
If the traditional installer keeps failing, installing iTunes from the Microsoft Store can be a simpler and more reliable alternative. It avoids many common installation issues related to missing components or permissions.
Step 1: Open the Microsoft Store on your Windows computer.
Step 2: Search for iTunes in the search bar.
Step 3: Click on the official iTunes app published by Apple.
Step 4: Click the "Get" or "Install" button to start the installation.
Step 5: Wait for the installation to complete automatically.
If you keep encountering installation errors or find iTunes too complicated to use, switching to a reliable alternative can save you time and effort. Coolmuster iOS Assistant is a user-friendly tool designed to help you manage iPhone, iPad, and iPod data without relying on iTunes. It offers a simpler interface, more flexible control, and stable performance, making it a great choice for users who want an easier way to transfer, back up, and organize iOS data on a Windows PC or Mac.
Key Features of Coolmuster iOS Assistant:
01 Install the Program on Your PC
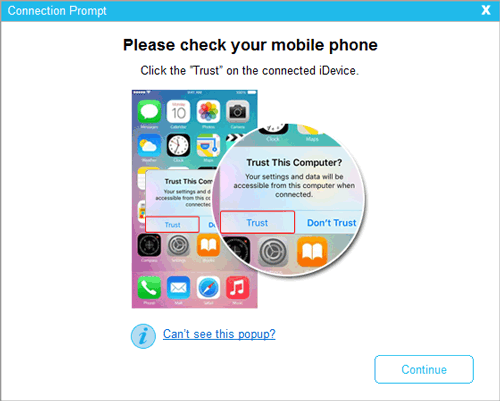
Download and install the newest version of Coolmuster iOS Assistant above or from the official site. Your iDevice should be connected to this application via a USB cable. Typically, your iPhone or iPad will be automatically recognized by the application after successful connection. Click on the "Trust" option on your iDevice and then hit the continue button. Failed to connect your iDevice?
Once your iDevice is connected successfully, you might see the main interface as below:

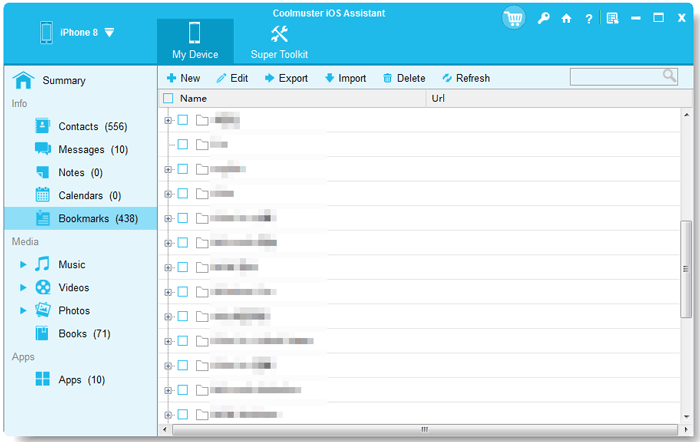
02 Manage iPhone/iPad Data
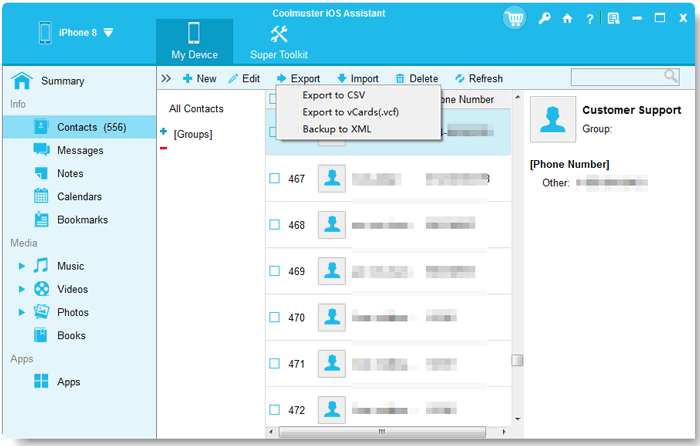
Export Files from iPad, iPhone or iPod to the PC
Coolmuster can transfer all files from your iDevice to the computer, including contacts, messages, photos, videos, music, notes, bookmarks, books, calendars, apps and more. Therefore, follow the following steps to export anything from your iGadget to the PC.
Import files and documents from Computer to iDevice
In the current version, you can import contacts, bookmarks, calendars, books, iTunes backups and many more from computer to iDevice. Nevertheless, additional files will be enabled in the next release. Follow the following process to import the files:
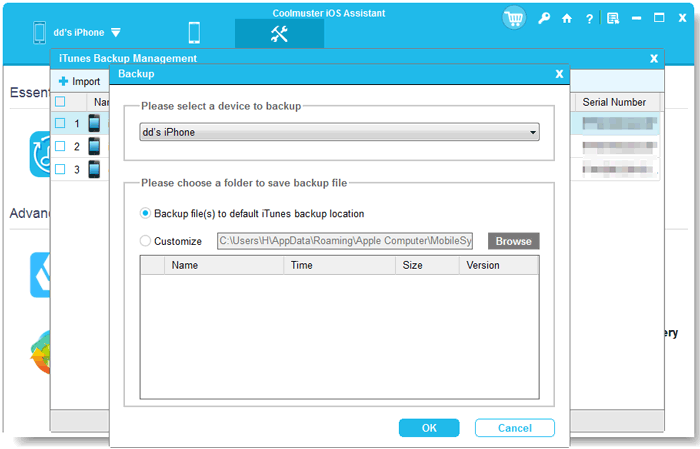
03Manage iTunes Backups
Back up iOS data to the PC or iTunes
More info about how to backup iPhone to iTunes with or without iTunes.
Restore iTunes backup Files to iDevice
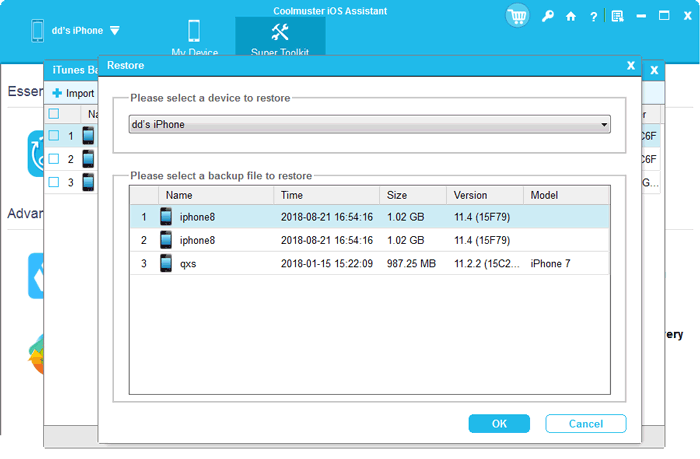
Import iTunes Backup files to iDevice
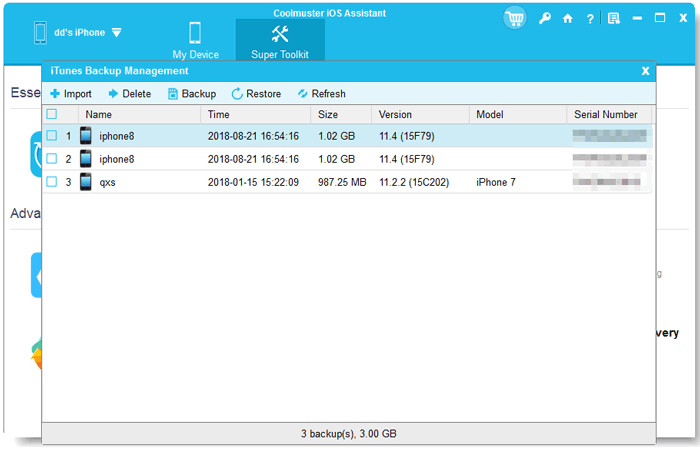
Delete iTunes Backup Files for iGadgets on the Computer

Video Guide:
iTunes installation errors can be caused by a variety of issues, including system incompatibility, corrupted installation files, missing components, or software conflicts. By following the step-by-step solutions above, you can identify the root cause and resolve the problem more efficiently.
In cases where iTunes continues to fail or feels difficult to use, switching to a reliable alternative like Coolmuster iOS Assistant can provide a simpler and more flexible way to manage your iOS data. Choosing the right approach will help you avoid repeated errors and ensure a smoother data management experience.
Related Articles:
How to Fix iTunes Back Up Now Greyed Out? Solved in 5 Ways
9 Proven Solutions for iTunes/iPhone Error 56: Step-by-Step


 Free Download for PC
  Free Download for Mac

