iCloud is a convenient and secure way to store data like photos, messages, videos, and emails. Apple offers 5GB of free storage, which can fill up quickly, especially if you back up messages and attachments. iCloud's automatic backup feature makes it easy to store data as long as your device is connected to Wi-Fi, charging, and locked.
However, with limited storage, you may get a notification about insufficient space. To free up space, you may need to delete messages from iCloud. This article explains simple methods to remove messages and attachments from iCloud, helping you manage your storage more effectively.
If you own an iPhone, chances are you've used iCloud as a backup tool to store important messages, contacts, photos and videos. As useful as it is, there may come a time when deleting data stored in the cloud is necessary, like if your phone storage space gets too full or if certain information becomes outdated. Here are reasons that could force you to delete messages from iCloud:
Deleting messages from iCloud doesn't have to be a hassle if you follow the right steps. So, how do I delete messages from iCloud storage? Keep reading to find out how to delete messages from iCloud storage.
If your Messages are synced with iCloud, you can turn off this feature and delete text messages from iCloud without affecting them on your iPhone or iPad. You can choose to remove all text messages or just large conversations from iCloud. To manage this, simply go to "Settings" and follow the steps below.
How to delete all text messages from iCloud but not iPhone
Step 1. Launch the Settings application on your iPhone and click on the option for ["your name]". Now proceed to "iCloud".
Step 2. Click on the "Show All" option under Apps Using iCloud to list all applications available.
Step 3. Click on "Messages" then "Manage Storage." You will see the total space and the free storage left in the iCloud drive.
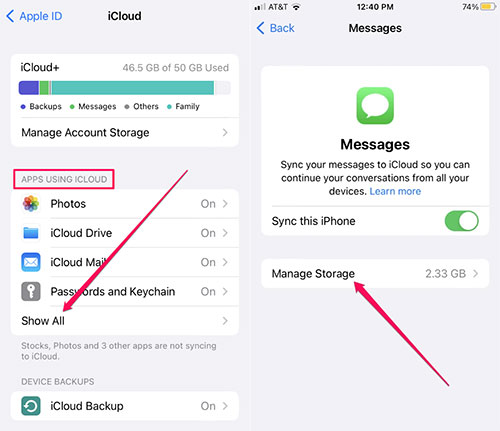
Step 4. Tap on "Messages" to open it. Now click on the "Disable & Delete" option. You will receive a confirmation notification popping up on the screen. Hit "Delete Messages". Remember, iCloud has the option for "Undo Disable and Delete" to undo the operation within 30 days.

When you disable and delete your iCloud messages, all your chats will download to the iPhone automatically so that you don't lose data. In addition, even after removing the text messages from iCloud, you've got 30 days to restore them before they are deleted permanently. Moreover, if your iCloud backup is activated, disabling and deleting SMS from iCloud can cause your phone to start including them in backups.
How to Delete Large Conversations from iCloud
Step 1: Open the "Settings" app on your iPhone, then tap "Your Name" and select "iCloud."
Step 2: Under "Apps Using iCloud," tap "Messages," and then choose "Top Conversations."
Step 3: Tap "Edit," swipe left on the conversation you want to remove from iCloud, and tap "Delete" to erase it from iCloud. (See how to recover deleted messages from iCloud.)
To delete messages from both your iPhone/iPad and iCloud, you can do it directly from the Messages app. First, ensure that your Messages are synced with iCloud by going to "Settings" > [your name] > "iCloud" > "Messages."
Step 1: Open the "Messages" app on your iPhone and select a conversation.
Step 2: Press and hold the message bubble or attachment you want to delete, then tap "Delete."
Step 3: Tap "Delete Message" to remove the entire thread from iCloud.
You can easily delete text messages from iCloud by signing in to your iCloud account through a web browser. Deleting messages from iCloud Drive on the website will remove them from all your iOS devices if iCloud Drive is enabled. Here's how to do it:
Step 1: Open a web browser and go to iCloud.com. Sign in with your iCloud account.
Step 2: On the main page, select "Mail."
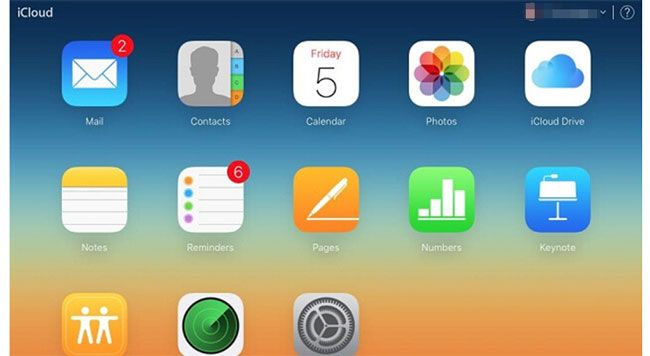
Step 3: Choose the text message you want to delete and click the "Trash" button.
Step 4: To delete multiple messages, select the items you want to remove and click "Delete."
It is possible to delete messages from iCloud but remember that once they are gone, there's no getting them back, even if you accidentally deleted them. To ensure that your data is not lost, we highly recommend backing up all messages to a computer with Coolmuster iOS Assistant. This intuitive software is precisely what you need to ensure the safety of your most valuable files.
iOS Assistant is the perfect solution if you are looking to selectively back up iMessages to your computer. This incredible tool lets you view your messages on your iPhone before exporting them into easily readable formats such as TEXT, CSV and HTML. Plus, with one click, you can back up all your iPhone data to a computer without delay.
Why Coolmuster iOS Assistant stands out;
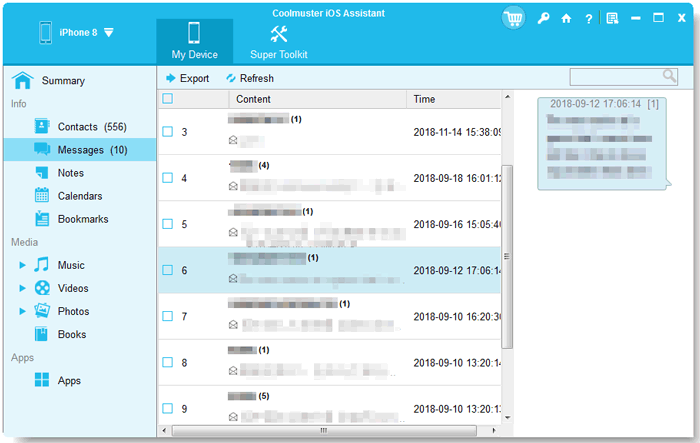
How to backup your iPhone messages selectively before deleting them:
01 Launch the program on the computer after downloading and installing it. Use a lightning cable to connect the iPhone to the computer.
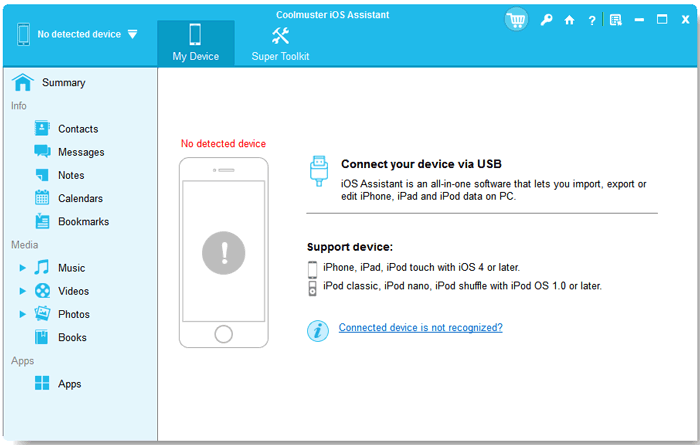
02 Unlock the phone and click "Trust" when prompted. After the software recognizes your devices, you'll see the primary interface.

03 Now select "Messages" from the left panel, then check those SMS you want after you preview them. After confirming everything and marking them, click "Export" to save to the computer.
Video Guide:
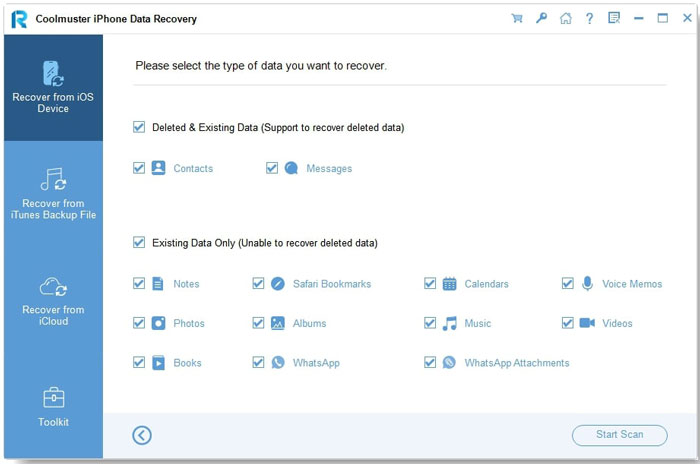
Have you ever experienced the regret of deleting a meaningful text message or an essential work-related SMS, only to realize it later? If this is something that sounds familiar, worry not. Coolmuster iPhone Data Recovery is the software that never fails to recover accidentally deleted data from your iOS device, iCloud or iTunes backup.
It has a user-friendly interface and efficient performance, allowing you to recover lost text messages without backup. Additionally, it allows you to restore messages with attachments directly from iTunes and iCloud backups. To put it simply, this software promises fast and reliable results.
What Coolmuster iPhone Data Recovery offers;
Steps to recover deleted messages from iPhone with iPhone Data Recovery:
01 Install the software on the PC, unlock the iPhone and click "Trust" when prompted.

02 After connecting the devices, choose "Messages" from the main interface and click "Start Scan".
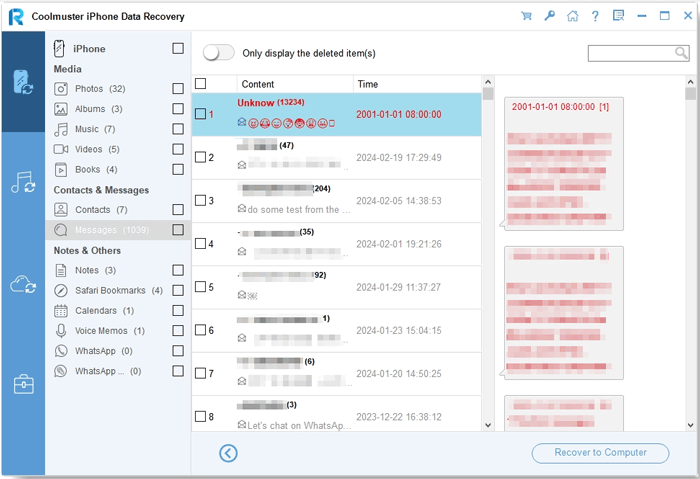
03 Once done with the scanning, go to the "Messages" button from the left side and browse deleted and existing messages on the screen. Select those items to restore and hit the "Recover to Computer" button.
Video Guide:
If you're no longer interested in storing your messages on iCloud, Apple provides an easy solution. Apart from the option for disabling and deleting messages from iCloud, there is a way to stop messages from uploading to iCloud. To do that, just head to "Settings" and click on "iCloud", then disable the slider for "Messages". After that, your messages won't be backed up to iCloud unless you enable it.
Don't worry about deleting all your messages from iCloud if you disable the 'Messages' option. It will only stop any additional messages from being uploaded, so existing ones won't be erased. By taking this step, you can rest assured that no new message content will be sent to the cloud.
Q1. Does iCloud keep text messages?
iCloud stores all your text messages. They are stored in the Messages application on the iCloud website. You can view these chats from any device with an internet connection. (What Does iCloud Back Up?)
Q2. When I delete messages from my iPhone, will they get deleted from iCloud as well?
The Messages app lets you conveniently erase messages and conversations from your device. When a message is deleted from one of your Apple gadgets with Messages in iCloud enabled, it will also be wiped off all other devices.
How do I delete messages from iCloud? This post is a comprehensive guide for all your iPhone-related queries, particularly how to delete messages from iCloud. We recommend Coolmuster iOS Assistant, an efficient and user-friendly application that can back up messages, videos, contacts, etc. Besides, Coolmuster iPhone Data Recovery is your go-to option to recover accidentally deleted messages.
Related Articles:
iPhone "Save Image" Not Working, How to Fix?
Photos Didn't Transfer to New iPhone? Work It Out with Easy Solutions
Contacts Didn't Transfer to New iPhone? 7 Flexible and Easy Fixes


 Free Download for PC
  Free Download for Mac

